Kali Linux 2 is the latest edition of Kali Linux, a desktop distribution that’s based on Debian and designed solely for security and hacking purposes.
In this tutorial, you’ll read how to dual-boot it with Windows 10 on a single hard drive on a computer with UEFI firmware.
Because the Kali Linux 2 installer, in automated disk partitioning mode, allocates disk space to partitions non-proportionally, completing the task of dual-booting Kali Linux 2 and Windows 10 on a single hard drive involves creating the Kali Linux 2 partitions manually. So you’ll need to have at least a basic understanding of disks and disk partitions in Linux. If you don’t, take a few minutes to read A beginner’s guide to disks and disk partitions in Linux and 7 tips for dual-booting Linux distributions and Windows.
The following are the steps involved in setting up a dual-boot system between Windows 10 and Kali Linux 2 on a single hard drive on a computer with UEFI firmware:
- Recover space from the hard drive
- Partition the recovered space for installing Kali Linux 2. For this tutorial, we’ll create three partitions for Kali Linux 2: One for the root partition; the second for the home partition. This is optional, but it’s always nice to have your home directory in a separate partition; the third and last partition will be for swap space, unformatted disk space that the system may use as virtual memory
- Completing related and important dual-booting tasks
To get from here to there, you need to:
- Have downloaded an installation image of Kali Linux 2, which you can grab from https://www.kali.org/downloads. Burn it to a blank DVD, or transfer it to a USB stick (recommended).
- Have a computer with Windows 10 installed. Space for installing Kali Linux 2 will be derived from the free space left on the hard drive
If you have all those in place, let’s get started.
Step 1 – Recover Free Space From the Hard Drive:
The hard drive on the test system used for this tutorial is 500 GB in size, with about half of that occupied by Windows 10. The other unused part, recovered by shrinking the C drive, will be used for creating partitions for Kali Linux 2. To shrink a Windows 10 C drive, simply right-click on it and select Shrink Volume. Follow the prompts to complete the process.
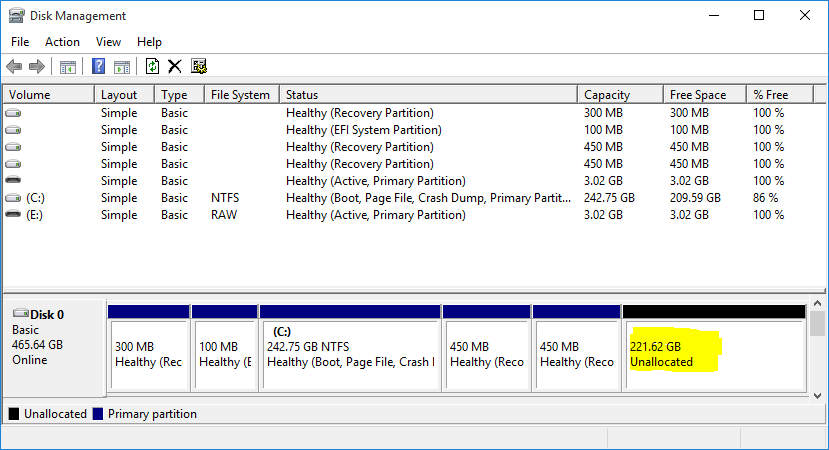
When completed, there will be an Unallocated space after the C drive, or after whatever partition you recovered the disk space from. Figure 1 shows the layout of the partitions on the hard drive used for this setup, as seen from the Windows 10 partition manager. The highlighted segment will be used for installing Kali Linux 2.

Figure 1: Windows 10 partition manager showing Windows 10 partitions and the free space
Step 2 – Booting From the Installation Media:
Boot the computer with the installation media you made in the optical drive or in a USB port. Just before it boots into the default boot disk, enter the boot menu by pressing the appropriate F-key, usually the F11 or F12 key. The idea is so the computer boots from the UEFI-aware version of the installer. It should without intervention, but just to be sure, you want to complete this step.
When at the boot menu, you should see two entries for the installation media, like those shown in Figure 2. The UEFI: PNY USB 2.0 FD 1100 entry boots into the target installer, so if you find an entry just like that on yours, select it and press the ENTER key to boot into it.
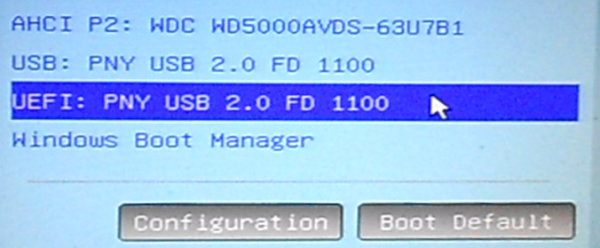
Figure 2: Computer’s boot menu
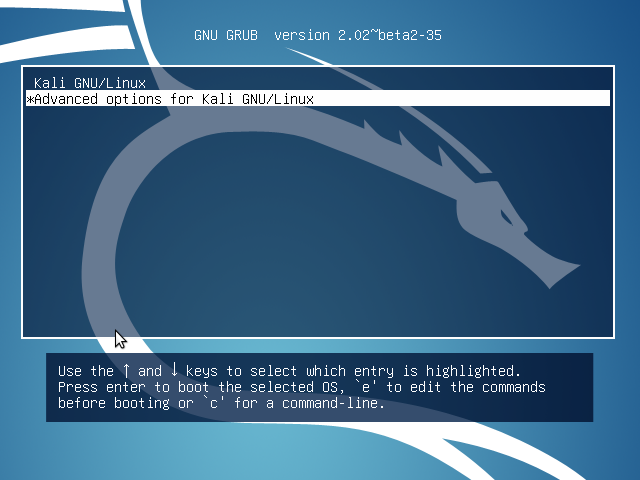
At the Kali Linux EFI Boot Menu, you’ll be presented with a bunch of boot options. The default will boot into a GNOME 3 Live desktop. This would normally be the best option to boot into, but the version of the installer you access from the Live desktop does not render properly, so I recommend that you skip the Live desktop and boot straight into the graphical installer. And you do that by selecting the Graphical Install option, as shown in Figure 3.
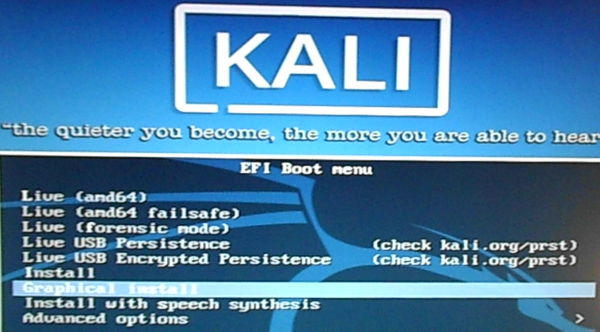
Figure 3: Kali Linux 2.0 EFI boot menu
Step 3 – The Debian Installer Disk Partitioner:
After booting into the Debian Installer, which is the name of the graphical installer used by Kali Linux 2, click through several steps until you get to the disk partition methods step, shown in Figure 4. The option to select here, is Manual. So select it and click the Continue button, or press the ENTER key.
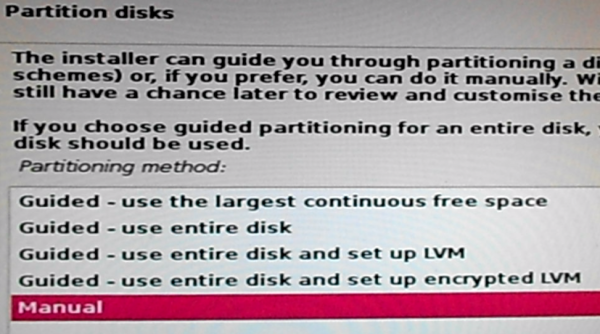
Figure 4: Disk partition options of Kali Linux 2
That should open the manual disk partitioning tool’s window, where all the detected disks should be listed, along with their associated partitions. Shown in Figure 5 are the Windows 10 partitions on the target disk, with the space recovered in Step 1 listed as Free Space. That free space will be used in steps 4, 5 and 6 to create partitions for Kali Linux 2. So select it, then click Continue.
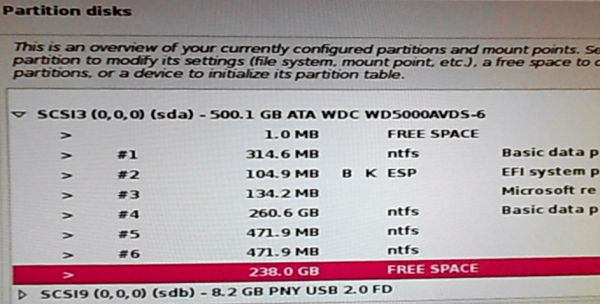
Figure 5: Manual disk partitioning window of Kali Linux 2
Step 4 – Create the Root Partition:
That should open a window like the one shown in Figure 6. We have to create a new partition, so select the first option. Continue.
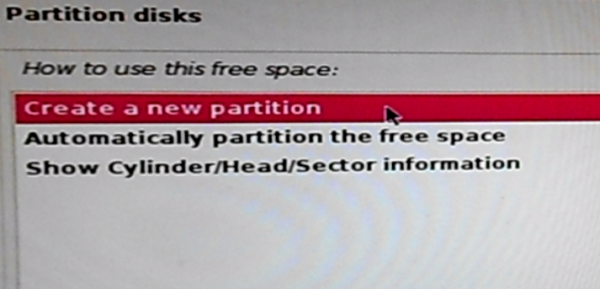
Figure 6: Creating new disk partition on Kali Linux 2
Specify the amount of disk space to allocate to the root partition. In this exampe I allocated 50 GB to it. that seems to be too much, but if you intend to use the system for a long time, 50 GB is a reasonable amount. You can go much lower, if you’re tight on disk space. Continue.

Figure 7: Specify root partition size of Kali Linux 2
Stick with the default here. Continue.
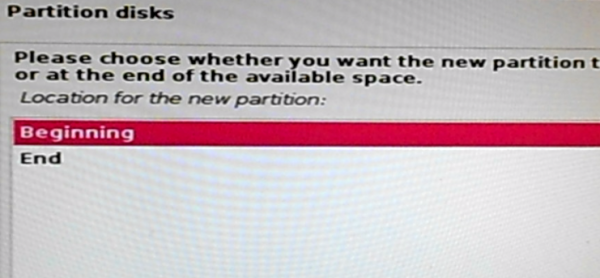
Figure 8: Specify location of the root partition of Kali Linux 2
This shows the specs of the new partition. No need to change anything, so select Done setting up the partition. Continue.
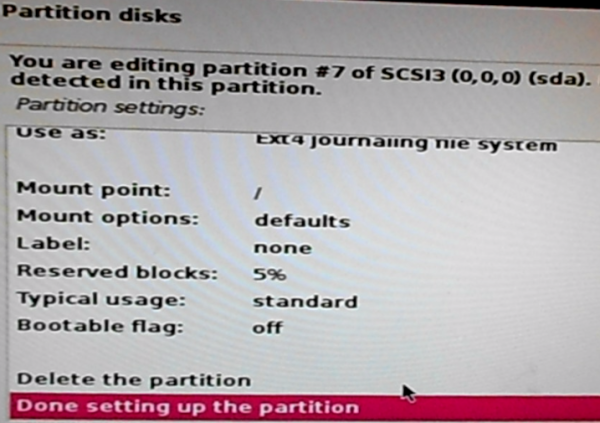
Figure 9: Kali Linux 2 root partition details
Back to the main disk partitioning window, you should see the new partition. Now you have to repeat the process to create the other partitions, so select the remaining free space, then click Continue.
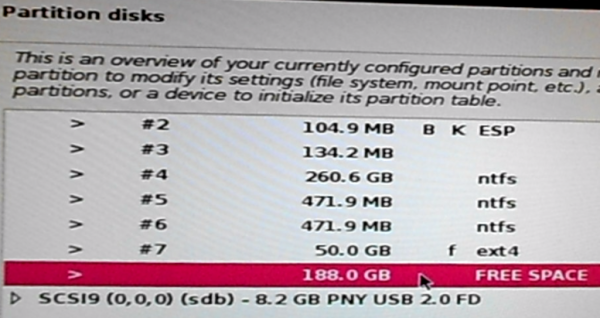
Figure 10: Kali Linux 2 free disk space
Step 5 – Create the Home Partition:
The second partition we’re going to create will be mounted at /home, and the procedure is a repeat of the one used to create the root partition. So the drill should be familiar. Here, select the default. Continue.
Figure 11: Creating new disk partition on Kali Linux 2
Specify a suitable disk space for the partition. Continue.
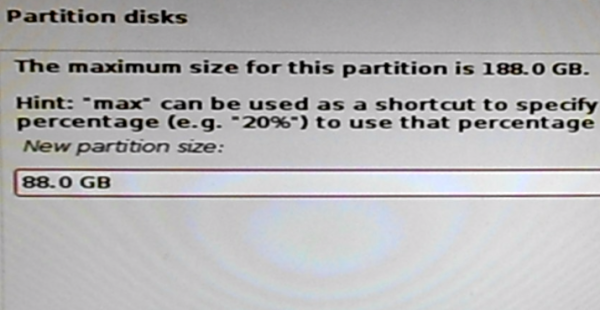
Figure 12: Specify /home partition size on Kali Linux 2
Stick with the default. Continue.
Figure 13: Specify location of the home partition of Kali Linux 2
As with the previous partition, the specs of this partition do not need to be modified, so select Done setting up the partition. Continue.
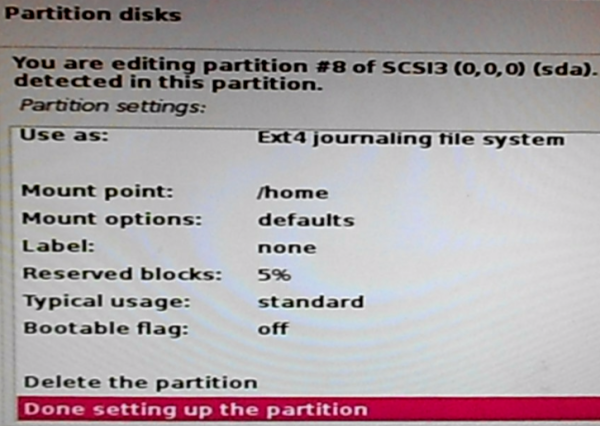
Figure 14: Kali Linux 2 /home partition details
Back one more time to the main disk partitioning window, select the free space, then click Continue to begin creating the last partition.
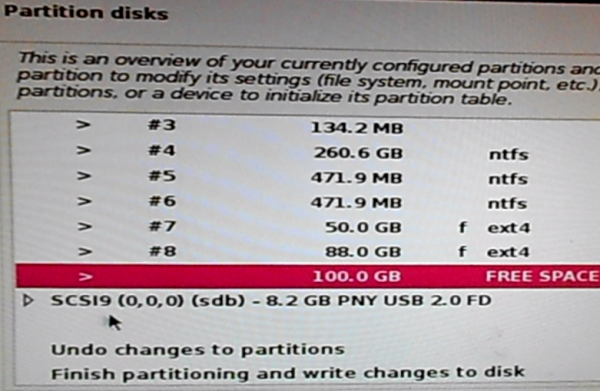
Figure 15: Kali Linux 2 free disk space


Hello,
first thanks for the cool tutorial
I have a problem after login and put the password kali just freez and ctr+alt+F1(F1-F6)dont start the tty just start a loadup very slow and not like on vmare version direkt to tty… so whats the problem?
Can you help?