
This is the latest article on Fedora on this website. To view the complete list of Fedora-related articles, visit the distribution’s category page at http://linuxbsdos.com/category/fedora.
So, it was released a lot later than expected. Big deal! The most important thing is, it was released. That’s the good part. The worst part is, it landed to a chorus of negative reviews.
Where those negative reviews warranted?
Yes, they were. Yes, they were. Fedora 18, aka Spherical Cow, earned its (bad) spots. And it wasn’t unexpected. Long before the stable version hit the download mirrors, I called attention to the reason Fedora 18 is getting so much flak. And unless you just dropped in from Pluto (is it a planet?), you’d know that the reason is Anaconda, the Fedora systems installer. (See Have you seen Anaconda’s new UI?).
The new Anaconda is just one feature, albeit a very important one, that shipped with Fedora 18. There are many other features, new and updated, that also shipped. So, this is not going to be all about Anaconda. It will form a major portion of this review, but, certainly, not all of it.
So before I get to Anaconda, let me introduce a few other parts of Fedora 18 that should be getting more attention than they have received so far.
Dnf: Dnf is a new package manager that will replace yum in future Fedora and related distributions. Together with Hawkey, the matching package management library, they are set to deliver to Fedora a “leaner codebase than Yum, … easier maintenance, better performance and memory footprint.” More information about it here. The dnf package is available in the repository. I installed and tested it and, so far, it works as advertised. To test it, install the dnf package, launch a shell terminal and have fun.
FedUp: From FEDora UPgrader, is the new tool for upgrading an existing installation of Fedora to Fedora 18. Compared to the old method, FedUp is a beauty. Though it involves working from the command-line, the entire process is very easy, even for a new user. All it requires is just typing or copying-and-pasting a command to a terminal, and rebooting the system. The tool takes over from there. It’s elegant and I love it.
Upgrading can be done over the network, from a local ISO installation image, and from other mountable storage devices. With respect to using the tool over the network, there is a security issue to take into account. From the official FedUp page:
FedUp does not yet ensure that only trusted software from Fedora is run on your system when you are doing upgrade over the network. Refer to Bugzilla: #877623 for more details. You can download the ISO release image and verify the authenticity independently before performing a upgrade with Fedup via media or ISO images methods to workaround this issue however a network upgrade is still the recommended option since it can handle updated packages better. Note that neither Anaconda or Preupgrade verified the authenticity of the source either and this is not a regression.
The other drawback is that it does not work for upgrading versions of Fedora earlier than Fedora 17. For those systems, the old method is still available. I’m sure by the time Fedora 19 rolls along, that FedUp should be able to handle upgrading any version of Fedora.
FedUp is the type of upgrade tool that every distribution not based on a rolling-release development model should have. Ubuntu could use its own version of FedUp. The folks at ROSA Laboratory have expressed an interest in having something similar for their distro, and I think a similar tool is cooking at Mageia. (See Fedora 18 and FedUp and Upgrading Fedora 17 to 18 with FedUp is elegant, but ….)
FirewallD: FirewallD is also new to Fedora, though it’s been around longer than FedUp. Technical issues kept delaying it, but the developer(s) finally tamed whatever was stopping it – just in time for inclusion in Fedora 18.
Unlike the old firewall application that it replaced. FirewallD is a dynamic firewall. In simple terms, that means a rule change will not require restarting the firewall. Aside from the daemon, it comes with a graphical interface, a command-line tool (firewall-cmd), and a panel applet (firewall-applet).
Firewall-config, the graphical interface, is very similar to the old system-config-firewall. Like its predecessor, it is not possible to set granular rules when it comes to opening up ports to external connections. So, for example, if you expose a service to other computers on your local network, there is no means within firewall-config’s interface (that I am aware of) to restrict connections from external networks. The screen shot below is of the main interface of Firewall-config.
With support for Zones, you can define the trust-level of network interface or connections, which comes in especially handy on a laptop computer. I haven’t been able to test the how well Zones work in FirewallD, but there’s time. Just know that out of the box, there are nine pre-defined zones, each with a specific set of services running.

And this is a screen shot of the firewall-applet. Some of the options are self-explanatory. The Change Zones of Connections… option does not really allow you to change a connection’s zone, just the network interface settings. So, this option is somewhat misleading, unless there is something I missed.

By enabling Block all network traffic, firewalld goes into Panic Mode.

In Panic mode, the manual page for firewall-cmd says that:
All incoming and outgoing packets are dropped, active connections will be terminated after a while of activity. Enable this only if there are serious problems with your network environment. For example if the machine is getting hacked in.
You can also block all network traffic when the system will be idle and you do not want to put the computer in Suspend or Hibernate mode. The net effect is that no network connection is allowed – in or out. Note that firewall-applet is not installed by default. yum install firewall-applet, dnf install firewall-applet will install it from the command-line. You can also install it from Apper, the graphical package manager.
Anaconda: So, Fedora got a new installer. It’s dubbed the NewInstaller, as opposed to the previous Anaconda, or the OldInstaller. I prefer to call them the New Anaconda and the Old Anaconda. The New Anaconda, has gotten a lot more press than any other feature of Fedora 18, and for good reason. It is the sole feature that caused the more than 2-month delay in the release of Fedora 18.
Like I wrote earlier, I drew attention to the New Anaconda right from the start. I didn’t like most of what I saw then and there are certain aspects that I still don’t like now. Several reasons have been given for jettisoning the Old Anaconda. Mostly, it is that it was old and was made up of a patch work of code that was difficult to maintain. And that it’s linear or wizard style was not very efficient for what it was designed for.
So a linear installer was replaced with a hub-and-spoke installer, a modular installer where each spoke is itself a linear or wizard-style. In essence, one linear application was replaced with another made up of several linear parts. I’m all for change and I like bleeding-edge stuff, but if you are going to replace an application, at least try to deliver a replacement with a UI that’s better than the old one.
And that’s where the problem with the New Anaconda lies – the UI. It is one heck of a mess. A graphical interface, a point-and-click application, is supposed to be intuitive and user-friendly and navigating its interface is supposed to offer a smooth experience. The New Anaconda is none of that. It is the antithesis of what a user-friendly UI is supposed to be. There is no doubt that the Old Anaconda’s code is old, but the UI was/is simple and very user-friendly.
For those not familiar with the Old Anaconda, here are two screen shots of it. I don’t want to get into a discussion of the merits and demerits of a linear (wizard-style) versus a hub-and-spoke installer, but these next two screen shots define what I like about the Old Anaconda’s UI. Keep in mind that I’m referring to the UI, not whether the code is old or a nightmare to maintain.
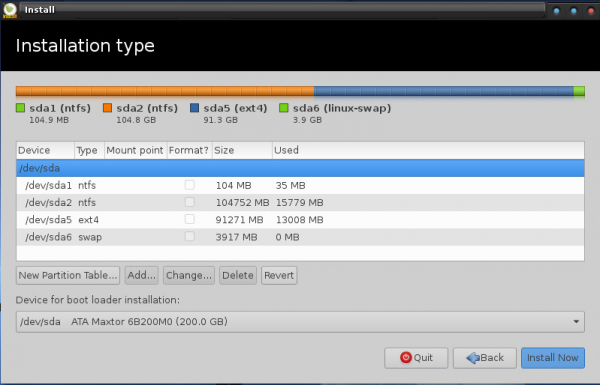
This is the disk partitioning methods step of the Old Anaconda. Every option here is simple and easy to understand. Even to a new user.

And this is the manual partitioning window. From here, you get a bird-eye view of the detected hard drives, their partitions, both free and used. There is no confusion here. The layout is simple to understand. Only a complete newbie will get lost at this step or the previous step of the installer. Notice how the buttons you will be using are all positioned at the bottom of the window. Keep this in mind as we walk through the important aspects of the New Anaconda.
retrospective on this subject. It’s a good read. But a case he makes against the Old Anaconda applies even more so to the New Anaconda. For example, he denounced the inefficient use of space in the Old Anaconda’s UI, but instances of wanton waste of space abound in the New Anaconda’s UI.
I have no doubt that (the New) Anaconda will improve with time, but for that to happen, the UI has to go back to the drawing board. Let’s just hope the designers don’t dig in like the GNOME 3 guys.
If you have not installed any Fedora 18, here are facts you need to know about it, and some of the questions I’ve raised about it.
General info: There are three partitioning schemes – LVM, btrfs, standard. In the Old Anaconda and in the installers of other Linux distributions, btrfs is available as a file system option. Here, it is a partitioning scheme.

When using the DVD installation image, you can install any desktop you want. Each selection on the left pane gives you all the applications you need for that particular desktop environment or selection. Options in the right pane are extras.

If you install, say, a KDE desktop from the above, or even from a Live installation image, you can still install other desktop environments from the graphical package manager. This is a screen shot of Apper, the graphical package manager, from a KDE installation. Cinnamon and MATE, two desktop environments that don’t have a dedicated installer image, can be installed from Apper, via yum or dnf. (See Install MATE on Fedora 18 and Install Cinnamon on Fedora 18.)


I’ve been using Fedora 18 since its release.
I’ve been running the Gnome, XFCE and, finally, KDE version (from which I’m typing right now).
I find it to be VERY good, polished (particularly KDE, now up to the last 4.10.3 version) and, above all, STABLE.
I really enjoy the KDE version. In my opinion is even better than the KDE-centric distro openSUSE 12.3 (I’m also running the latter on a spare partition).
I thoroughly recommend it!
Luca.
Also on Fedora/KDE, as you said is reaching perfection.
I’m a retired engineer fascinated with the variuos Linux offerings especially Fedora x64 18 and 19 and even 20 .
On all my win 7 and selected Linux distros pick-up and configure my wired ethernet and they operate flawlessly. However lately wired connection is crossed out and won’t connect. ANY attempt to configure my network is frozen with entries unable to complete. A separate message tells me I have a control center problem and that it is reorted. I’m stuck!!!
Also it would be helpful if ultimately the Anaconda installer is made more user friendly. Having set up the HDD with partition manager or gparted it would help if the partition IDs – SDNs could be readily identified during installation, without the risk of data loss.
When it works Ireally like the way it is all going . .
I’ve seen that network connection problem in another Fedora-based distro, but not in other distro.
Mousing over the icon of any HDD will show its device number in a popup.
Fedora is not what I’ll really recommend for a pain-free out-of-the-box experience.
Sorry, my first effort regrettably was rushed and not without typos. The network access problem is with Fedora NOT the other distros or Win7; like others have been experiencing.
I will revert to a more tried distro for now BUT I will keep a beedie eye on Fedora as it matures a little more, I was getting used to it.
I don’t understand why everyone is complaining. I love the new Anaconda. It is much easier than the old one. I gave up on Fedora because of Old Anaconda. When 18 came out with a new one, I came right back.
Is it even turn off the bloody firewall? It’s impossible to understand how it works without spending tons of time doing so. There are many other things about this version that make it difficult to use. Fedora’s supposed to bleeding edge, but does it have to make you bleed? It’s like Gnome 3.
May I suggest using another set of tools – like Parted Magic / GParted – to set up the drive before letting the Anaconda lose.
I’m very happy with Fedora 18 on two ThinkPads of recent vintage but partitioning in Anaconda is confusing. Why do Fedora want ‘dumbed-down’ graphical interface to an otherwise quite technical distro?
What’s all the fuss about? Honestly, I didn’t even notice the installer had changed. Installed it next to windows, was a typical linux installer, had every option I required. Handled custom lvm alot better than ubuntu. Usually if I need to do something a bit more complicated I just install in a root partition and change it manually later.
I’m very happy with fedora 18, although I am using the KDE spin.
Seriously, how can you not notice that there’s a difference between Anaconda in Fedora 18 and the Anaconda in, say, Fedora 17? Nobody is conparing the installer’s in Ubuntu and Fedora, just the old and new Anaconda.
I gave up at the partitioning stage. It’s a disaster, there’s no other word for it. I need a list of all my disks and partitions, so I can choose which partitions or disks to reformat and which to mount and where. That doesn’t exist with this one. It’s confusing and there’s no obvious indication of how, for example, to decide where to mount the Windows partition (especially if it’s on a different disk from where you want to install Fedora). I gave up at that point. I wasn’t confident of not wrecking my system. Just bring back the old Anaconda.
Matthew Smith reflects my experience accurately.
I too was in real fear of wrecking the installations set up on my two HDDs. With real respect to the devellopers and the technology behind the scenes being addressed, Anaconda needs to be much more user friendly AND intuitive.
All was fine and Fedora was working well and then after several sessions. From then on the wired network locked out and was unavailable; for me necessitating a far too risky re-installation of Fedora.
I totally agree that Fedora 18 is more than just the installer. I’m quite happy with it overall.
However on the installer, the decision to do this hub spoke thing isn’t a good idea. You’re not going to ever try to configure multiple things at a time. There’s no benefit to doing them in a different order (or having the user get to decide which one he configures first). The wizard style is just much less confusing and more straight-forward.
I also agree that not explaining the options is another problem with the new installer. The example provided about the disk format and partitioning is perfectly shows the issue of not explaining the options.
Hopefully they’ll fix the installer. Fedora 18 has some other really nice features once you get it up and running.
When you see a new application for the first time, you tend to be in shock. This means that until you become familiar with it, you are in a mental and rejection mindset until the new functionality becomes familiar.
I started with Fedora 18 alpha, as I had a spare disk, and had “after supper” spare time. As I got to know it, I found it to be a good improvement, except for Gnome3, and nautilus.
By coincidence, on the RPMFusion.org website, where the free and non-free (no source code) software is kept, I found a Fedora 18 spin from Russia. This spin included all the codecs, pdf readers, etc, etc, to make Fedora18 fully useable with youtube, with some very very old MS swf files, and more. With one Spin, I no longer had to spend a few hours adding all that rpmfusion software which was omitted from the RedHat official release.
After installing the Russian spin. I added vlc, and some other software that is specific to my needs. I am following some online courses, and with the spin I have installed, I have not had to revert to another operating system because the youtube or similar presentation was not viewable.
I use Fedora only as a desktop / development system.
Back to Anaconda. I tend to backup my /home and a few other directories before I install new software. After a backup, I installed Fedora using anaconda, where I did a delete of partitions I did not want to retain. With the free space, I let anaconda do what it does best, apportion out the free space and complete the installation.
Since I, much like the author are not impressed with Gnome3, I added cinnamon and KDE. I am waiting for KDE 4.10 to determine if it will be my permanent DE. So far, I have settled and am very happy with cinnamon.
What’s the Russian distro?
I installed Fedora 18 LXDE on an older computer (HP/Compaq NC 24000 I got used on eBay. Though I usually run Linux on virtual machines and had only done one full hard drive install before, I found it easy to use the installer.
The only puzzle was the part about how to “reclaim disk space”, but even that proved to be just a click or two to figure out.
I had had the trepidation with Fedora that its stance about only including open software would pose some challenges for me. I consume a lot of music and video, and make music in my own right. I thought it would be a hassle to get flash, LAME, DVD codecs and the like installed. But I found that the rpmfusion.org, the home to add links to non-free repositories to one’s installer librararies, was easy to use.
The only issue I have had so far, and I think it is user error on my part, is that the distro ships with Firefox
when I prefer Chromium or Chrome. My efforts to get Chrome working have not worked so far. One fellow advised me that it should be in the repositories once I elect the non-free library, but my searches do not turn it up. On the other hand, when I download the yum file from google, it does not seem to work to install. I know I’m just missing something. On the other hand, the version of Firefox I got seems like it is much more full-featured than I remember Firefox to be. Midori runs, as one might expect from such a lightweight browser, very quickly as well. But Firefox has been fast enough.
In the LXDE version, I am finding Fedora 18 to run quite well even on an older computer (1.2 Ghz single core CPU).
Fedora recognized the wireless card “right out of the box”. I was able to easily convert a photo to .png
and substitute a picture of a kestrel for the simple blue
out-of-the-box wallpaper.
In summary, after reading some of the negative press, I can report that my experience has been different. I’ve really enjoyed Fedora 18, and plan to keep it as my distro from now on.
So, could you give a step-by-step description of how to make Anaconda reclaim disk space automatically.
Russian Fedora repo has chromium.
I haven’t tried the Russian spin, so I don’t know for sure, but chances are they just have the google repositories added to their distro. More info here: http://www.google.com/linuxrepositories/