Linux Mint 13 Cinnamon and Linux Mint 13 MATE are the latest editions of the popular Linux desktop distribution based on Ubuntu Desktop. This tutorial presents a step-by-step guide on how to dual-boot either one with Windows 7 on a computer with a single hard drive.
Because the Cinnamon and MATE editions of Linux Mint 13 share the same installation program, the steps involved are the same regardless of the edition you use. For this tutorial, a 32-bit installation image of the Cinnamon edition was used.
If your computer is running a self-installed copy of Windows 7, the default number of partitions will be just like the ones shown in the image below. Keep in mind that the partitions on an OEM (Original Equipment Manufacturer) installation could be different. For this tutorial, the operating assumption is that you computer is running a self-installed copy of Windows 7. Note: On your computer, make a mental note of the amount of free space on the C drive listed on this image. You will need the information during the installation of Linux Mint 13.

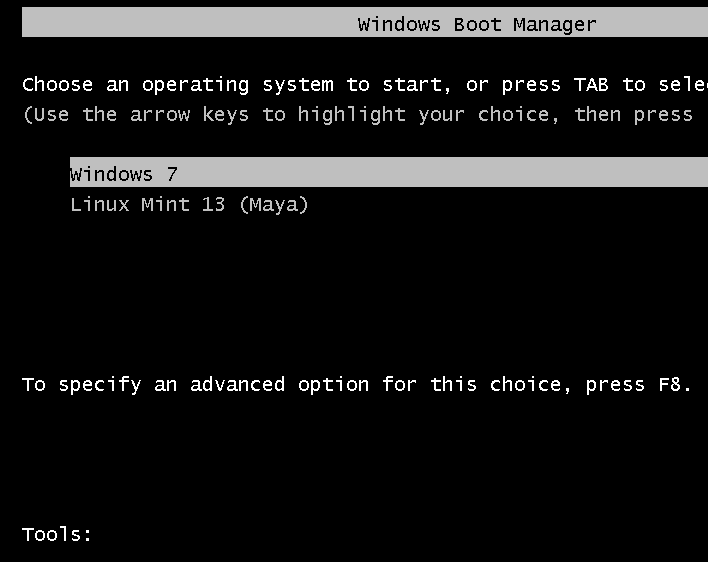
The objective here is to install Linux Mint 13 on the same hard drive, with GRUB, Linux Mint’s boot loader, installed in the boot partition (of Linux Mint), leaving Windows 7’s boot programs in the hard drive’s Master Boot Record (MBR) untouched. Then using another application to add an entry for Linux Mint 13 in Windows 7’s boot menu, so that at boot time, you will be able to choose which operating system to boot into. Selecting Windows 7 will cause the computer to boot into Windows 7 and selecting Linux Mint 13 will boot the system into your newly installed copy of Linux Mint 13, but not after a brief stop at Linux Mint’s boot menu.

After creating partitions for and installing Linux Mint 13, the new partitions as seen from inside Windows 7 will look a lot different. This image shows the partitions from the computer used for this tutorial after the dual-boot operating has completed.

For this tutorial, the partitions that will be created for Linux Mint 13 are: a partition mounted at /boot; root partition mounted at /; a partition mounted at /home; and a Swap partition. You do not need to create all four, but that is what will be done for this tutorial.
What do you need to complete this tutorial? Just five items:
- This tutorial
- You, and an Internet-connected computer, needed to read this tutorial.
- An installation image of Linux Mint 13 (MATE or Cinnamon edition). You may download it from here. Burn the downloaded image to a DVD, or transfer it to a USB flash drive.
- The target computer running Windows 7 (Note: you may opt to reinstall Windows 7 anew)
- EasyBCD – a free software from NeoSmart Technologies that will be used to add an entry for Linux Mint 13 in Windows 7’s boot menu
Note: If you are not familiar with disk partitioning in Linux and how to dual-boot operating systems, it is highly recommended that you read guide to disks and disk partitions in Linux and tips for dual-booting Windows and Linux before continuing with the rest of this tutorial.
Now that we have a pretty good idea of what we need to accomplish, time to get it done. To start, boot the computer from the Linux Mint 13 DVD installation image that you made. Linux Mint 13 DVD is a Live DVD and by default, will boot into a Live desktop environment. Click on the installer’s icon on the desktop to start the installation process. When the installer starts, click through the first steps until you get to the one shown below. You definitely do not want to select the second option. Like the second option, selecting the first option will lead to an automatic partitioning of the free space needed to install Linux Mint 13.

Selecting the first option will actually bring you to this step, where you can see how the installer will resize the main Windows 7 partition (the C drive). The problem with selecting the first option, is that GRUB will be installed in the MBR of the hard drive, where it will overwrite Windows 7’s boot files. Since this is not what we want to do, the only option left, is the last option (Something else). So, if you are at this step, click the Back button.

Selecting Something else and clicking Continue will bring you to the Advanced Partitioning Tool. “Advanced” does not mean that the tool is really advanced, it just means that it is for people who know how to partition disks in Linux. If you read and understood the material discussed in guide to disks and disk partitions in Linux, consider yourself an advanced user.
The main window of Advanced Partitioning Tool is shown below. By default, the partitions listed at this step – sda1 and sda2, are the two Windows 7 partition that we saw on the first image on this page. In Windows’ parlance, sda2 is the C drive, while sda1 is the System Reserved partition.

The task here is to resize sda2, freeing up enough space that will be used to create the partitions for installing Linux Mint 13. To begin, select sda2 and click Change.

This is the resize window, also known as the Edit Partition window. The sda2 on the computer used for this tutorial has about 320 GB of disk space. How much of that disk space we can free up depends, of course, on what is available. This is where you have to be very careful.

The system used for this tutorial was a recent installation, so Windows 7 has only used about 7 GB. With that, I decided to allocate 100 GB to Windows. That amount is what should be shown in the New partition size field. And that is all you need to do here. Click OK.


I have just successfully dual-booted windows 7 and Linux Mint 13, on my laptop.
It was a new laptop (500GB HDD) with OEM installed Windows 7. Consisting of a windows ‘recovery partition’ of 2GB and a windows ‘system (C:)’ partition of 475GB. Just two partitions.
Instead of using the ‘Advanced Partitioning Tool’ I used Windows 7 ‘Disk Management’ to shrink the (C:) partition. But ‘Disk Management’ would only allow me to shrink the partition by 225GB, resulting in (C:) partition being 250GB. Ideally i would have liked to shrink (C:) to 100GB.
Bye the way, here is the event log of the file that windows ‘disk management’ could not shrink beyond:
System (C:)
\\?\Volume{d7a03d38-cc48-11e1-9373-806e6f6e6963}
\System Volume Information\{8b9e2b23-f14d-11e1-896c-e0ca94af1a0a}{3808876b-c176-4e48-b7ae-04046e6cc752}::$DATA
0x3cf647f
0xa11b0e
The reason i choosed to use windows ‘Disk Management’ to shrink rather than ‘Advanced Partitioning Tool’ was one of being cautious on my behalf.
The question/s i have are:
1)Would ‘Advanced Partitioning Tool’ have given ability to shrink (C:) further than ‘Disk Management’?
2)And if it could, would this be safe in terms of not damaging the Windows 7 installation.
I guessing that the reason i could not shrink (C:) further was related to the windows 7 being an OEM installation? Or does ‘Disk Management’ only allow to shrink a partition to say 50% of original size, by any chance?? Maybe you could elaborate on this issue?
Yes, the Advanced Partitioning Tool will allow you to shrink the partition to any size you want.
For all the dual-boot installations where I have used the Windows Disk Management tool to shrink the C drive, the default behavior of the tool has always been to shrink the partition by half. However, it always allowed me to change the suggested size to anything I want, provided that it is within the range of free disk space.
So, unless you have data on the C partition that is taking up about half of available disk space, you should be able to shrink it by more than half.
The key to shrinking any partition with data on it is to find out how much of the disk space is free space. You can see that info from the Disk Management tool and also from Advanced Partitioning Tool.
Hi. I am new to linux. Having read through this tutorial i note that you placed /boot on a primary partition /sda3 and /, /home , /swap on logical partitions. i take it that these logical particans /sda5,/sda6,/sda7 are within the extended partition /sda4?
My main question is: Is there a reason/advantage in placing /boot on a primary partition as opposed to setting it up on a logical partition, resulting in a partition table of /boot, / , /home , /swap on /sda5 , sda/6 , sda/7 , sda/8 respectively?
Yes, in this case the logical partitions are within sda4. Note that even if the extended partition’s number is anything other than 4, for example, sda2 or sda3, the logical partitions will be numbered from sda5 onwards. That is the first logical partition is always sda5. But I’m sure you have read this article.
Also, in this case, there is no particular reason/advantage for having /boot in a primary partition, other than the fact that there were enough free primary partitions that I could use. If there was only 1 primary partition left, I could have done as per your question suggested.
Is there any benefit of placing /boot on a primary partition as opposed to logical partition from any computing perspective? or vica versa?
i have enjoyed reading many ofyour dual-boot tutorials and other guides.
Have you ever considered writing a multi-boot (3 or more OS’s) tutorial?
Afaik, there is no benefit. Linux will boot from a primary or logical partition. The only thing you have to watch out for is how far from the beginning of the HDD the /boot partition is located. That could sometimes prevent the system from booting.
See this tutorial on triple-booting Fedora, Ubuntu and Windows 7. If you have others in mind that you would like to see, let me know.
Perfect! I was searching for this finid..
I successfully installed this on my cr**y intel dp55wg mobo with two hard drives and dual boot works perfect after configuring with EasyBCD.. thanks to you..
When dual-booting with 2 hard drives, you do not actually need EasyBCD, but it doesn’t hurt either.
yea GRUB is taking care… but its too complex for other members in my home.. they are accidently selecting memtest or recovery instead of windows.. Am learning now.. will remove easybcd after i get grip on grub
Complete and easy success thanks to you.
Hi I have given up installing mint on my main machine for the moment but have installed it on one of my latops, evrything seems fine and I am slowly getting used to everything. I have a question though, which may not be for this forum so would be happy to ask it elsewhere.
My laptop works fine at home but if I take it to a friends house and connect it to thier internet connection (wired) it will not connect it just says the wired connection is disconnected. I can not find any info out there as to how to set up a wired connection but can not see why it would not work as essentially the connection is no different from the one I have at home.( a windows laptop connects at both points no problem) Anyone got any bright ideas?
step by step instructions here please as my knowledge of Linux is very limited.
Thanks
The connection should work auto, but since it does not, you can configure if manually.
Click on the NetworkManager applet on the panel. If Enable Networking is not checked, select it to enable it. If it is enabled and still not working, click on it to deselect it, then select it to enable networking.
there is no network manager on the panel, if I click the panel and choose add to panel the only thing I can add which has anything to do with networks is network monitor
Which desktop environment are you running – MATE or Cinnamon?
64 bit mate
From the command line, type sudo dhclient eth0. Run that if eth0 is the name of the Ethernet device. If you do not know what it is, running ifconfig -a will list the detected network devices.
ok have done that and this is the result
graham@graham-EASYNOTE-SW51 ~ $ ifconfig -a
eth0 Link encap:Ethernet HWaddr 00:40:d0:a4:a3:31
inet addr:192.168.1.108 Bcast:192.168.1.255 Mask:255.255.255.0
inet6 addr: fe80::240:d0ff:fea4:a331/64 Scope:Link
UP BROADCAST RUNNING MULTICAST MTU:1500 Metric:1
RX packets:52242 errors:0 dropped:0 overruns:0 frame:0
TX packets:44224 errors:0 dropped:0 overruns:0 carrier:0
collisions:0 txqueuelen:1000
RX bytes:38859338 (38.8 MB) TX bytes:6556023 (6.5 MB)
Interrupt:20 Base address:0x6000
lo Link encap:Local Loopback
inet addr:127.0.0.1 Mask:255.0.0.0
inet6 addr: ::1/128 Scope:Host
UP LOOPBACK RUNNING MTU:16436 Metric:1
RX packets:4 errors:0 dropped:0 overruns:0 frame:0
TX packets:4 errors:0 dropped:0 overruns:0 carrier:0
collisions:0 txqueuelen:0
RX bytes:240 (240.0 B) TX bytes:240 (240.0 B)
wlan0 Link encap:Ethernet HWaddr 00:60:b3:62:54:30
UP BROADCAST MULTICAST MTU:1500 Metric:1
RX packets:0 errors:0 dropped:0 overruns:0 frame:0
TX packets:0 errors:0 dropped:0 overruns:0 carrier:0
collisions:0 txqueuelen:1000
RX bytes:0 (0.0 B) TX bytes:0 (0.0 B)
graham@graham-EASYNOTE-SW51 ~ $ sudo dhclient eth0
[sudo] password for graham:
Rather than invoking init scripts through /etc/init.d, use the service(8)
utility, e.g. service smbd reload
Since the script you are attempting to invoke has been converted to an
Upstart job, you may also use the reload(8) utility, e.g. reload smbd
RTNETLINK answers: File exists
HI Graham
I had the same problem. I couldn’t install Mint 13 on my old computer and even bought a new HP p7 1225 and was still unable to install. The monitor would go blank with a no screen error message. However, it installed just fine on an old laptop. I was finally able to install Cinnamon by a backdoor way through a recovery mode. Still doesn’t work correctly as I have to boot through recovery mode. There is a serious bug in Mint 13 and I have filed a bug report. So don’t give up on Linux. The fault is not with the fine bsdos tutorial.
Hello, thank you so much for the tutorial. However, I have a problem:
I installed Mint Maya 13 on my new pc running Windows 7. I followed the instructions. However, I didn’t have the choice between “primary” and “logical” drive when creating the partitions for Linux. Also, there were already a bunch of partitions there. I made my partitions from the partition containing windows (after checking the size of it, etc.)
Anyway, when ready to install, a message roughly saying “I need a partitions for BIOS of at least 1MB” or something, “if you don’t correct this error, the boot might not work later”. I pressed ESC but it started installing anyway. Then when using EasyBDC, after adding Linux, they say “No entry detected!”.
So now, when I boot I have “Windows 7” and a bunch of “linux mint” entries and the latter don’t work.
How many partitions did you see while attempting to install Mint and what were the partition numbers (sda1, sda2, etc)?
Mmm that’s a good question. There must have been at least 5, I remember my new partition “/boot” was “sda6”.
The original partitions were all named “sda1” “sda2”, etc.
I also remember one of the partitions’ free space was “unknown”. One of them was for windows, one of them was just called “data” in windows and empty.
I booted Mint from USB, now I can see the partitions:
/dev/sda
free space 1MB
/dev/sda1 fat32 209MB 33MB
/dev/sda2 134MB unknown
/dev/sda3 ntfs 120000MB 64461MB (that’s one with windows I played with)
/dev/sda6 ext4 100MB 33MB (my /boot)
/dev/sda7 ext4 20000MB 3739MB (my /)
/dev/sda8 swap 4000MB 0MB
/dev/sda9 ext4 128774MB 2235MB (my /home)
/dev/sda4 ntfs 450092MB 3221MB (that’S the one called “data”
/dev/sda5 ntfs 26843MB 9661MB
free space 0MB
Please note that I allocated all the remaining space I had to /home (sda9) because I didn’t want to waste unused space. Was that bad?
It looks like the original partitioning table was GPT, rather than MBR, which is the default on most systems. And since I think the Mint installer does not support GPT by default, that could be part or the main cause of your problem. If you are not familiar with what I’m referring to, take a few minutes to read guide to disks and disk partitions in Linux.
You might want to reinstall Windows and use an MBR partitioning scheme. Best to consolidate your ntfs partitions. Aside from the ntfs partition that is your C drive, you might want to lump the others into one partition. And what is that unknown 134 MB sda2 partition for?
There are tutorials on how to dual-boot Windows and Linux with a shared ntfs partitions on this site. Search here and here.
Thank you finid. I just got the pc last week with Windows 7 preinstalled. I don’t know what the 134MB partition is for… recovery perhaps?
Do I really need to reinstall if I just want to put everything back like it was before I tried to install Linux? Like with the “revert” button or something?
I think they should add a warning at the beginning of this tutorial “Attention, this tutorial is only for people who have MBR partitioning.
p.s. I had read the 2 guides before attempting anything.
Well, if you do the revert, that is, go back to factory default, I think you will still have 4 primary partitions, which means that one of those ntfs partitions will have to be deleted and repartitioned if Mint is going to be installed.
But go ahead and “revert.” Then post the partitions and partition numbers, so we can see figure out what to do next.
If it were me I would reinstall Windows with MBR and the setup partitions. First of all I changed two primary partition to logical, then you have room for another primary. The partitions I changed to locical were recovery and HP Tools on my laptop. I made set of recovery disks just to be on the safe side. Although Linux will install nicely on logical drives.
Oh no… I tried to “revert”, nothing happened (or changed). So I decided to get the pc back to factory settings (with windows 7 preinstalled, etc.) but when it seems to be finished and the pc reboots, nothing happens.
I can tell windows must be there because when I boot with Linux on my USB and click on “install mint”, it gives me the choice to “install along side windows 7”, etc. The original partitions are also all there.
That EasyBDC really screwed it up… any way to reset that?
Well, you can do this: Go ahead with the default installation of Mint, that is, let it install itself alongside Windows and install the boot loader in the MBR. Then after installation and if you boot into Windows, then you can use EasyBCD to reinstall Windows’ boot loader in the MBR.
But given that you may already have 4 primary partitions on the hard drive, I do not think this will even work. Unless the Mint installer can install on a GPT partitioning scheme.
You can install Ubuntu 12.04 on GPT partitioned drive. If you prefer the mint desktop you can run Mint Maya Desktop on Ubuntu. The systems of the two are basically the same. You can get information on using the Mint Desktop on Ubuntu 12.04 at the Ubuntu Forums at this URL. http://ubuntuforums.org/index.php
Go to desktop enviornments and there is all kinds of help. You can also post a new topic and ask how to install Mint Desktop in Ubuntu 12.04 64 bit.
I hope this helps with your install.
What you are calling “Mint Maya Desktop” does not exist. You either run Cinnamon or MATE or Mint. And there are separate ISO installation images of Mint 13 of both desktop environments.
And if you must run MATE or Cinnamon, why go to though the hassle of running it on Ubuntu? Why not just run Mint?
Excuese me, I did mean Mate or Cinnamon as you suggested. If Scott prefers the Linux Mint mate or Cinnamon desktop then he could use those desktops on Ubuntu 12.04 Percise Pangolin. It seemed by reading your comments on his install abut the GPT partitioning scheme that mabye Linux Mint would not install properly or not at all, but Ubuntu will. So adding the Linux Mate or Cinnamon Desktop just might be the answer for Scott. I wasn’t thrying to contradict you finin, just offering an idea. Sorry I intruded.
Awesome tutorial!! Notes for us newbies installing from a Win7. You have to run in compatibility mode which you get to by not letting the start-up screen timeout and run its default installer, but press space or probably any key and another screen pops up. Choose compatibility mode, sit back and enjoy the ride.
In thinking I had a disc error I downloaded a cool file checker of sorts Winmd5free. When you download your iso(or any file) from Linux there is an MD5 code given. Winmd5 let’s you find and compute the downloaded file’s MD5 to be sure you got the copy right. I also downloded InfraRecorder to burn my disc from an iso to a dvd-rw. Also here’s a great link after you’re dual(or triple w/Win8) booting like me. http://blog.sudobits.com/2012/06/03/things-to-do-after-installing-linux-mint-13-maya/
i want to try cinnamon, do you thing it is better to just install Maya or just add cinnamon to my Pangolin, right now im dual boot Windows 7 and Pangolin, thinking to replace Pangolin with Maya
Since Maya is the latest, might as well.
My attempt to follow the tutorial came to a dead stop at this step:
“To start, boot the computer from the Linux Mint 13 DVD installation image that you made.”
After the Linux Mint countdown expires, the screen goes white for a couple of seconds, then the computer shuts down completely.
When I reboot into Windows 7 (Home Premium) and then reinsert the Mint 13 image disk, Autoplay asks if I want to run MINT4WIN.exe from that disk. As I understand it, MINT4WIN is for installing a Linux emulation under Windows and does not actually create a dual-booting setup.
Is there a particular version of Mint 13 that I need to download that will actually boot?
All versions work, afaik. Perhaps the program you used to create the DVD messed something up. Try another burn or try a CD image to see what happens.
Hi I know nothing about linux but have just installed it as dual boot on a single drive spare system ( just as a test) using these instructions. instructions are clear and I had no problems. Now for the question I want to install linux on my main machine and I am having real problems with this,niether the 32 bit nor the 64 bit version seems to want to boot from the DVD( same versions I used on the spare machine) I get the screen saying linux is booting then a grey screen with a blinking curser in the top left which I have left for over 20 minutes to see if it sorts itself out. When I aborted the boot and rebooted windows the hard disk manager reports that both my mirror drives are out of sync and need to be resynced which takes around 9 hours. On the machine I have 1 x 2tb boot drive, 1 X 2tb scratch disk,2x 2tb drives mirrored ( music) and 2X 2tb drives mirrored (software). I am assuming I will have to break the mirrors to get the linux system to install, which I would rather not do if at all possible. Do you have have any suggestions as to how I might approach this install? I am happy to suppliy a much more detailed description of my system if you need it.
I’m not certain what’s going on, but my guess is that the disk configuration is confusing the Mint. That does not really make sense, but the disk setup is the only difference between your main system and the one you used for the test installation.
Btw, which of the drives do you plan to use for Mint?
Suggestion: Try other distributions, say, Fedora or ROSA Linux, and see what happens.
I was going to use the windows boot drive as the linux boot drive, simply by splitting it in half 1tb windows and 1tb linux.
is the look and feel of the other 2 distributions similar to Mint Maya? I quite like that as it is similar to windows and I will probably find it easier to transition. As I say I know nothing about linux but would like to try and move away from windows if possible.
Thank you very much for this tutorial. Much appreciate it.
No issues with my new installation.
Hey there. I am following the instructions to addapt it to a 2 drive configuration and I am having serious troubles with Mint 13 64bits and Windows 7 64bits. I have Windows 7 on a drive and wanted to install Mint 13 on another drive so this is what I did :
1) Installed Win7 64bits on a drive.
2) Installed Mint 13 64bits on the other drive making the partitions as mentioned here ( boot, swap, / and home )
3) On installation instructed Linux to boot from /boot ( wich happens to be on something like sdb1 )
After restarting all seems to be fine with Linux but Windows is gone. I tryed manually adding the Windows disc on the Grub menu but it sends me a “not recognize device” grub errors so I am nos sure what to do.
Is this question right in this place or should I post it somewhere else ? thanks in advance guys.
I’ve just done this OK. Install Win 7 64 on one HDD and check it boots. Install Mint 64 on second drive but choose “do something else” at the installation choice menu, set up boot, root, swap and hope partitions and ensure that Grub is installed on second drive, not Windows drive – change HDD boot priority in BIOS and check Linux boots. Change HDD priority in BIOS back to drive 1 (Windows) and install EasyBCD then follow instructions above to add Mint boot option to Windows drive. Should now dual boot.
You should have installed GRUB in the MBR of sdb, not in /boot. Check out the guide on doing the same thing for Ubuntu or Fedora from here and here.
When dual-booting with 2 HDD’s sda, on which Windows is, should net even be touched by the installer.
I had only one HDD initially, that’s why I tried to install Grub in /boot. I added second drive to fix problem when Grub > /boot failed.
The problem with this installs seems to be with GRUB 2. Not sure, but that’s the likely culprit as GRUB 2 is not exactly ready for prime time.
Now that you are using 2 HDD, reinstall Windows, if you have to, and install Mint to the other drive. There should be no problem whatsoever with that setup. And you do not need EasyBCD when using 2 HDD. Use the links to the Ubuntu and Deepin tutorials as a guide.
Yes I see what you mean, actually the Grub installer seems to have picked up the Win 7 drive and has included it in the boot list, so if I select Mint from the Win 7 boot loader I can still then start Win 7 from Grub – max flexibility. Seems that using 2 drives solves many problems even though it cost me another SAS RAID but I picked up a couple of 74Gb SAS drives for only $15, perfect for Mint as I have a couple of 3Tb SATAs for data storage.
And if Mint is your primary system you can just make the Mint drive the primary drive by changing the BIOS boot order.
Ok guys thanks a lot. I got it working.
What ringed a bell was the page with the instructions for Ubuntu. I saw the picture of the partitions and then I realized what was the problem.
I used miniTool to remove partitions and wipe clean both HDD, then installed Windows on Drive1 but when I checked the partitions on the Mint installation there was a 100MB partition on the Drive2 where I was about to install Mint. Windows was installing the loader on Drive2 while installing Windows itself on Drive1 .. I guess ( and is just a guess cause I am not sure if that fixed it ) that since I had Drive2 as the 1st bootable drive on BIOS, Linux copied the loader on that drive even the Windows itself was being installed in another drive. Then when I installed Mint on drive 2 the loader was deleted.
I solved the problem changing the boot order of the drives. Once the Drive1 was the 1st to boot I saw both partitions ( loader and windows itself ) on that drive and everything went smooth.
Thanks a lot for ur help !
Correcting .. Windows copied the loader on that drive..
Followed the instructions using Win 7 Ult 64 and Mint Cinnamon 64 but installation failed to install Grub into /dev/sda3. Any suggestions much appreciated.
What was the error and what’s the size of your partitions – Windows’ and Mint’s?
Win 7 U 64 was approx 100Gb and is located at the beginning of the drive, Mint Cin 64 was the balance of the drive (SAS RAID) at 46Gb
Thanky you so much for this tutorial. It’s clean and neat and I enjoyed reading it all way down.
I knew most of the tips but I’ve found some precious informations for my everyday messing with OSes.
I’ll look forward for more tutorials from you
cheers
This tutorial was so simple a first grader could follow it. I am new with linux and I installed it on my second hard drive w/o incident.