This post shows how to dual-boot Ubuntu 16.10 and Windows 10 on a computer with UEFI firmware and on a single hard drive. The computer used for this article is an HP 250 G5 laptop with Secure Boot disabled.
First Step – Get Your Windows 10 Computer Ready
1. For a pain-free and successful operation of the sort that you’re about to undertake, it is recommended that you disable Secure Boot (Restricted Boot). How this is done depends on your computer, but if you have the same HP 250 G5 laptop I used for this tutorial, see this article. Owners of a Lenovo G50 laptop should consult this guide.
2. From the BIOS or UEFI setup utility, configure the computer to boot from external media.
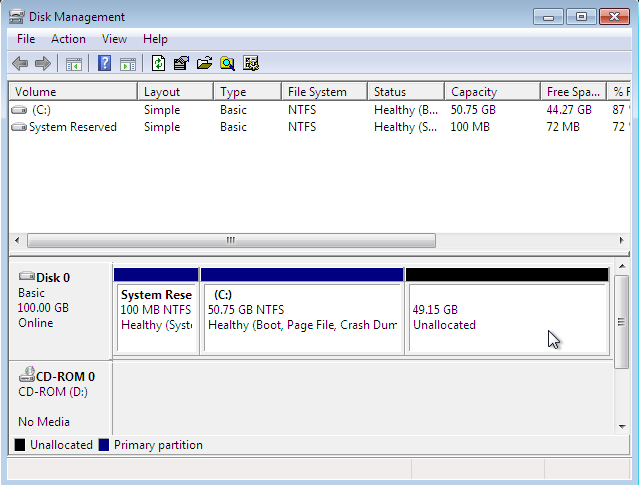
3. After that, you need to free up disk space from your computer by shrinking the C drive or other partition with enough free space on it. Getting that done is fairly simple by using Windows 10 partition manager. When completed, the partition should show partitions and free disk space similar to the one shown in Figure 1. Ubuntu 16.10 will be installed in the Unallocated disk space.
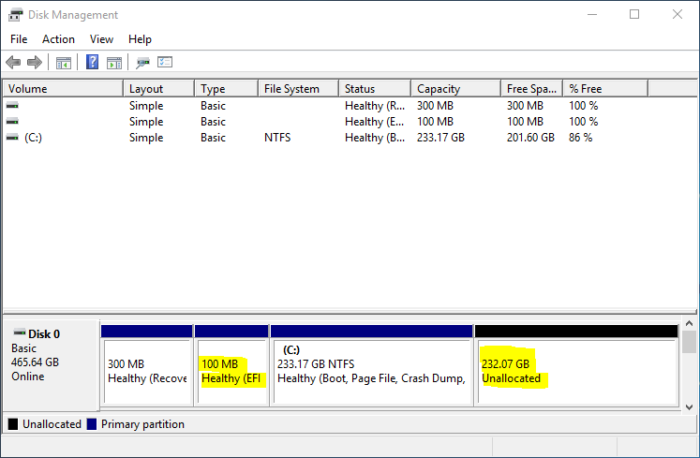
Figure 1: Windows 10 partitions and the free disk space for installing Ubuntu 16.10
Download Ubuntu 16.10 and Create a Bootable USB Stick
The next step in this operation is to download an installation image of Ubuntu 16.10 desktop from here, then transfer it to a USB stick. From Windows 10, use this article as a guide to create a bootable USB stick of Ubuntu 16.10. And from any Linux distribution, the simplest method is to use the following command:
# This command assumes that you're executing it from your Download directory
#
# /dev/sdb is the target USB stick. Yours might not be sdb, so verify before copying and pasting

sudo dd if=ubuntu-16.10-desktop-amd64.iso of=/dev/sdb bs=1M conv=sync

#
When you’ve finished creating the installation media, insert it into the appropriate port in your computer and reboot. In the next step, you’ll use that bootable USB stick to install Ubuntu 16.10 alongside Windows 10.
Dual-boot Ubuntu 16.10 With Windows 10
If the computer has been set up to boot from external media, you should see the Ubuntu 16.10 boot menu. One of the entries will be to boot into the Live desktop. I suggest you select that option, play around with the Live desktop, and if you’re satisfied, launch the installer by clicking on its icons on the dock or on the desktop.
After the installer starts, click through the first few steps until you get to the one shown in Figure 1. The installer should detect that Windows 10 is already installed and offer to install Ubuntu 16.10 alongside it. That’s great, but it will not create a separate partition for your files and folders.
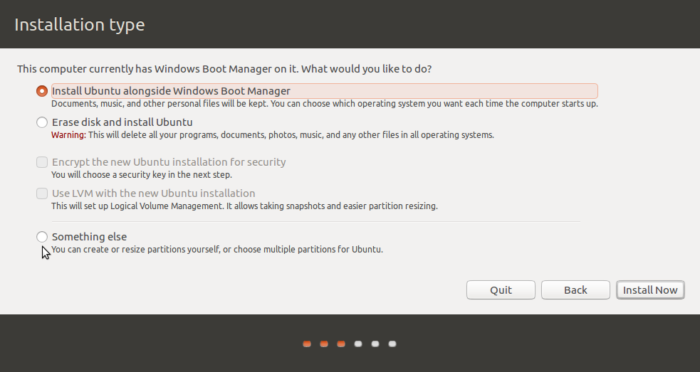
Figure 1: Partition methods of Ubuntu 16.10 installer
For that to happen, you’ll have to select the Something else option, then click on the Continue button to move to the next step.
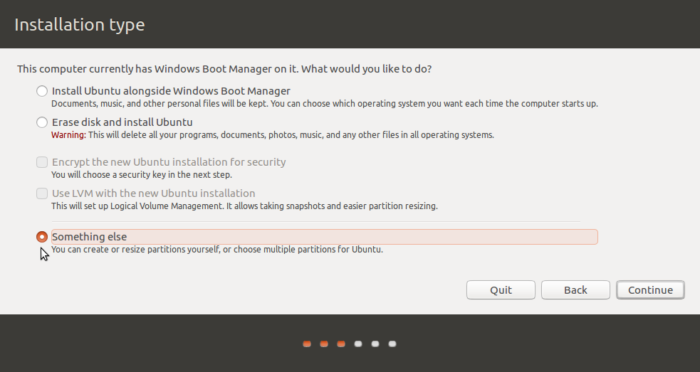
Figure 2: Something else option of Ubuntu 16.10 installer
That next step shows the so-called advanced partitioning tool, where you’ll see all the partitions detected by the installer. Of the existing Windows 10 partitions, the one of interest here is the one that has efi in the Type column and Windows Boot Manager in the System column. That is the EFI System Partition, where the boot loader files will be installed. To start creating partitions, select the free space, then click the + button.
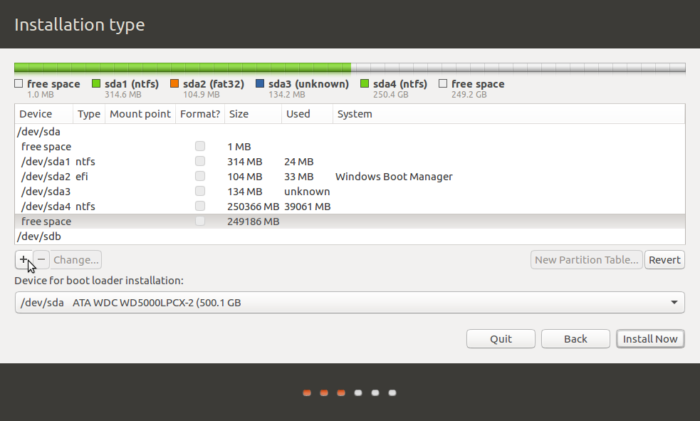
Figure 3: Advanced partitioning tool of Ubuntu 16.10
That should bring up the installer’s partition editor. For each partition, you only need to specify the size, the file system (from the Use as menu) and the mount point. For partitions other than the one that will be used as swap, stick with the default file system – Ext4 journaling file system.
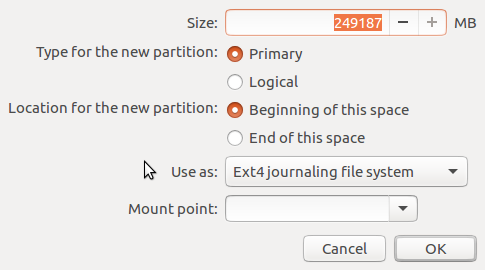
Figure 4: Ubuntu 16.10 partition editor
So let’s start by creating the root partition. For size, any value higher than 20 GB will do. From the Mount point, select /. Click OK.
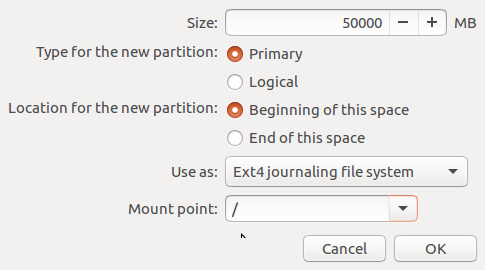
Figure 5: Ubuntu 16.10 root partition
The next partition will be mounted at /home. This is the partition that will hold all your files and folders, so assign most of the available disk space to it. When you’re finished setting it up, click OK.
Figure 6: Ubuntu 16.10 home partition
For the partition that will be used as swap, a size of 2000 MB (2 GB) to 4000 MB (4 GB) should be enough. From Use as, select swap area. OK.
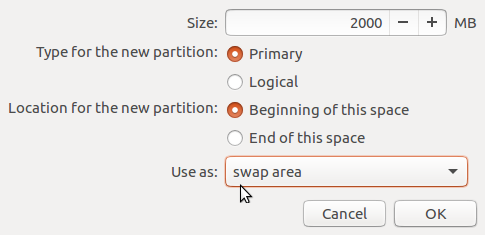
Figure 7: Ubuntu 16.10 swap partition
After creating that last partition, you should be back in the main partitioning tool’s window for the last time. From the Device for boot loader installation, select the efi partition. On the system used for this article, that partition corresponds to /dev/sda2, that is, the second partition on the hard drive. Then click on the Install Now button to continue with the rest of the installation.
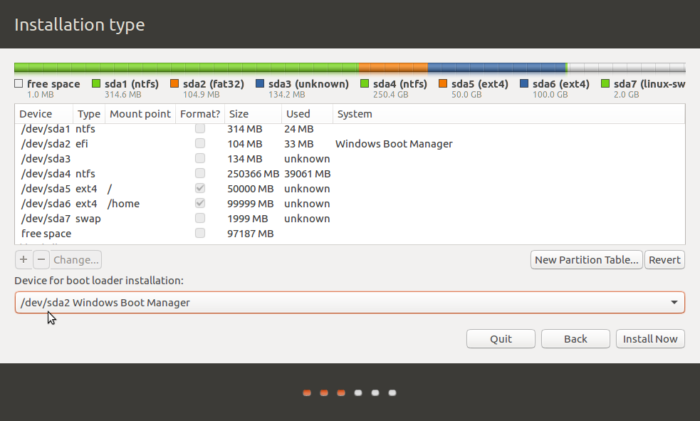
Figure 8: Advanced partitioning tool of Ubuntu 16.10 after creating partitions
After installation has completed successfully, rebooting the computer should reboot into the GRUB menu. GRUB (Grand Unified Bootloader) is the boot loader used on virtually all Linux distributions. Aside from the entries for Ubuntu 16.10, it will also have one for Windows 10, which makes it possible to boot into Windows from the GRUB menu. Unfortunately, you can’t add an entry for Ubuntu 16.10 in the Windows Boot Manager menu, so it’s recommended that you make GRUB the default boot manager. To accomplish that, read this article.


I installed xubuntu 16.04 lts but on restart it booted directly into windows 8. I can access ubuntu by going to boot devices on boot-up. How to make grub the default bootloader so that i dont have to select ubuntu from the boot devices option?
You can do that from the BIOS/UEFI utility, though because every PC vendor has a slightly different implementation of UEFI, there’s no guarantee that it will stick.
On newer PCs, it will, but on older ones, the default is the last to boot.
Funnu, because I use both Windows 10 and Ubuntu since 14.04 LTS (use 16.04 LTS now) on the same hard drive and this article find helpful, because I didn’t know how to install 16.10 LTS on my new brand Dell laptop with uefi. Now I know how to do that. Seems easy. The only one thing I observed you left 97187 MB unallocated (free space) after all. I am wondering why? Probably just like that. But for future all space should be allocated, so you should do the simple math and count how many megabytes you need for each partition.
Thanks for the comment, but I left that unallocated space there intentionally – just in case I needed to install another distro, which I usually do.
Dear Nonya,
Please list some distros you consider better than Ubuntu.
This article is totally worthless, as no sane person would ever want to have Windows 10 on a computer! And its questionable whether any sane person would use Ubuntu when there are much better Linux distros out there!
ignorant