So the first distribution review of 2014 turns out to be that of a Linux distribution that I’ve never published any article about, one that I’ve never actually used.
And that distribution is Siduction, a desktop distribution based on Debian Unstable branch. The latest release – Siduction 2013.2, features 32- and 64-bit variants of five desktop distributions – GNOME 3, KDE, LXDE, Razor-Qt and Xfce. To see what it has to offer, I wanted to install all five editions, but after a bad experience with the installer, I stopped after managing to install the KDE and GNOME 3 editions.
So the focus of this review will the KDE and GNOME desktop editions, and, of course, the installer. And since the installer is a new application and I had a tough time with it, the bulk of this review will be devoted to it. Most users are already familiar with the KDE and GNOME 3 desktop environments, but the installer, that’s going to be a new experience for most people.
According to the Release Notes, the installation images are “enhanced with some useful packages and scripts, our own installer and a custom patched version of the linux-kernel 3.12.” Since I tend to attach a lot of importance to the installer, let’s see what it looks like and what it has to offer.
The Installer: Like all Linux distributions, the installation images are Live images. After booting into the Live desktop and looking around for a while, installation to the target hard disk drive (HDD) started when the installer’s icon (named sidu-installer), which was on the desktop, was clicked.
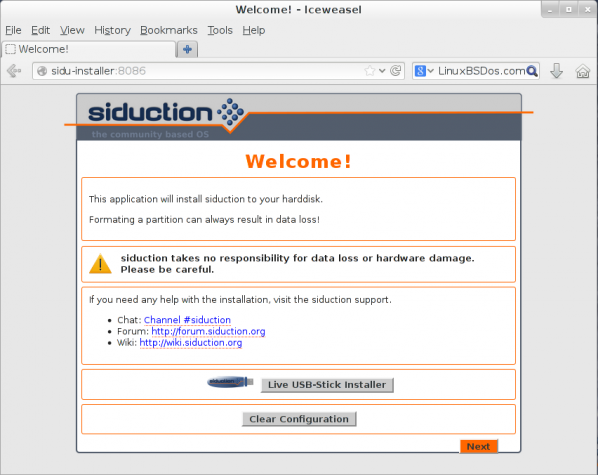
To my surprise, the installer opened in IceWeasel, the Web browser. That’s new to me. Of all the distributions I’ve used or reviewed, I’ve not come across one with this type of installation program. The address on the address bar shows that it’s actually an application listening on port 8086.

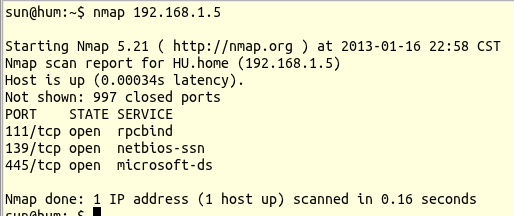
Like I wrote earlier, this was new to me. An Nmap scan of the machine showed these open ports. So there you have it, a graphical installer for a Linux distribution that runs from a Web browser, and listening on port 8086. But how good is it? From my experience, not very. The series of screen shots that follow show why.

The interface is a little bit on the confusing side. To a large extent, it’s not very intuitive. With so many buttons on the main page, it’s not exactly clear which one needs to be clicked first or last, or which one should be ignored. Beyond that, it has automated and a manual mode disk partitioning modes, which is always a good thing. In the automated mode, there is support for creating standard disk partitions and LVM volumes. LVM, the Linux Logical Volume Manager, provides a method for dynamic management of disk space.

My test install environment was in a virtual environment with about 50 GB of disk space available to it. When attempting to use an automated disk partition option, clicking on the Recommendation button after selecting the disk space to use, allows the installer to auto-allocate disk space to the default partitions that it creates. Those partitions are for root, /home and Swap. After I was satisfied that I had clicked on all the buttons required to complete the installation on this page, I clicked Next.

Sat back and watched the installer do its thing, or try to do its thing.

Not before long, it came back with an error message.

I went through the installation at least five times, alternating between the standard and LVM installation. The last thing I have time for is to jump to an IRC channel just so I can install a Linux distribution. Not in 2014.

Eventually, I gave up on the automated disk partitioning mode and chose to partition the disk manually.

For manual disk partitioning, the installer offers four tools – gparted, gdisk, fdisk, and cfdisk. Out of familiarity and point-and-click ease of use, I chose GParted.

This is a screen shot of GParted’s main interface. It shows the partitions created during an attempt to use the installer’s automated disk partitioning tool. All are extended partitions, which doesn’t really make any difference. Just something I think you should know. In any case, deleting those existing partitions from a previous attempt and creating new ones was not a problem.

Exiting GParted dropped me back to the installer’s main interface. Time to assign file systems to partitions. This screen shot shows the process of assigning file system to the root partition and the file system options.

Clicking Next on the previous step got me to the step shown in this screen shot. Since there was just one partition left, aside from the Swap partition, it gets assigned to /home. But the Device menu is empty. Maybe clicking on the Gerate and/or Freitext buttons will make something happen.

Clicking on the Gerate button did the trick. With the relevant partitions assigned file systems, I continued with the rest of the installation.

Actual package installation took just about 3 minutes.

Success! But the attempts to get there was frustrating. I don’t know what, if any, advantage a browser-based installer brings to the table, but whatever it is, the interface needs to be more intuitive. The one localization issue I encountered is minor, but the interface needs to be more polished.




Let me add some points to this otherwise well-written review
1.) In debian sid it is always a very good idea to install/update packages through very basic tools like apt (recommended here), as the console outputs often give hints to possible breakages, and in some graphical package managers these are sometimes suppressed. Synaptics or Debian Package Search is just one apt-get away 🙂
2.) “Homerun and Lancelot are not installed and are not in the repository.” ?
$ apt-cache search lancelot
plasma-widget-lancelot – Miniprogramm Lancelot für Plasma
$ apt-cache policy plasma-widget-lancelot
plasma-widget-lancelot:
Installiert: (keine)
Installationskandidat: 4:4.12.1-90r0
Versionstabelle:
4:4.12.1-90r0 0
500 http://packages.siduction.org/kdenext/ unstable/main i386 Packages
4:4.11.3-1 0
500 http://http.debian.net/debian/ unstable/main i386 Packages
3.) As for the installer, what I’ve read in their forum and on irc they are not satisfied with it at the moment and know that it needs rework, not only regarding usability.
4.) This seems to be the first time a debian distribution tries to switch to systemd-init completely and for a full set of desktop environments, and systemd is not completely set up in debian yet. If one sees siduction in this respect as a feasibility study, it is really bleeding edge and activating/deactivating default services is still work in progress. I really like to heavily test this distro on some (not productive) machines.
As much as I appreciate past reviews, this one IS a bit different. However, it’s built on an “unstable” version of Debian, may have a somewhat flawed installer (I had no problems, however), and what’s with reiserfs? That development/support ended in 2008 (for more than obvious reasons when Hans did the unthinkable): most, if not all main projects/distros suggest ext4, so I guess even though Sid uction (see what I did there?) is all that I mentioned, it may be one of those distributions best taken under the premise that it’s, as a whole, is unstable, and to be viewed that way. I doubt anyone is running this as a production OS, so those of us who’ve tried it, either as HDD or VM installations see it for what it is. Just HO.
Great,McAfee firewall enabled,what a comparision,hahahaha
Many more experienced users, who this distro is targeted at, like to have the ability to SSH into their machines and it makes sense to have this set up from the start, although perhaps a better way would be to present a choice during installation like some Slackware based distributions do. But most home users of that type, and SOHO anyway, would be running this behind a router with a firewall configured on it already, or even better with a hardware firewall or their own server using Smoothwall, IPcop, etc. acting as a gateway between LAN and the ‘big wide open’. Thus the insistence on all ports closed and no running services seems a bit redundant these days.
Siduction is based on Debian unstable/Sid (thus it’s name), obviously it’s not targeted to the new Linux user. So, for the experienced Debian user, the nits that you’ve picked are largely meaningless. The installation isn’t the best, but since it’s strength is being a rolling distro, you only install once. If you know what you’re doing (like you should if you’re using it), it’s not that big of pain for a one time deal. Also, this is meant as a desktop distribution, not a server distribution. So, an experienced Debian user is not going to have the box directly facing the internet in most scenarios. If they do, they should have the know-how to lock it down themselves in the configuration they like. The strength of Siduction (and other distributions based on Sid), is the rolling updates of Sid combined with the added value of stabilizing that a bit, as well as having extra utilities to run Sid as a desktop distribution, combined with forums/support to know when breakages in Sid are likely to occure before running your updates. It seems your review is coming more from a perspective of a RPM type guy, and not someone with experience of running Debian systems as desktops… (that and the perception that Siduction is intended as a general use desktop system – it’s not, it’s intended for users experienced in the way of Debian).
It’s good to see a review of Siduction, a very interesting Debian Sid distro. There are a couple of aspects in the review I’d like to comment on, though:
1. The install process – yes, if an installer is offered, it should work. At the same time: Siduction is a rolling distro, based on Debian Unstable. It’s aimed at experienced users, who are able and willing to solve technical problems. If you can’t get through the install process, then probably Debian Sid is not for you.
2. The same thing is true for graphical package management. If you don’t know how to open a terminal and type “sudo apt-get install synaptic”, then chances are that Sid is not for you…..
3. Security: restricted boot does not give more security but does reduce user freedom. See extensive discussions and whitepapers about this issue, among others at fsf.org
On the first point, I don’t see anywhere on the project’s home page where it’s stated that the distro is for guru-level users only.
On point 3, I agree. Every sensible person agrees.
You really have no idea how to differentiate between the differences of “Windows” based network security and “Unix/Linux/BSD” based security do you? When the attackers are from the windows world they can’t effect the Linux system very easily at all since their “keys are a completely different kind of key” for your unlocked car metaphor.
Blindly saying “all things need a firewall”, is just an uninformed blanket statement, but sure, a properly configured firewall helps.
Firewalls on a Linux distro aren’t the cure for linux network security cancer like it is for the Windows world where its security is like swiss cheese and with closed source bugs they can use & exploit.
You should really try to learn the difference/reasoning for what a firewall is used for in a Linux based context instead of blindly following what is true in the Windows world and blindly bringing a truth from a Windows context for a firewall and applying it without thought in a Unix/Linux context.
If you have SSH running on an Internet-connected box and you have nothing protecting it, then it’s either you have no idea what you are doing or you don’t care. Try setting up a box, connect it to the Internet and watch your logs for the number of break-in attempts targeting SSH.
Security is a process, so no single security application is enough to protect a system, but if you fail to provide basic network security on an Internet-connected system, then you don’t…