4. Advanced Partitioning Tool: This is the installer’s Advanced Partitioning Tool window. Though the installer has support for LVM and full disk encryption in the automated partitioning modes, they are not supported in the Advanced Partitioning Tool. Which means that this “advanced” tool is only so in name only.
In this window, you can see two Windows 8 partitions, and the free space. The free space is what will be used to create partitions for Ubuntu. Select it, then click the “+” button. Note that because there are two existing primary partitions on the system, you can only create two more primary partitions. You can read more about that here.

5. Partition Creation Window: This is the partition creation window. There are no exotic options here. Because there are existing primary partitions on the disk, the installer will attempt to create any new partition as a logical partition. You can stick with what the installer wants to use, or modify if. For this tutorial, I chose to create the first partition for Ubuntu as a primary partition.

6. Create Boot Partition: The first partition will be mounted at /boot. Notice that “Primary” is selected, instead of “Logical.” I allocated 250 MB of disk space to it, which is about the default in this latest edition of Ubuntu. I also chose Ext2 as the file system. That, is also the default for the boot partition in Ubuntu 12.10. OK.
Because I’m assuming that you have read guide to disks and disk partitions in Linux and Ubuntu 12.10 installation and disk partitioning guide, certain details are being omitted in these steps.

7. Create More Partitions: After the boot partition has been created, you will be returned to the main window of the Advanced Partitioning Tool. To create the remaining partitions, select the free space, then click the “+” button. This step has to be repeated for the other partitions too.

8. Create Root Partition: The next partition will be mounted at /. I allocated 15,000 MB, or 15 GB to it. And I used the default file system. Because there is just one primary partition left, the installer will create it and subsequent partitions as logical partitions. And there’s nothing you can do about that. MBR-based partitioning schemes are limited to a maximum of four (4) primary partitions. OK.

9. Create Home Partition: The third partition will be mounted at /home. Aside from the disk space, I used the defaults for the other options. OK.

10. Create Swap Partition: The last partition is for Swap, disk space that the system may use as memory. It has been suggested that on a 32-bit system, 2 GB is all you need for Swap, and 4 GB or more for a 64-bit machine. Be sure to select “swap area” from the Use as dropdown menu. OK.

11. Complete Partitions List: When all the partitions have been created, you should see them listed in the main window of the Advanced Partitioning Tool. The final task at this step, is to specify the Device for boot loader installation. By default, it is /dev/sda or the HDD’s MBR. But we want GRUB to be installed in the boot partition, which is sda3 in this tutorial. So, select /dev/sda3 from the dropdown menu. GRUB, the GRand Unified Bootloader, is the name of the boot loader in Ubuntu and almost all Linux distributions.

12. Bootloader Device: After the right partition has been selected for the boot loader installation, the window should look like he one shown below. Click Install Now.

After the installation of Ubuntu has completed, rebooting the computer will drop you into Windows 8. Last and final task, is to add an entry for Ubuntu is Windows 8’s boot menu. There are several options for doing it, but the one that I’ve been using for my tutorials, is EasyBCD from NeoSmart Technologies. It is free for personal use.
13. Download and Install EasyBCD: Download EasyBCD from here. Install it as you would any other Windows application. After installation, start it, if it is not started automatically. The main window is shown below. To add an entry for Ubuntu, click on the Add New Entry tab.

14. And Entry in EasyBCD: Then click on the Linux/BSD tab. GRUB 2 is the version of GRUB used by Ubuntu 12.10, so select it from the Type menu. For the Drive dropdown menu, Automatically locate and load always worked for me, but you can select the specific partition, if it makes you happy. Modify the Name field to match, then click the Add Entry button.

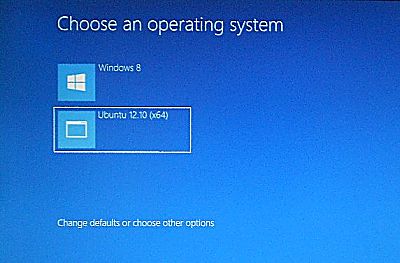
15. Preview Boot Manager’s Menu: To preview what Windows 8’s boot menu will look like, click the Edit Boot Menu tab. You can change the boot order and mess with a few other options from here. Save Settings, exit EasyBCD and reboot the computer.

That’s it folks! Got any problems or questions, feel free to ask. To make it easier to help you out, be sure to provide some details about your hardware and partition sizes.


i did not able to put ubuntu 14.04 beside with windows 8 .
it is possible or not .
It is possible. See Dual-boot Ubuntu 14.04 & Windows 7 on a PC with 2 HDDs and UEFI firmware and Dual-boot Ubuntu 14.04 and Windows 7 on a PC with UEFI firmware.
Everything worked just as you described. Now have a new box with Windows 8 62 bits and Ubuntu 12.04 64 bits. Great!
This is not for EFI guide. That HDD and Windows not using EFI.
Followed this tutorial to the letter, but easybcd and eufi installations dont work very well I think, cannot boot ubuntu 13.04. Also I dont see the metro bootloader.
I don’t believe you did a clean uefi/gpt install.
Same here, I tried many different other tutorials but I think Microsoft messed around with their stuff disabling dual booting for other operating systems.
Thats not for UEFI he/she was using a MBR disk keep in mind for full UEFI usage you need a GPT HDD not MBR it won’t work!
Esta es una buena opcion que la vengo manejando desde ya un ano y la verdad es muy pero muy operativo tener las dos OS 😀 (les recomiendo)
Can I use Windows’s Disk Manager in the pc to do that because I don’t have the disk.
OR
Is there any other way to create.
Windows DM is a fairly unrobust and limited tool and it DOES NOT create partition with perfect alignment. At least the one that came with XP and Windows 7 did not and I don’t believe anything has much been changed with Windows 8 DM or even disk part tool. Parted magic although will create partitions with the 1mb alignment and also sector alignment if you so desire.
I have installed ubuntu 12.10 on my lap with preinstalled windows 8.The problem is that now if i want to get ubuntu i have to take it from boot options.By default the os booting is windows 8,with no option of selecting ubuntu in boot menu.Can u help me
Are both OSs on the same HDD or separate HDDs?
Actually i have a 500 gb hdd.Windows 8 is installed in C drive.I have installed ubuntu in another drive.Now i can see the ubuntu 12.10 option in boot menu.But the problem is that when i enter that option it shows “ERROR INSERT WINDOWS INSTALLATION CD”what should i do?
I can take ubuntu from manually choosing boot options
I also get this error message, though I installed them both on the same drive, but different partitions..
This maybe cause your using UEFI
hi finid
I was trying to dual boot linux with windows 8 but I got a problem here. The link below shows a screenshot while installing linux on my system-

When I select the free space and choose boot partition as primary then the remaining space becomes unusable. So is it possible to select all the partitions of linux including the boot partition as logical.
Yes, all Linux partitions can be logical.
hey finid

I have installed ubuntu and there is some problem. After I choose ubuntu from the boot menu I get the following screen.
Plz Help
From what I see in the first image you showed, the most likely cause of the failure to boot is that the boot partition is too far from the first sector of the disk, or the start of the disk. A boot partition on a 1 TB HDD located at close to the 950 GB mark is way past the point where the system can detect it.
If that’s the correct diagnosis, and I think it is, the best solution is to create the boot partition right after the Windows system partition, which means repartitioning and reinstalling both OSs.
hey i tried googling on this issue nd i found that through grub shell command prompt some commands need to be entered to boot manually or using the linux live cd to fix it. but i am not able to get through with the steps correctly. do u have any idea on this…
the following imformation was taken from the following site-
http://tuxers.com/main/instigating-a-manual-boot-from-the-grub-prompt/
please do give me a solution if possible because reinstalling and repartition is a complete headache
It is very unlikely any method will solve your problem. I think the boot partition is too far out from the first sector of the disk for any method to help.
But I could be wrong. Try the steps given in that article that you found or the one given here.
please reply…
Hi finid
You were wrong in ur earlier statement. I finally worked it out by trying boot repair….removed both grub nd installed new one. Only the boot menu is in ubuntu style but thats not a problem for me…
Thanx for ur help for doing the overall procedure.
I need some assistance. I followed this guide exactly the way you suggested. Everything is working fine except one small issue. The Windows Dual Boot screen is displaying the old command line Windows Boot Manager instead of the Metro bootloader. I googled about it and tried all the settings but this never changes. I’m at a loss for what could be the reason for this.
I do sometimes see the Metro bootloader at random but I don’t know what could have caused it to appear. I really need that metro bootloader because my bluetooth keyboard is not responsive in command line or bios for me to change selection. I have to plug in a wired keyboard just for that which is annoying.
I would really appreciate if you can help me resolve my issue. I have a SSD hard disk on which Windows 8 is installed and a normal hard disk on which Ubuntu is installed.
I think this is a normal behavior with this really semi dual boot installation procedure.
You will see the Metro boot loader after booting up with Windows-8, then shutting down, and restarting your computer.
In other words, the Metro Boot Loader will allow you to switch from Windows-8 to Linux/Unbuntu, not the other way around.
But I’m not seeing it in Restart either. It happens randomly.
Do you get the Metro Boot Loader always?
Yes, I always get the Metro Boot Loader after a full shutdown of Windows-8 then restart of the computer.
— I get the Windows Boot Manager if I select to boot up Ubuntu (from the Metro Boot Loader) then shutdown Ubuntu and restart the computer.
— If I select Ubuntu from the Windows Boot Manager, it brings up Grub the Linux boot loader, from which I can select to boot Ubuntu or Windows or whatever is there.
It is kind of convoluted, but the dual boot works fine and cleanly.
I have installed Windows-8 Professional VL for x64, and the Ubuntu Linux-secure-12.10 for x64, and of course the latest version of EasyVCD 2.2 (you need to download it directly from Neosmart), all on a newly built UEFI system, with a virgin disk, nothing preloaded on it.
Maybe disabling Windows “Fast Startup” can help to avoid the random behaviour/appearance of the metro boot loader.
To get back to metro boot loader from the “old” boot loader I found something in the EasyBCD forum: “…Win 8 > opened easyBCD > Selected “Useful Utilities” > Selected “EasyBCD Power Console” > ran command bcdboot c:\windows > I then rebooted…”
For me this helped, however choosing Kubuntu 12.10 leaves me with the problem Loonbloom descriped (“…it says that the boot file is either missing or damaged, it mentions the file “/NST/AutoNeoGrub0.mbr” as the file that can’t be read…”). Pressing enter brings me back to metro boot loader where Win8 can be started without problems. Although I completely reinstalled Kubuntu, I can only boot it from UEFI/”BIOS”
Have a look at this:
http://www.boyans.net/BootMenuPolicy.html
@Wega–> Somehow, your Linux installation is corrupted. You cannot have more than 4 PRIMARY partitions.
I did this today. After Ubuntu install laptop booted to Grub menu where I could select Ubuntu or Windows 8. For me this is fine even though I like the look of the Windows 8 dual boot OS Select screen more.
However, if you select to boot up Windows from the Grub menu, boot up Windows then restart your computer, you will boot up to the Windows dual boot select screen.
I am assuming you did download and used the updated version of EasyBCD 2.2 , and you saved the new settings as described in the last step of the procedure.
This procedure works well on newly built PC’s if it is strictly followed. Thank you. However,
1. Your digressions and comments about GPT and the MBR are plainly misleading, and you may want to update and remove them from your text.
2. The size of the Linux partitions in your tutorial are questionable. In particular, the size of the swap area is supposed to be twice the size of the RAM on your computer. So 8 GB would be a better recommendation.