One tool that has seen very little or no change over the past several releases in Ubuntu Desktop is the installation program. So it is somewhat surprising that some users are having a hard time dual-booting Windows 7 and Ubuntu 12.04 using a tutorial written for Ubuntu 11.04.
Stemming from comments in that article, and email from readers, I decided to revisit that tutorial using Ubuntu 12.04. So the purpose of this article is to show how to dual-boot Windows 7 and Ubuntu 12.04 on a computer with one hard drive. And it will be on a computer with an existing installation of Windows 7. If there is a need to, you may reinstall your copy of Windows 7.
If you want to attempt this on a computer with two hard drives, see how to Dual-boot Ubuntu 12.04 and Windows 7 on a computer with 2 hard drives.
To get started, download an installation image of Ubuntu 12.04 from here. Depending on your platform, you may download the 32- or 64-bit image. Screenshosts used in this tutorial were taken from test installations using a 32-bit installation image in both a virtual environment using VirtualBox, and on real hardware. In either case, I did not encounter any errors that others have reported, so I am certain that if you follow this guide, you should have a computer with both Windows 7 and Ubuntu 12.04 installed in a dual-boot configuration.
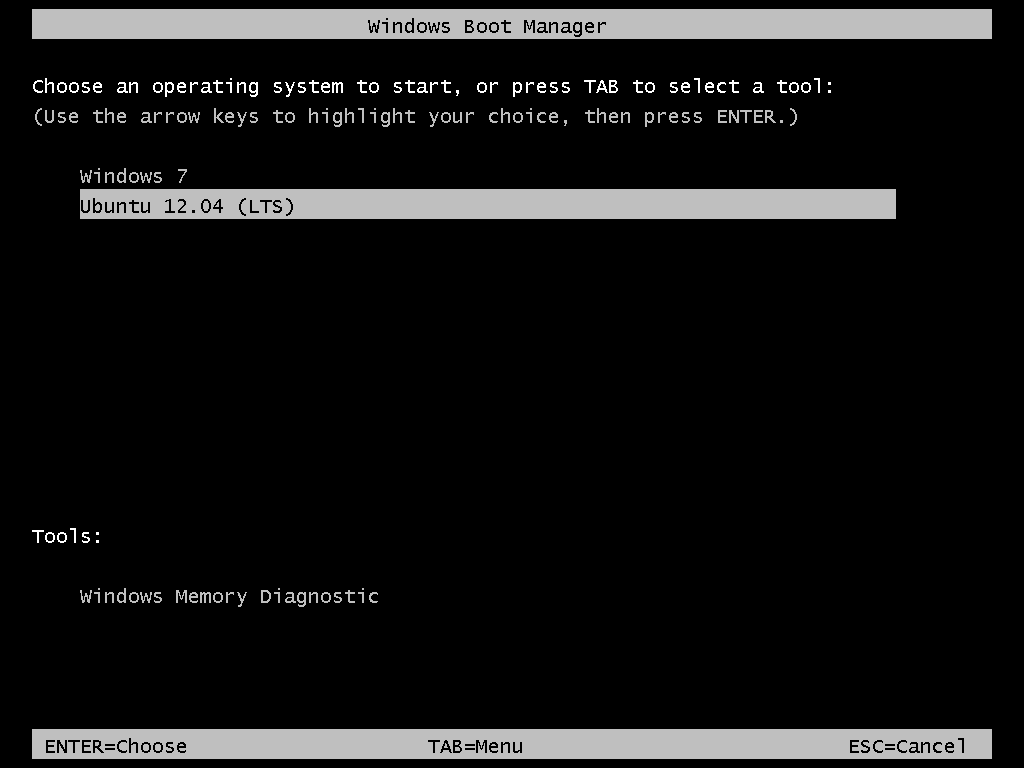
So that anytime you reboot the computer, you should see Windows 7’s boot menu with two entries listed – Windows 7 and Ubuntu 12.04 (LTS). Then you may choose to boot into Windows 7 or Ubuntu 12.04.
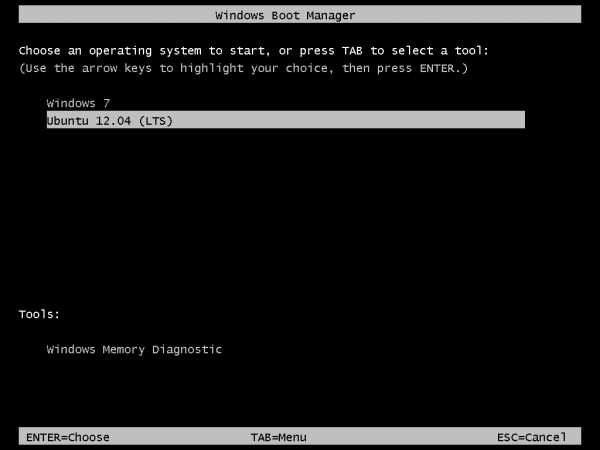
Now that you know what the overall goal is, how do you get from here to there? First, understand that if you have a computer running Windows 7, that Windows 7’s boot manager is responsible for making sure that the system boots. Installing Ubuntu on the same hard drive throws another boot manager into the mix. So the most important decision you are going to make about this, is which boot manager (Windows 7’s boot manager or Ubuntu’s) do you want to be responsible for primary boot operations?
When dual-booting Windows 7 and a Linux distribution on a computer with one hard drive, the best option is to have Windows 7’s boot manager be the primary boot manager. Why? Because whenever you reinstall or update Windows 7, its installer will overwrite anything it finds in the portion of the hard drive where critical boot-related programs are installed. That portion of the hard drive is known as the Master Boot Record (MBR). Also, certain anti-virus programs have been known to mess with the contents of the MBR, so installing GRUB in another location will ease the maintenance headache associated with your system. This point determines where GRUB will be installed.
If you are not familiar with disk partitioning (in Linux) and dual-booting, it is highly recommended that you read guide to disks and disk partitions in Linux and tips for dual-booting Windows and Linux.
By default, a new installation of Ubuntu 12.04 is installed on two partitions – a main partition, and Swap. The main partition is usually a primary partition and the Swap, a logical partition. And if Ubuntu is the only operating system on the hard drive, you will see both partitions labeled /dev/sda1 and /dev/sda5. Because you are going to install it on a computer with another operating system on it, the partitioning scheme will have to change.
The recommended partition scheme that will work better with the system you are about to install will have at least three partitions. They are the:
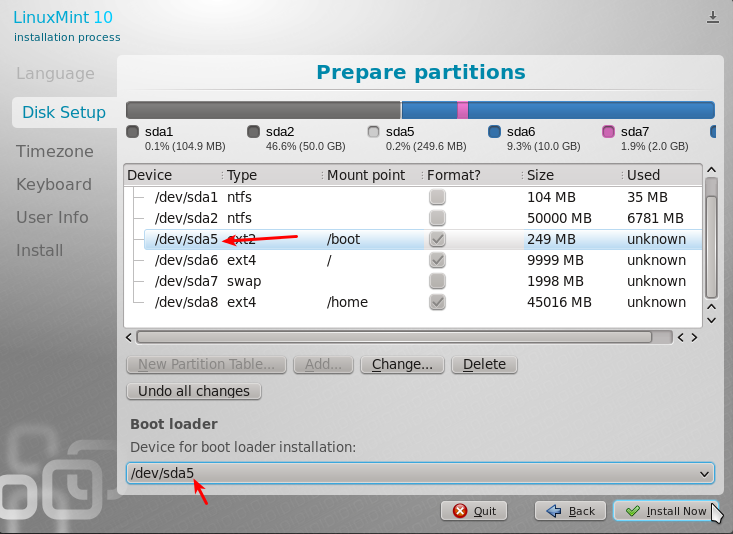
- Boot partition – This is where GRUB will be installed, instead of in the MBR. Installing GRUB in the boot partition is where users have encountered errors, so pay particular attention to what you do with this partition
- Root partition – This is where all the programs will be installed
- Home partition – This is optional, but it helps to have your files and folders on a separate partition
- Swap space
I think what you need to do should be pretty clear now. Time to begin the process! If you have not done so already, burn the installation image (of Ubuntu 12.04) you downloaded to a CD or transfer it to a USB stick, and boot the computer from it. When booted from the CD, you will be given the option to boot into a Live Desktop or start the installation without visiting the Live Desktop. It does not matter which option you choose, but booting into the Live Desktop and starting the installation from there seems to be a very good choice.
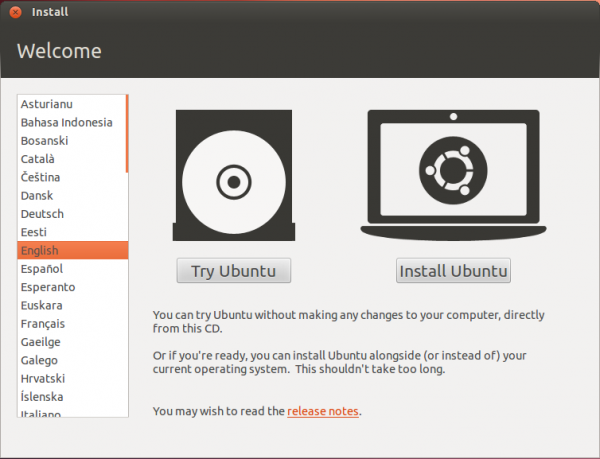
Whether the installation process is started from the Live Desktop or not, clicking through the installer gets you to the step shown in the image below. The most important information here is the minimum disk space (4.4 GB) recommended for a successful installation of Ubuntu 12.04. That piece of information will help you determine how much disk space to allocate to the root partition.
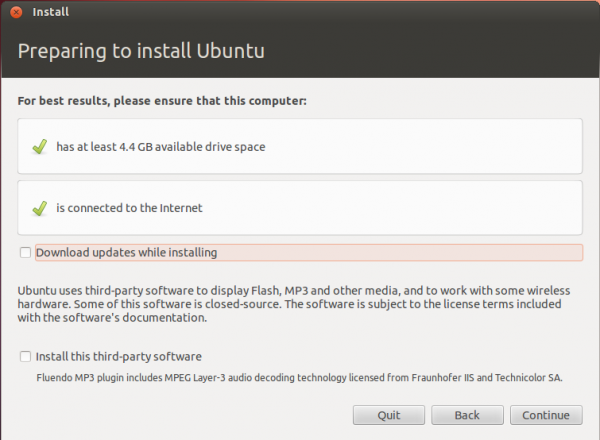
Clicking Continue from the previous step will land you here. If, as in this example, you have Windows 7 installed on the target hard drive, you should see the same three options shown here. Because you will be creating partitions manually, the option you want to select is Something else.
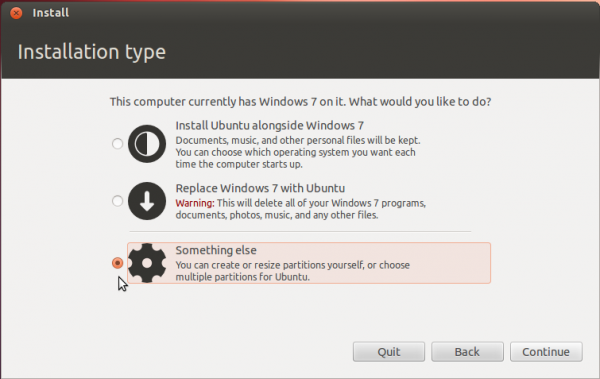
That should bring you to the Advanced disk partitioning tool. Again, if we are operating from the same point, that is, if you have a default installation of Windows 7 on the target hard drive, you should see two ntfs partitions (/dev/sda1 and /dev/sda2) listed. The main Windows 7 partitions, also popularly known as the C drive, is your sda2. To install Ubuntu, you will have to resize that partition. Note: If have free unallocated space on the hard drive, you do not have to go through this partition resizing process. To resize the partition, select it and click the Change button.
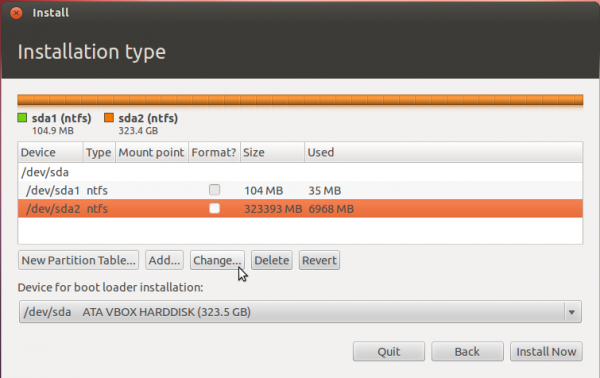
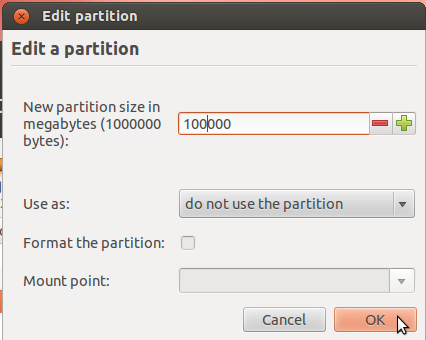
That should open this window. The only thing to do here is tell the installer how much disk space you want to keep for Windows 7. The rest will be used for Ubuntu. The system used for this tutorial has about 324 GB of disk space. I chose to keep 100 GB for Windows.
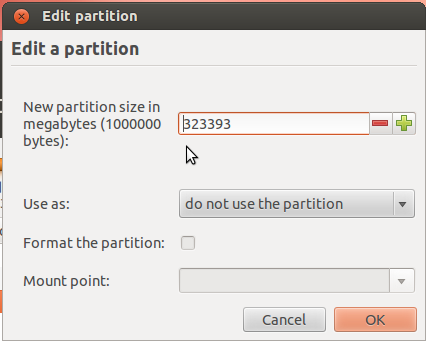
So the window now looks like this. Click OK.
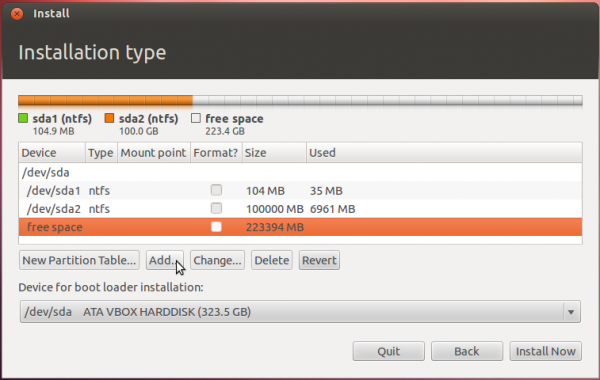
After the partition has been resized successfully, you should see the freed space marked as free space. Select it and click Add to start creating partitions for Ubuntu 12.04.



dear sir
what to do if the unpatitioned space made from manage option of windows 7 desktop and restarted with ubundu12.4,and not getting freespace.then we made all portion of disk free space since we saw the option revert is possible.but un fortunately windows7 refused to boot.how can i regain the windows 7 booting.we stopped ubundu instalation when it shows full as free space and re started but no use.
regards
jkj
Hi,
Like I’ve mentioned previously in comments before, following this guide to a ‘t’ helped me to properly set up a Windows 7+Ubuntu 12.04 environment.
I would like to upgrade to Ubuntu 13.04, can you tell me if I can try to directly upgrade from the Update Manager from Ubuntu, or will that cause problems given that GRUB isn’t in the MBR?
It should work just fine.
Help. i can’t “change” the sda2( C: ). there is no option of new partition .
Why not provide some more detail on your setup. What’s the size of the HDD, and how many partitions total are there?
Thanks for your detailed information. I could install Ubuntu 12.04 LTS with Windows 7 dual boot by myself without any problems.
dear sir,
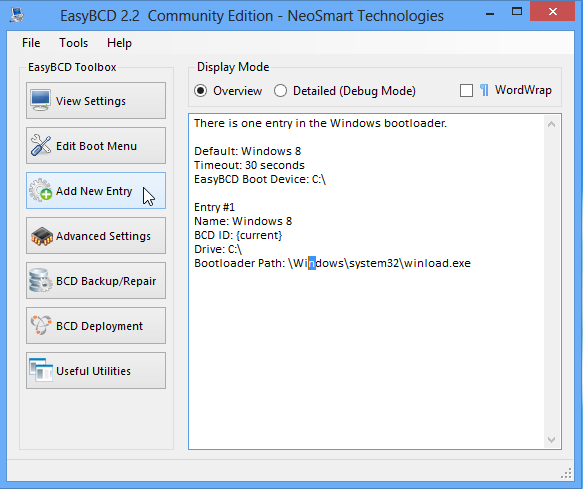
i installed ubuntu 12.04 along with my windows 7 , initialy by dvd_RAM and there i gave install it ,,, i partitioned as per the website ,, and after all of that i boot and got windows there i installed EasyBCD and gave linuxUbuntu and GRUB2 options for boot and made ubuntu as my default boot loader.. then i restarted and selected ubuntu in that ….
then i got BLACK SCREEN WITH SOME COMMANDS AND AT LAST
“grub>”
what i have to do??? please help me 🙂
I ran into very similar problems. I have two hdds and the easybcd INSISTS on setting my second hard drive as the location of the Ubuntu installation, even though it is not. I tell it to use the partition I created and it sees it, but once I save it it changes the Linux boot to point to that other hard drive. Apparently if I didn’t have the second hard drive, it would give me the empty prompt like you got. The author has either very luckily got some sort of configuration that just happens to work, or he did some other work that he didn’t mention, despite his claim to the contrary. I’m scouring the easyBCD forums for an answer to all this, apparently it’s a pretty common problem.
If you are dual-booting using 2 HDDS, you do not need to use EasyBCD. Just make the Ubuntu HDD the default boot disk from the BIOS.
I’m not using the other HDD as the “Linux” drive. I’m using it as a hot backup drive. Anyway, after much research, I’ve concluded that easyBCD is a buggy, unfinished mess and therefore completely pointless at this time.
Sometimes, the issue is not EasyBCD, but how far the Linux boot partition is from the first sector of the HDD. People have used Boot Repair to fix that.
Try using Boot Repair. See this link for details.
My problem, so far, is not that any part of my boot partitions are broken, it is that easyBCD recognizes EXT4 partitions, lets you select them when setting up a new boot point, then ignores the fact you did so and stupidly substitutes your selection to the next windows drive letter when you hit Save.
Really great guide, thanks! Before I start, I am a little hazy on the subject of the partitions mentioned:
I have win7 as the primary OS today, and on the same disk I have an empty primary partition that I intend to use for Ubuntu 12x.
Is the root partition a requirement if I intend to use Windows boot manager? Or could I just stick with two partitions for Ubuntu (boot = 20GB and swap = 8GB (double my RAM)), and still get the intended effect?
The root partition is required, so you can create just root and Swap, though it is highly recommended that you also create a separate boot partition. It makes it easier to troubleshoot stuff.
You don’t need to double your RAM. 2 GB for a 32-bit system is enough, and 4 GB for a 64-bit system.
This guide worked perfectly for me on my Windows Vista system. I can now dual boot without issue and I am using the Windows Bootloader to control the dual boot process as opposed to GRUB.
However, after running clamTK within Ubuntu on my Windows C:/ drive it found numerous threats which I then quarantined. Now when I boot into Windows none of my apps/programs function. I can boot up but almost all the apps won’t open and I can’t get a network connection.
Prior to installing Ubuntu I created a full system image of Windows to an external drive. Can this image be restore without affecting the Ubuntu partition?
If not, what is the easiest way to remove Ubuntu and resize the Ubuntu partition to give the space back to my C:/ drive. What I am looking to do is remove the Ubuntu partition, restore the system image and then reinstall Ubuntu again. Thanks.
From ClamTK’s home page, it is a “light-weight, on-demand scanner for Linux systems.” What’s the point of using it to scan a Windows drive?
In any case, nothing you do on the Windows side will impact Ubuntu, unless you mess with the Ubuntu partitions. So go ahead and try to restore Windows from the backup image you created.
ClamTK can be used to scan a Windows drive to verify if it is infected. It has been recommended by many websites when I was doing research, even in the Ubuntu forums. Examples below.
http://lifehacker.com/5492593/use-linux-to-scan-unusable-windows-drives-for-viruses
http://dwmallisk.blogspot.ca/2012/07/using-linux-to-rescue-windows.html
Thanks I am glad that the Ubuntu partition won’t be affected. However, I made the system image prior to installing Ubuntu and partitioning my drives as per this guide. If I was to restore my image will the windows bootloader still recognize that I have 2 OS’s occupying the system? Or will I have to run EasyBCD again?
It should, but if not, you can always rerun EasyBCD.
Thank you for your prompt responses. I will give it a try and report back. Much appreciated.
So I ended up having to restore my Windows system image that I created prior to installing Ubuntu with this guide. It worked and got Windows back to how it was prior to the install, but it also completely deleted my Linux partitions in the process as well.
So, I am going to have to follow this guide again, which worked great the first time around.
I have a question though, I have an HP desktop computer with a primary C:/ Drive but also a Factory Image D:/ Drive. Would you recommend or is it safe to remove the D:/ Drive? I am using Vista. It’s 13GB in size and I could add it to the C:/ first before creating the Linux partitions. I just don’t know if this is recommended. Thanks.
Depends on what’s on D and if you’ve ever used it or will ever use it. Those factory-image drives tend to be recovery partitions, which tend to be rarely used. So determine what it’s for and if it’s worth keeping. If it’s not, you can just delete this and use the space for other stuff.
I believe you are correct, the drive is used as the recovery partition for the system in case something goes wrong. I have never used the drive before or touched any of it’s contents.
I was just wondering if it is safe to do so or recommended to remove? Can I backup this drive to an external hard drive or just create backup disks instead?
If you have an installation disk, I don’t see a real need for that partition. If you do, might as well delete it and reinstall if you ever need to.
Thanks, I will create install disks and delete the partition. Appreciate all the help thanks.
I noticed that for the Linux boot partition, you keep it as “logical”, whereas in the similar tutorial “How to dual-boot Linux Mint 13 and Windows 7”, you make it “primary”. What’s the best choice? Does it matter?
It does not matter. Linux will boot from both primary and logical partitions.
I have a Windows 7 machine and am trying to install Ubuntu 12.10 as a dual-boot. I can install Ubuntu within Windows 7 where it works fine, but I want to do real work with it (run Python and Sphinx primarily) so I need to partition it.
My problem is that I cannot get my machine to recognize that I want to boot from my DVD (I have also tried a USB thumb drive, also no luck). When I go to boot options (F12), I try to put my DVD in the default position, but I can’t even find it in the list. When I run EasyBCD, it says that it knows exactly where the Ubuntu ISO resides, but it does not.
Have you tried getting into the BIOS to see what’s going on at that level?
I have installed Ubuntu in my win 7 as per the instruction. However when I am booting by opting Ubuntu 12.04.Its directly going to grub. And Now what ??
Do you mean a GRUB menu or a grub > prompt?
Hi , I am getting grub > prompt. I am new to Ubuntu(Linux).don’t know how to proceed.
GRUB was not configured properly. Try the fix given here, under the “Encountering the dreaded GRUB 2 boot prompt” section.
I have installed Ubuntu 12.04 64 bit without internet connection. is this a problem. I just wnat to know can I use Boot-Repair CD to fix the GRUB problem.
Sure, give it a try. Let me know if it worked for you.
Installing Ubuntu without Internet connection is not a problem. However, you need Internet access to get updates.
I have made dual boot of Ubuntu 12.04 and Windows 7..!! And now my windows has got corrupted and I want to reinstall my windows 7. But i have my important project work on Ubuntu 12.04 OS, so are there chances of Ubuntu getting affected due to Windows installation? I have seperate partion for both Windows and Ubuntu, and i want my boot loader to load from Ubuntu and not from Windows.
give me proper solution please its too important and urgent.
Not if it’s done right. But the first thing you do, is backup your data. Then proceed with the reinstallation of Windows, making sure to leave Ubuntu’s partitions untouched during the process.
Note that after installation of Windows,, its boot loader will be installed in the MBR. So if you want Ubuntu’s boot loader to be the master boot loader, you will first have to be able to boot into Ubuntu, which means adding an entry for it in the Windows boot menu.
After that, boot into Ubuntu and type sudo grub-install /dev/sda, followed by update-grub.
You should then be able to have GRUB as your boot loader.
Thanx for ur advice.. but didn’t got your point upto the mark.. if possible elaborate a bit easier.. m new for ubuntu..
I guess this means:
1. reinstall win7, somehow restricting it to
use its 2 partitions? (But these days win7 uses
3 partitions! 1 system, 1 c-drive, 1 recovery.
This is a big problem with the suggestions here
about dual booting – win7 and hp or whoever uses
up 4 primary partitions, probably with malice
aforethought.)
And you need a windows DVD; no-one
has such a thing anymore. It would be helpful to tell how to create one at a time of one’s choosing.
How to protect the Linux partitions?
2. use easybcd in win7 to add linux as a bootable
option.
3. Boot into linux and replace the win7 boot program
in the MBR with grub2. (But why, if we can now run Linux?)
2.
i have a dual boot windows 7 and xp machine (4 partition – 1st for 7, 2nd for xp , 3rd n 4th for my data) . Now i want to make a Dual boot win 7 and ubuntu 12.10, just want to ask what if i dont create four different partition as u told and install ubuntu directly into the 2nd paptition ??
You can install Ubuntu in partition 2 only after you delete it, which means deleting XP. Is that your aim? Are you willing to lose XP?
If “yes,” you can then use the recovered space from the XP partition and use it to create logical partitions for Ubuntu.
And note that in a dual-boot setup, it’s better to have three partitions for Ubuntu – /boot, /, and Swap. You can get away with just / and Swap, but those three work best.
Hi! I’ve made a stupid mistake: I thought this could work for Windows XP too. And it certanly did, except when you must tell windows that another operating system is installed using EasyBCD. The problem is that EasyBCD doesn’t work with XP only!
How can I do now?! I’ve already installed my Ubuntu 12.04 but I can’t boot!
=(
well, can you boot into Windows?
Yes, I can. It starts normally!
Is it possible that I would need to edit boot.ini or something like that?
Please help! I want to use Ubuntu!
Well, I’ve found the solution finally.
You need to add a copy of the boot partition’s 1st sector to your C:\ folder and then add a line to boot.ini to tell Windows to execute the file. This is fairly easy.
First, boot your linux CD and open a terminal.
If your boot partition is sda5 type:
sudo dd if=/dev/sda5 bs=512 count=1 > ubuntuMBR.bin
Then copy the ubuntuMBR.bin file to your C:\ directory.
Next, boot into XP and add a reference to ubuntuMBR.bin to the end of boot.ini. See: http://support.microsoft.com/kb/289022
You need to add something like:
C:\ubuntuMBR.bin=”Ubuntu”
to the end of boot.ini.
i have send the screen shots to contact@. Check your mail.
I’ve replied. Check your email. Be going to bed in the next 15 minutes, so If you don’t reply within that time, expect an answer when I wake up.
I m having windows 7 n in that i have 4 partition.one for windows7,one for system(default),one for my data storage and one is totally blank in which i wan to install ubuntu.
but when partition wizar came while installing ubuntu i was not able to see my partition.it only show system(deafault) and two other that i dont know.so i want to install ubuntu on that free partition so what can i do please help me.
and sorry for my poor english.
it shows
sda
sda1-1mb
sda2-ntfs-208mb
sda3-ntfs-157286mb
sda4-ntfs342610mb
i have 20gb partiton free on windows which doesnt appear here.
With that 1 MB sda1, it looks like the partitioning scheme that Windows 7 used is GPT-based. That’s likely why the Ubuntu installer cannot see the partitions.
What edition of Ubuntu are you trying to install?
Ubuntu 12.10 amd64 as i have 64 bit laptop.
Could you send me screen shots of the Advanced Partitioning Tool step of the Ubuntu installer and the Windows partition manager, so I can see the partitions fro both ends?
If you can , see them to the email on my contact page.
I ran into the same issue last night. What I found on another post helped me sort it out.
what you want to do is backup your win7 isntallation and everything on it as you will need to install win7 again. I had no problems doing this as it was a clean install for me.
then with ubuntu’s gparted application layout the partition scheme, make 2 nfts partitions for windows and any aditional partitions including one for ubuntu, mark your first partition as the boot partition (boot flag it), then install win7 to that partition, once that is completed you can pop the ubuntu disk in and ubuntu will recognized the partions you created with gparted (giving you the 3 options) and will allow you to then follow the rest of guide here. I spent hours trying to get to work out the gpt bug but I couldn’t so a full clean install with partition in gparted terms is what you need to get this to work. if there’s a simpler solution that can correct the gpt issue avoding having do to a repartitioning-reinstall for win7 I’d be happy to know.