Linux Deepin is a desktop distribution based on Ubuntu Desktop that was recently added and reviewed on this website. (See Linux Deepin 11.12.1 review.)
It uses a heavily modified GNOME 3 desktop, and though it is based on Ubuntu, a new installation of Linux Deepin 11.12.1 does not have any of the network security applications that you find on Ubuntu enabled: A default installation of Linux Deepin 11.12.1, the latest edition, will leave your computer wide open for the bad guys to mess with.
This tutorial shows how you can install IPTables, the Linux firewall application, ufw, a command line frontend to IPTables, and Gufw, a graphical interface for managing ufw, the Uncomplicated Firewall, on Linux Deepin 11.12.1. The idea is to enhance the network security profile of your Linux Deepin installation. Before continuing, you might want to read why your computer needs a firewall enabled.
Installing these application can be accomplished from the command line or from Deepin Software Center (DSC), a graphical application for installing software on Deepin. Either method is easy, but let me present the graphical method first. From the panel, click on the icon of DSC (by default, there are seven icons on the panel. DSC is the fourth from either end).
When DSC starts, click on the Repository tab, then type “gufw” in the search field. Gufw should be the only entry in the search result. Click Install to install it. Because Gufw depends on ufw, which in turn depends on IPTables, you only need to install Gufw. The other packages will be installed with it, as they are dependencies. If you are new to Linux Deepin, DSC will not inform you about the dependencies. It will just install them in the background.

Installing from the command line is just as easy. first, launch a terminal. This screen shot shows where to find it.

When it launches, simply type sudo apt-get install gufw. Gufw, along with the other packages, will be installed.

Whether you installed it from DSC or from the command line, you will find an entry for Gufw in Applications > Other > Firewall Configuration. Click on it. Once it starts, you will notice that it is disabled by default. To enable it, first unlock it by clicking the “key” icon on the bottom right of the window. You will be asked to authenticate.

After authenticating, click on the Status switch. It will change from Off to On. Now, the firewall is enabled, and your computer has a network security layer and an improved network security profile, one that is much better than the default. If you do not enable any service on your computer that you need to access remotely, then you do not need to add any rules. This is because the default policy allows all outgoing connections, while denying all incoming connections, except those with an entry in the State table, that is, those that are related to an outgoing connection. This is called Stateful Inspection. If you need to add any rule, just click on the “+” button at the bottom left of the window.

This is the rule addition window. The three tabs give you the option to create rules using pre-configured applications and services, simple (broad) rules, and more granular or specific rules. If you need to enable a service that you want to access from other computers within your network, create rules from the Advanced window. Why? It allows you to create rules with specific IP addresses and ports from which a connection will be accepted.

For example, the next three images show how to create an advanced rule to allow ssh connections only from the local network. In this type of rule, the incoming port number (From), and the target (To) IP address are optional. The From address can be a specific address, like 192.168.1.2 or a whole subnet, like 192.168.1.0/24. So, to create the ssh rule, you can specify the fields as shown in this image.

Or as shown in the one below. Both are the same. After all the fields have been specified, click Add, then click Close to close the window.

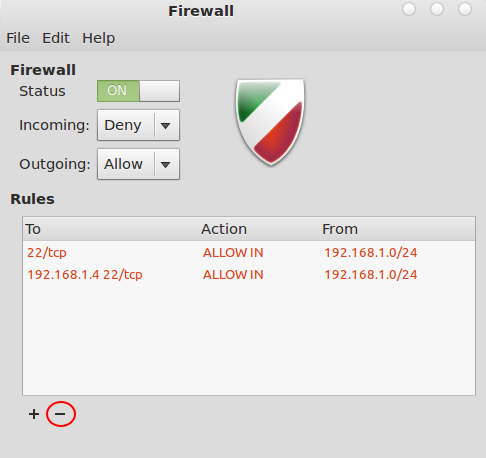
You should see the rules listed in order on the main Gufw window. Note: The two rules shown here are the same. Just one is needed. To delete a rule, select it and click on the “-” button.


that is the second thing….
the 1st is removing ms-mono 😉
sudo apt-get purge cli-common mono-runtime
Assuming that does not affect dependent apps.
I wrote a bunch of UFW application profiles for Ubuntu:
http://jhansonxi.blogspot.com/2010/10/ufw-application-profiles.html
The latest version is included in my Ubuntu kickstart support archive:
http://jhansonxi.blogspot.com/2011/12/full-featured-ubuntu-online.html