One tool that has seen very little or no change over the past several releases in Ubuntu Desktop is the installation program. So it is somewhat surprising that some users are having a hard time dual-booting Windows 7 and Ubuntu 12.04 using a tutorial written for Ubuntu 11.04.
Stemming from comments in that article, and email from readers, I decided to revisit that tutorial using Ubuntu 12.04. So the purpose of this article is to show how to dual-boot Windows 7 and Ubuntu 12.04 on a computer with one hard drive. And it will be on a computer with an existing installation of Windows 7. If there is a need to, you may reinstall your copy of Windows 7.
If you want to attempt this on a computer with two hard drives, see how to Dual-boot Ubuntu 12.04 and Windows 7 on a computer with 2 hard drives.
To get started, download an installation image of Ubuntu 12.04 from here. Depending on your platform, you may download the 32- or 64-bit image. Screenshosts used in this tutorial were taken from test installations using a 32-bit installation image in both a virtual environment using VirtualBox, and on real hardware. In either case, I did not encounter any errors that others have reported, so I am certain that if you follow this guide, you should have a computer with both Windows 7 and Ubuntu 12.04 installed in a dual-boot configuration.
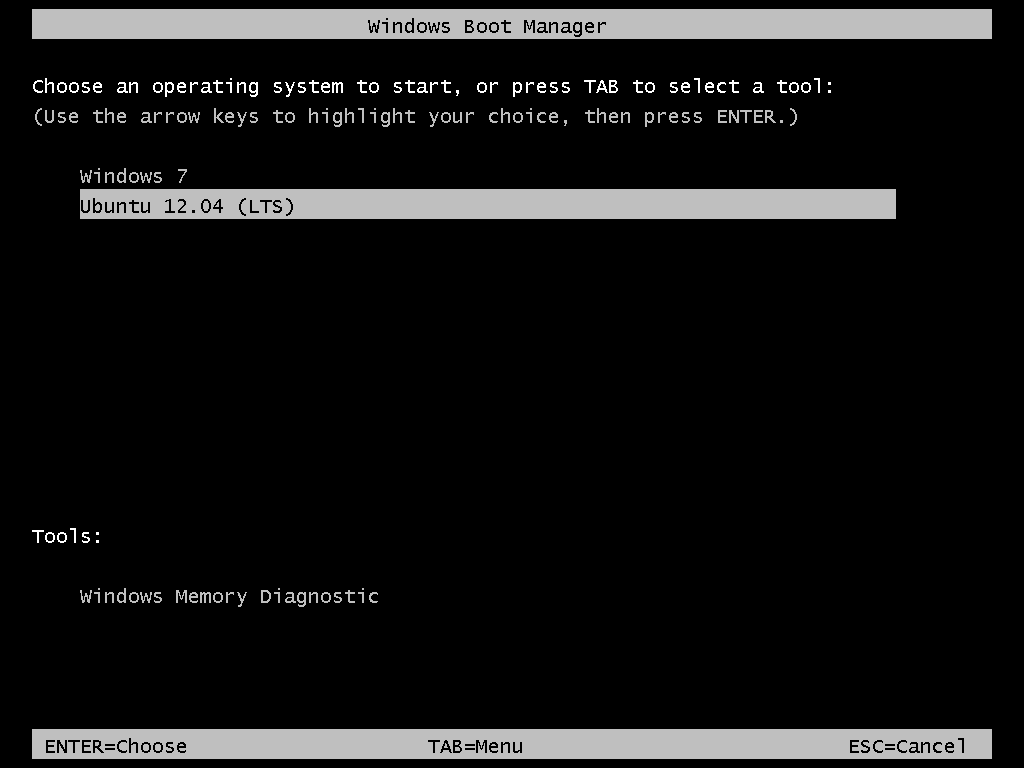
So that anytime you reboot the computer, you should see Windows 7’s boot menu with two entries listed – Windows 7 and Ubuntu 12.04 (LTS). Then you may choose to boot into Windows 7 or Ubuntu 12.04.

Now that you know what the overall goal is, how do you get from here to there? First, understand that if you have a computer running Windows 7, that Windows 7’s boot manager is responsible for making sure that the system boots. Installing Ubuntu on the same hard drive throws another boot manager into the mix. So the most important decision you are going to make about this, is which boot manager (Windows 7’s boot manager or Ubuntu’s) do you want to be responsible for primary boot operations?
When dual-booting Windows 7 and a Linux distribution on a computer with one hard drive, the best option is to have Windows 7’s boot manager be the primary boot manager. Why? Because whenever you reinstall or update Windows 7, its installer will overwrite anything it finds in the portion of the hard drive where critical boot-related programs are installed. That portion of the hard drive is known as the Master Boot Record (MBR). Also, certain anti-virus programs have been known to mess with the contents of the MBR, so installing GRUB in another location will ease the maintenance headache associated with your system. This point determines where GRUB will be installed.
If you are not familiar with disk partitioning (in Linux) and dual-booting, it is highly recommended that you read guide to disks and disk partitions in Linux and tips for dual-booting Windows and Linux.
By default, a new installation of Ubuntu 12.04 is installed on two partitions – a main partition, and Swap. The main partition is usually a primary partition and the Swap, a logical partition. And if Ubuntu is the only operating system on the hard drive, you will see both partitions labeled /dev/sda1 and /dev/sda5. Because you are going to install it on a computer with another operating system on it, the partitioning scheme will have to change.
The recommended partition scheme that will work better with the system you are about to install will have at least three partitions. They are the:
- Boot partition – This is where GRUB will be installed, instead of in the MBR. Installing GRUB in the boot partition is where users have encountered errors, so pay particular attention to what you do with this partition
- Root partition – This is where all the programs will be installed
- Home partition – This is optional, but it helps to have your files and folders on a separate partition
- Swap space
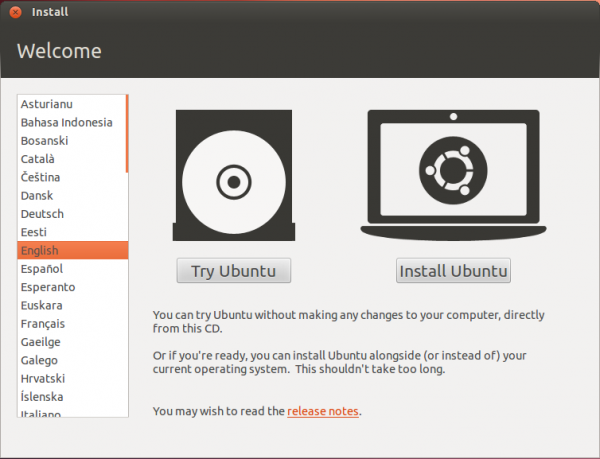
I think what you need to do should be pretty clear now. Time to begin the process! If you have not done so already, burn the installation image (of Ubuntu 12.04) you downloaded to a CD or transfer it to a USB stick, and boot the computer from it. When booted from the CD, you will be given the option to boot into a Live Desktop or start the installation without visiting the Live Desktop. It does not matter which option you choose, but booting into the Live Desktop and starting the installation from there seems to be a very good choice.
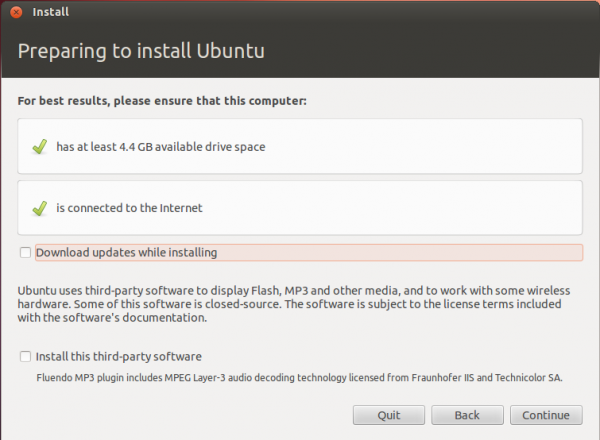
Whether the installation process is started from the Live Desktop or not, clicking through the installer gets you to the step shown in the image below. The most important information here is the minimum disk space (4.4 GB) recommended for a successful installation of Ubuntu 12.04. That piece of information will help you determine how much disk space to allocate to the root partition.
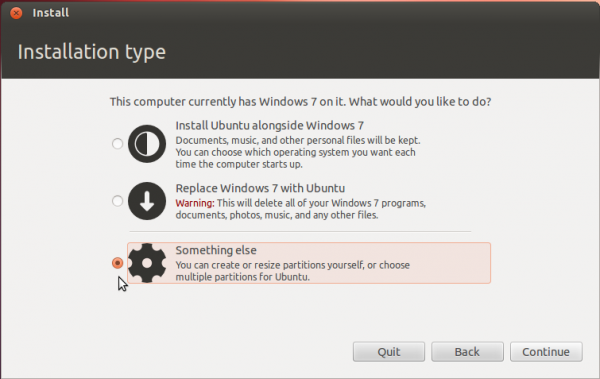
Clicking Continue from the previous step will land you here. If, as in this example, you have Windows 7 installed on the target hard drive, you should see the same three options shown here. Because you will be creating partitions manually, the option you want to select is Something else.
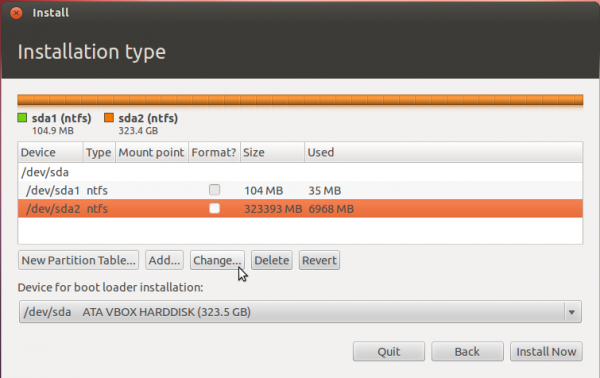
That should bring you to the Advanced disk partitioning tool. Again, if we are operating from the same point, that is, if you have a default installation of Windows 7 on the target hard drive, you should see two ntfs partitions (/dev/sda1 and /dev/sda2) listed. The main Windows 7 partitions, also popularly known as the C drive, is your sda2. To install Ubuntu, you will have to resize that partition. Note: If have free unallocated space on the hard drive, you do not have to go through this partition resizing process. To resize the partition, select it and click the Change button.
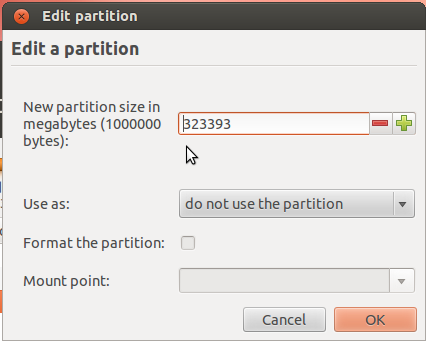
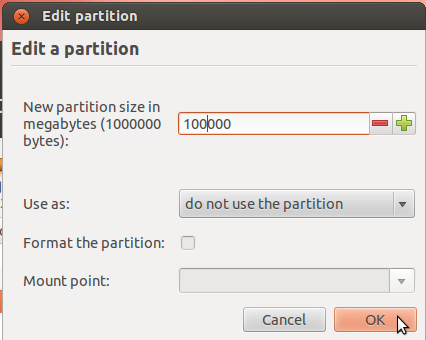
That should open this window. The only thing to do here is tell the installer how much disk space you want to keep for Windows 7. The rest will be used for Ubuntu. The system used for this tutorial has about 324 GB of disk space. I chose to keep 100 GB for Windows.
So the window now looks like this. Click OK.
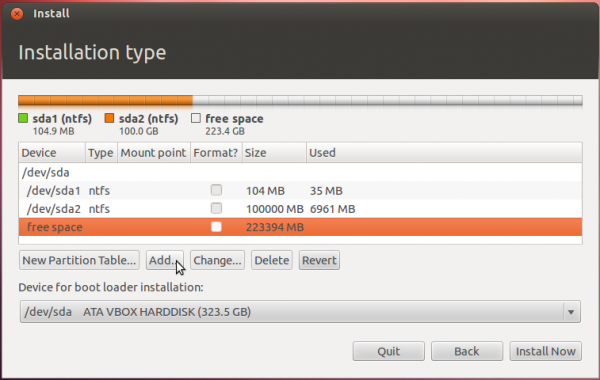
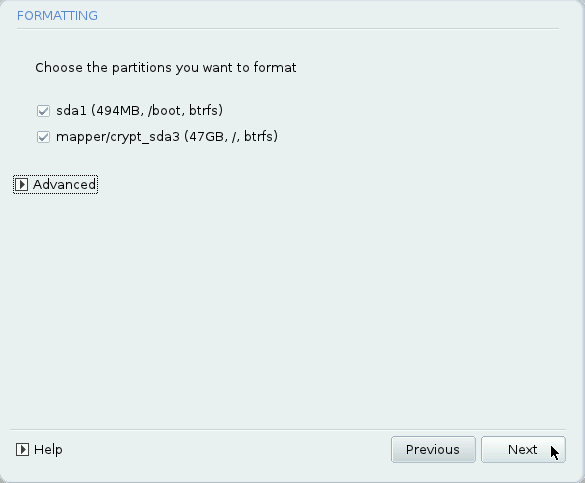
After the partition has been resized successfully, you should see the freed space marked as free space. Select it and click Add to start creating partitions for Ubuntu 12.04.


Hello,
To begin, thanks for the great instructions. I am using a dual boot Windows 7 Pro with Ubuntu 12.04 as of last spring. There is one problem that keeps cropping up. After updating packages, there are low space warnings in the boot partition. To fix, I deleted some of the old packages using nautilus, but that was messy and caused errors. Now I use the Synaptic Package Manager without errors.
My question, wouldn’t it be better to increase the boot partition size, so this doesn’t have to be done so frequetntly? If so, what size would you recommend?
500 MB is just about right. That’s more than the default size in a new installation of Ubuntu, when LVM disk partitioning is used.
If your /boot is 500 MB and you get disk space issues, you might want to remove old kernel entries there. How many kernel entries do you see in GRUB’s boot menu?
There is just one Kernal entrie on the Grub boot menu. I had to remove the old kernels. As I said, I used nautilus before, but that caused and error with part of the package missing. I rebuilt the package with Synaptic Package Manager, and now there are no more out of boot space errors too. Next time, I plan on using Synaptic Package Manager to clean out the old kernels.
Hi, thanks a lot for this tutorial, it’s really helping me.
I just have one question: I’m trying to install it right now and I have the problem that I can’t change the disk space for sda2, it also says that the ‘used’ space is unknown..
what should I do?
How many primary partitions do you have? More info about the HDD and system would also help.
I figured it out after all 🙂 thanks for your reply and the awesome tutorial!
hi, i want to install ubuntu in drive D instead of C because my C drive is only 20 GB and windows 7 is using most of its space, so should i resize drive D: and install ubuntu in D or not?
thank you
The answer is, yes, you can. Provided you don’t have data on D that you want to keep.
Question: Is D a partition or a separate hard drive?
no D is a partition but D has some data that i want to keep, lets say i give 20 GB to D while installing ubuntu for my data like in this tutorial it has given 100 Gbs to C for windows 7 files, can i do that with my drive D and save my data while resizing/creating new partitions for ubuntu from the same partition that is D?
Yes.
While following the above procedure during the partition re-allocation I am not getting a partition called free space. Instead the new partition created is being displayed as unusable. Also when I click on the new (unusable) partition I cannot select any option such as add, change etc., except revert.
It’s likely that you are using an MBR partitioning scheme and have maxed out the number of primary partitions it allows you to create. That number is 4. See Guide to disks and disk partitions in Linux.
How many primary partitions do you have on Windows?
Yeah. I think that is the problem.I already have 4 partitions including Windows boot partition.
Thanks for the quick reply.
If you already have 4 primary partitions, then your options are:
1. Delete one of the partitions that you can afford to do without and use it to create the partitions for Ubuntu.
2. Get another HDD or SSD and install Ubuntu on it.
I combined two partitions. I am going to follow the above steps now.
Thanks for the help.
I have the same problem as Sebastian below. However when I try to edit the file /etc/default/grub it opens in read-only mode.So I can’t save the changes. Can you please help me to get around this?
You need root privileges to edit that file, so use sudo nano -w /etc/default/grub to edit it.
Yeah. Got it this time. Thank you very much for your help.
Hi, I followed the steps to dual boot, but I encountered the problem that after I choose ubuntu to start, it only shows the black cmd window. and I tried twice for installation of ubuntu, it’s the same problem. I have no idea what I am going to do now… maybe u can just help me out, thx.
Please address this issue because I am having the same results.
Nothing knowing any other info about your PC and HDD, try Boot Repair.
And come back and tell us if it worked or not.
Hello, thanks for this excellent guide!
The only thing that’s kind of awkward with my installation is that after choosing ubuntu in the first bootmenu, I get sent into another bootmenu where I have to choose ubuntu or windows again… any idea on how to fix this?
I’m using Windows 7 and XBMCbuntu (which is basically Lubuntu 12.10)
Thanks in advance!
in Ubuntu, edit the file /etc/default/grub and change GRUB_TIMEOUT=10 to GRUB_TIMEOUT=0. Then run
<strong>sudo update-grub</strong>.Wow, thanks for the speedy reply!
This did the trick, I can now boot smoothly to either Windows or XBMC 🙂
Great work!
This tutorial worked perfectly for me when I installed Ubuntu 12.04 and Linux Mint. I have now installed Elementary OS Luna (which is based on Ubuntu 12.04) and it isn’t working the same way.
The first time I installed Elementary and rebooted I was able to boot into the OS no problems. Then after running updates on the system and installing the recommended drivers it asks me to reboot. After doing so I can’t boot into Elementary. I have the option for Elementary, but when I select it it quickly flashes two lines of code at the top of the screen and then just goes to a black screen. Won’t go any further.
I can boot into Windows without an issue, I have even removed the Elementary OS boot option for Easy BCD and readded it and it still won’t boot.
Not sure how to proceed or why it won’t boot in. I followed the steps exactly. Thanks.
what if it doesnt give you an option to boot on ubuntu
If done correctly, that is, if Ubuntu is installed last, there should be an entry to boot in to Ubuntu, right above the one to boot in to Windows.
I followed your tutorial step by step and it will not dual boot. Once I choose Ubuntu in the boot menu it says grub4dos 0.4.5c 2012-06-19,
It then asks me to input a command and when I type boot, it says the kernel must be loaded before booting. I am using a custom built computer and using windows 7 and Ubuntu 12.04. Any help is greatly appreciated.
I have this exact same problem but with ubuntu 13.04 and linux mint 15.
I meant to say dual booting with windows 7 and ubuntu or dual booting windows 7 with mint.
Same problem. Installed following directions. On boot I get a choice of Windows 7 or Ubuntu 12.04. I pick Ubuntu and get to a Grub2 command line program.
One difference from your excellent tutorial noted when using EasyBCD — the image of Add Device shows: Device:(Automatically configured). I selected “Automatically locate and load”. Didn’t work. I tried “Partition 3” — where /boot is. Same result. For Drive options I see C:\ (which EasyBCD picked) and BOOT. When I tried BOOT I got an error message saying Windows 7 could not be installed due to an error in \NST\AutoNeoGrub0.mbr.
Help, please!
Try Boot Repair.
Thanks!
I downloaded a current version of Boot-Repair, burned it to CD, booted from the CD and Created a Bootinfo Summary just to have a record of the busted status at that point.
Then I booted from the CD again and ran Recommended Repair.
If I read the Bootinfo Summary correctly, /dev/sda3 (the Ubuntu boot sector) was of system type Extended but should have been ext4.
After running Boot-Repair’s Recommended Repair it appears I have GRUB (not GRUB2) installed. On boot I see:
GNU GRUB version 1.99-21ubuntu3
Ubuntu, with Linux 3.2.0-52-generic-pae
Ubuntu, with Linux 3.2.0-52-generic-pae (recovery mode)
Windows 7 (loader) (on /dev/sda1)
Windows 7 (loader) (on /dev/sda2)
The third choice still manages to load Windows 7.
The first choice gets me to an Edubuntu login prompt, but the user name and password I entered when installing Edubuntu are not accepted.
I tried using the second choice (Ubuntu… recovery mode) and selected the root option so I could enter linux commands.
A simple ls commands shows that the linux file system is there.
Then I tried to add a new user:
“#sudo adduser xxx” reports:
groupadd not able to lock /etc/group; adduser
`/usr/sbin/groupadd -g 1000 xxx` returned error code 10
So at this point I have the following issues to report:
o It takes me about 4 hours to *try* to install Edubuntu 12.04. Possibly one reason why it takes so long is that I’m using a fairly old HP laptop that only has around 400 MB memory. That said:
o On my second-to-last attempt to install edubuntu 12.04 I believe I followed all the steps outlined in this tutorial perfectly. (My hard disk is close enough in size to the example in your tutorial that I simply copied exactly everything shown in each of the screen shots, even leaving a bit of disk space unused.) When trying to complete the installation, the process eventually reported that /home had 0 bytes.
o So I tried again. I found all the partitions expected, with correct size and type, but none of them were named. I do not believe I made that error. That said, I named them on this re-attempt and made sure the names and sizes and types were correct.
o After using EasyBCD to install a GRUB2 loader I had the problems reported originally:
On boot, if I selected to boot Ubuntu 12.04, I ended up at a GRUB2 command line program and it could not find anything to boot from.
o So I downloaded Boot-Repair and am now at the point described above: I have a GRUB loader; it can boot Windows 7; but the Ubuntu user and account I created during installation are not recognized.
I have stumbled over too many problems:
o unnamed partitions;
o the boot partition was created as an Extended partition when it should have been ext4 like all the others
o initial user account and password not properly set up.
a) Something is wrong in the Ubuntu 12.04 installation process.
b) The latest (32-bit) version of Boot-Repair is not correct for this version of Ubuntu.
—
Any suggestions other than another 4 hour re-installation process?
Given that Edubuntu appears to be installed, how can I log into it?
How can I change the boot loader process to be as simple as shown in your tutorial? (Some *very* unsophisticated people will be using this machine in a third world country where I am serving as a US Peace Corps Volunteer.)
Thanks much for your help.
Thank you for this tutorial. I’m currently following it.
I just have a question: at the end of partitioning you remain with some “free space”. What will it be used for?
I left that just to show that you can, and that you can use it to create more partitions after the system is up and running.
Just one more thing: I’ve installed Ubuntu following this tutorial and it worked perfectly fine; I can acces both Ubuntu and W7 without any problem.
However, when I enter in Ubuntu I am asked to choose the mode in which I want to enter, that is, if I want to enter in recovery mode or normal mode and other options I can’t recall. Is this normal?
And thank you very much once again.
Yes. There are at least two options in the boot menu of Linux distributions.
Used this procedure, works perfectly fine.
Thanks a lot finid.
Just one question:
If the need ever arises, what is the correct procedure to completely remove Ubuntu from the system, after it has been installed using exactly the above described procedure.
Thanks
From inside Windows, just delete the Ubuntu partitions. Be sure that you do not delete the Windows partitions along with it.
Hi, thanks a lot for the tutorial, Dualbooting is working perfectly. I have a problem though. When I use Windows, I cannot see the partitions made for ubuntu, /home for example. only the c:/ partition. What can I do?
If it helps, when I installed ubuntu, in the partition tool there was only one partition for Windows, not two. What I did was to resize it directly and then in the free space create the ones for ubuntu. It seemed then from the EasyBCD program that it boots from the c:/ partition and that there isn’t any other partition.
Help is really appreciated =)
Is the PC a store-bought one or did you install it yourself? Even if you did, it should have at least 2 partitions. From the Windows partition, can you see any other partitions other than the Windows partitions? If you can’t I couldn’t tell you why.
From Ubuntu, what partitions can you see from the manager? The name of the tool is Disk.
Not being able to see Linux partitions from Windows is normal. Windows simply refuses to recognize them, and Windows disk utilities report them as “Unallocated space.”
There’s a freeware tool that I have used in the past, but I don’t remember its name; it allows you to identify and read at least some Linux partitions from Windows — at least it did from XP Pro when I had to back up critical files via a Linux live CD, and restore them to XP after reinstalling it.
Search Google for “read ext4 from windows” to get a number of links that may solve the problem for you.
The problem he described is not normal. You should be able to see the partitions from the Windows 7 partition manager, but from what he described, he’s not seeing that, just the C drive.
Thanks to both for answering. I should have said that I couldn’t see any other partition of windows than c:/ from EasyBCD, I wasn’t clear.
I installed windows myself and after that ubuntu. From the partition tool in ubuntu I can see 6 partitions: NTFS 60 gb. 500 mb /boot, 70gb /home, 20 gb /, swap 4 gb and 5,5 gb free space
the NTFS’ one has the option of “boot” (I’m a spanish speaker and in spanish it is “arrancable” which I believe is “boot” in English)
here’s a screen image of the partition manager in ubuntu: http://postimg.org/image/kihoco399/
And from the windows partition manager the same partitions, here’s a screen image: http://postimg.org/image/nvgy582cz/
Also here is a screen from the windows explorer in which it can be seen that I cannot acces to the other partitions but the c:/ one: http://postimg.org/image/7x0zajxwh/
I think that the cause of this is that when I installed Windows, there was a problem, I cannot remember it but it had to do with the installer which could n’t recognize the disk or write in it (I had ubuntu before that so I believe it didn’t have the NTFS format). So I looked it up and a tutorial gave me the instructions to enter an option in the windows installer and format the disk. I did it and then I could install windows. I wish I could find the tutorial now. Please tell me that I didn’t ruin my disk haha
And I will look up “read ext4 from windows” to solve this,
Thanks again!
This worked like a dream. I have had no issues booting into either Windows 7 or Ubuntu (although at the first boot, I got a message about a certain partition, but I didn’t write down which one it was before the message disappeared and it hasn’t happened again since). I started with the LifeHacker tutorial, but it left me hanging at one point since I was using the newer Ubuntu distro.
Again, thanks a million for this wonderful article,
Sam
Respected technician…
I have installed abuntu 12.04 as u described above i have 3 partition on my system along with c and i shrink one of partion for ubuntu. I sucessfully install ubuntu but problem is that my win7 dosnt start. It boot in ubuntu mode directly… Please healp me i want make my win7 as primary option..plz healp
Dear Sir,
Thank you for your help. Your help is great.
Unfortunately I am unable to use keyboard to select one of OS in Windows Boot Manager(WBM). The keyboard is not responsive. I choose option “Wait for user selection” in Easy BCD. I am stuck in WBM, unable to boot to window or Ubuntu.
Main Board : MSI ZH77A-G43 Plus
CPU: Intel i5 3330 3Ghz
USB Mouse and Keyboard used.
Please help.
Thamks
Clement
That’s a hardware issue that has nothing to do with the dual-boot setup.