The second logical volume to create will be for swap. I normally would assign swap about 5 GB, but we are using LVM, so I can go lower than that, knowing that if the need arises, I can always grow the logical volume. For File System, be sure to select “swap” from the dropdown menu. OK
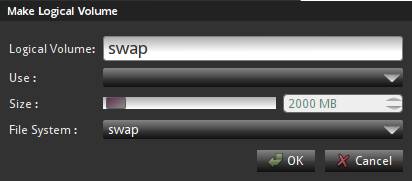
Create LV swap
The last logical volume we are going to create will be for /home. For this tutorial, I assigned it a disk space of 5 GB. It does not matter whether you allocate a lower or higher value than this. You can always resize (grow) it after installation, if the need arises. Be sure to specify the mount point (Use) as /home. The file system is ext4. OK
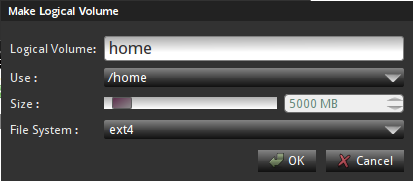
Create LV home
This is what the volume group and logical volume configuration window looks like after all the logical volumes have been created. Click OK to return to the main disk partitioning window.
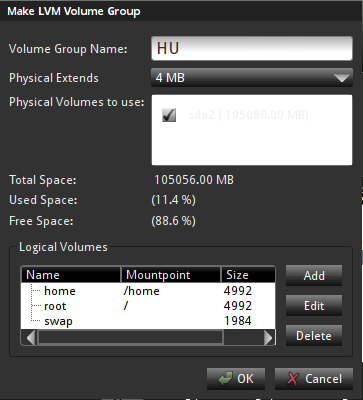
Verify VG and LVs
All the partitions and logical volumes have been created and we are back to the main disk partitioning window. You will notice that we have only used up just a fraction of the more than 100 GB of available disk space. The unallocated space (see arrow) will be used to grow or create logical volumes as the need arises. The percentage of disk space used and free are available in the previous image. Only the actual size (in MB), is given here. Click Next to continue.
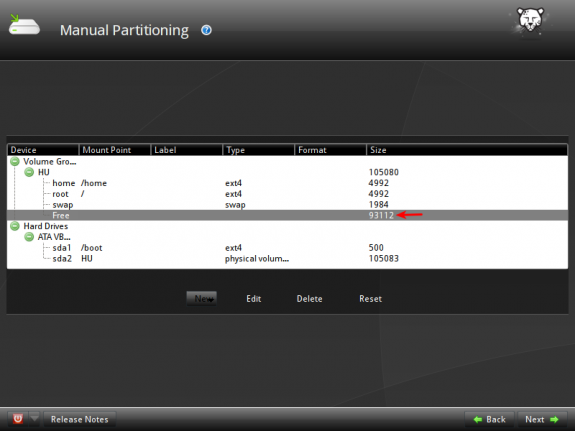
Verify all partitions
This is the last image of this tutorial. Here you configure the boot loader. Unless you are going to install GRUB somewhere other than in the MBR, you do not need to do anything here. Just click Next to continue with the rest of the installation.
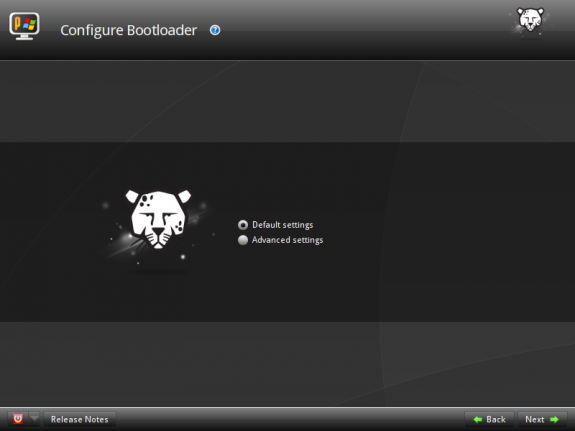
GRUB options
I hope this tutorial has been helpful. There are more to come. Check back often and/or subscribe to this website by RSS or email to have future articles like this one delivered automatically to your feed reader or inbox.
Resources: Download the x86 ISO image and the x86-64 ISO image.





Hi, I have a few questions. Is it necessary to create a boot partition if you’re dual booting from separate drives? I followed your Linux Mint partitioning guide and had problems. Then I went back and realized that guide was for a single drive setup. Doh!
Now, for Grub. I understand Pardus uses Grub Legacy whereas Mint uses Grub2. Any advice on where I should install Grub for Pardus? Or which bootloader I should let be the default. Would you happen to have any links to guides on adding entries to the bootloader I end up using? I have one for adding Mint to Grub Legacy but it seems a little complicated for a noob like me. Thank you for your time and your guides.
A boot partition is not necessary if 2 hard drives are involved, and, afaik, it does not matter which distro is on sda or sdb. Note that a boot partition makes boot recovery operations a bit easier, so it is not only when dual-booting that you need a separate partition for /boot.
If you install Pardus on sda, and Mint on sdb, by default, Mint’s installer will install GRUB 2, Mint’s boot loader, in the MBR of sda, with an entry for Pardus added automatically to the boot menu. This is the easiest way. No modifications to GRUB files needed. The reverse is also true, if you install Mint on sda and Pardus on sdb.
When dual-booting with 2 hard drives, however, I find that it is better to install each distro’s boot loader in the MBR of its own hard drive. That way, if something goes wrong with one drive, you can always boot from the other without messing with anything. And you do not have to bother about editing any GRUB files because the last distro you install will automatically add an entry for the other in its GRUB menu.
But since the boot menu of the first distro, the one on sda, will not have an entry for the distro on sdb, you may update GRUB, when logged int the first distro. That should cause it to probe the drives and add an entry for the distro on the second drive in its menu.
I’ll post a detailed tutorial on dual-booting 2 Linux distros on separate hard drives this Saturday.
Thank you for your quick and detailed response. Unless I’m misunderstanding you, it sounds like it would be helpful to have a boot partition even with dual booting. However, when I followed your guide for partitioning Mint I got a black screen and this message: The disk drive for /boot is not ready or not present. Continue to wait; or press S to skip mounting or M for manual recovery. I waited, nothing happened. I pressed M, had no idea what to do. I pressed S and was able to login normally. It just seemed pointless to have the /boot partition or that it might cause problems in the future.
I’ll just try it with a boot partition and see what happens. I can always reinstall. I’m installing over Windows. So, I’m finally getting off the MS train. I never saw this coming. Especially since I’d never heard of Linux two years ago. Thanks again. Keep up the great work.
hi i tried to dual boot pardus and windows 7..
i have dual booted many linux os with windows but with pardus i cant dual boot it,..i have already installed win 7 then installed pardus..it dint work..
then i installed pardus first and win 7 later..i tried to do dual booting ,using bcd ..i created 2 options at boot..windows 7 and pardus..win 7 boots fine..but when i select pardus nothing happens..just a black screen with a blinking cursor..could u pls make a video of this and upload in you tube..
if u cant make a video then please give all the screenshots of this installation that is DUAL BOOTING WINDOWS 7 AND PARDUS.. ,,especially for selecting the partitions and using bcd..PLS HELP ME..I LOVE THAT PARDUS OS..BUT CANT REMOVE WIN 7 SINCE MY PARENTS NEED IT..
Will try and see if I can post it by Thursday.
thanx finid for the concern and ur quick reply..
unni..
A guide on how to dual-boot Pardus 2011 and Windows 7 has just been published. View it here.