Ok, so /boot and the physical volume have been created. The next task is to create the volume group and logical volumes. Those will be created from the same window. To get there, select the newly created physical volume, then click New > LVM > Volume Group.
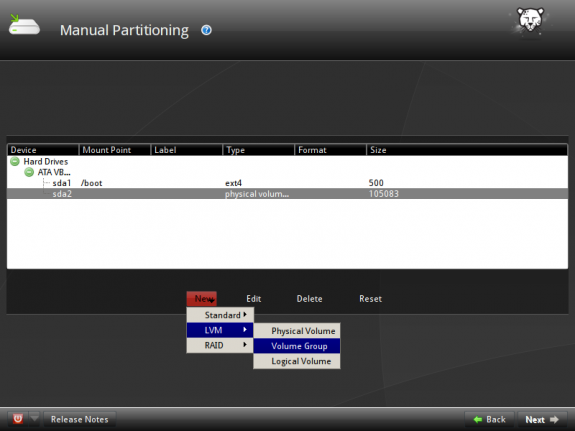
Create LVM volumes
This image is just to show the options that will need to be configured at this step. The first task will be to create the volume group. Creating the volume group just involves filling out the Volume Group Name field. The system’s default volume group name is derived from the hostname of the computer. In this example, the volume group is vg_hu, and that is because the hostname is HU. You do not have to stick with the default. I normally do not. I always like to rename it.
After the volume group name, the next task is to start creating logical volumes and you do that by clicking on the Add button.
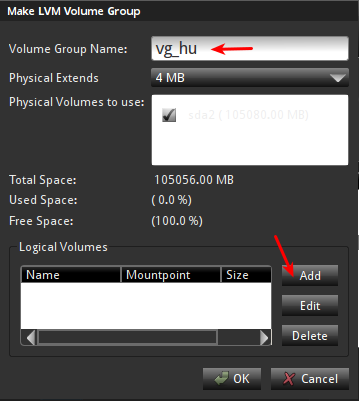
LVM options
Ok, let us create the volume group. I prefer short names, nothing fancy, does not need to be. After you have named the volume group, click on the Add button to start creating the logical volumes.
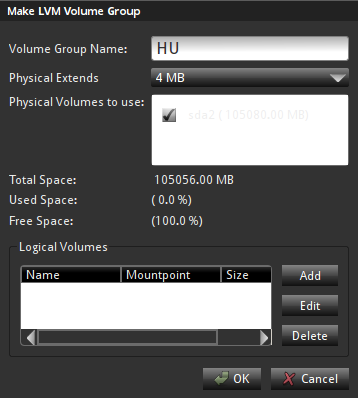
Create VG
This image is just to show the options that will have to be set when creating logical volumes. The options are:
- Logical Volume – this is the name of the logical volume. The system default is LogVol00. I always like to rename it after the mount point that will be assigned to the logical volume. For example, I would name the logical volume for /, root, the one for /home, home, the one for swap as swap, etc. Names like those are a lot easier to work with than LogVol00, LogVol01, etc.
- Use – this will be the mount point. You will need to select the appropriate one from the dropdown menu.
- Size – use the slider to specify the size, or just type it in the input field next to it.
- File System – this will always default to ext4, and I see no reason to change it, unless you prefer xfs, which is the other journaling file system option.
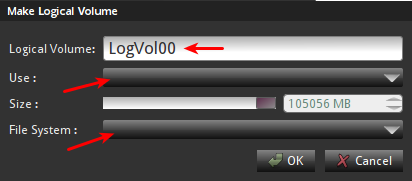
Logical volume options
Ok, time to start creating the logical volumes. The first one will be mounted at /. What is the appropriate size to allocate to this logical volume? Here’s a hint. A new installation of Pardus 2011 takes up about 4.5 GB of disk space. Most of that is used up by the contents of /usr. So if you intend to create a single root partition (logical volume), then 5 GB is a good size. However, if you are going to create a separate logical volume for /usr, then about 2 GB should be sufficient. Because we are going to have everything but /home under /, 5 GB will be enough. As long as you allocate enough disk space to get the system installed, you should be fine.
To continue with setting up this logical volume, be sure to set the mount point as /, and leave the file system at the default, ext4. OK.
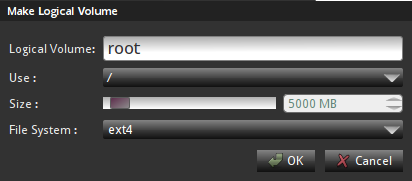
Create LV root
With the first logical volume created, click on the Add button to create the next one. This step will have to be repeated to create all the remaining logical volumes.
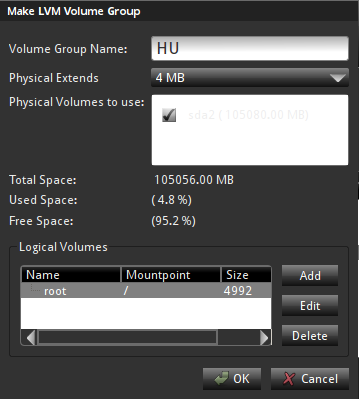
Create more LVs



Hi, I have a few questions. Is it necessary to create a boot partition if you’re dual booting from separate drives? I followed your Linux Mint partitioning guide and had problems. Then I went back and realized that guide was for a single drive setup. Doh!
Now, for Grub. I understand Pardus uses Grub Legacy whereas Mint uses Grub2. Any advice on where I should install Grub for Pardus? Or which bootloader I should let be the default. Would you happen to have any links to guides on adding entries to the bootloader I end up using? I have one for adding Mint to Grub Legacy but it seems a little complicated for a noob like me. Thank you for your time and your guides.
A boot partition is not necessary if 2 hard drives are involved, and, afaik, it does not matter which distro is on sda or sdb. Note that a boot partition makes boot recovery operations a bit easier, so it is not only when dual-booting that you need a separate partition for /boot.
If you install Pardus on sda, and Mint on sdb, by default, Mint’s installer will install GRUB 2, Mint’s boot loader, in the MBR of sda, with an entry for Pardus added automatically to the boot menu. This is the easiest way. No modifications to GRUB files needed. The reverse is also true, if you install Mint on sda and Pardus on sdb.
When dual-booting with 2 hard drives, however, I find that it is better to install each distro’s boot loader in the MBR of its own hard drive. That way, if something goes wrong with one drive, you can always boot from the other without messing with anything. And you do not have to bother about editing any GRUB files because the last distro you install will automatically add an entry for the other in its GRUB menu.
But since the boot menu of the first distro, the one on sda, will not have an entry for the distro on sdb, you may update GRUB, when logged int the first distro. That should cause it to probe the drives and add an entry for the distro on the second drive in its menu.
I’ll post a detailed tutorial on dual-booting 2 Linux distros on separate hard drives this Saturday.
Thank you for your quick and detailed response. Unless I’m misunderstanding you, it sounds like it would be helpful to have a boot partition even with dual booting. However, when I followed your guide for partitioning Mint I got a black screen and this message: The disk drive for /boot is not ready or not present. Continue to wait; or press S to skip mounting or M for manual recovery. I waited, nothing happened. I pressed M, had no idea what to do. I pressed S and was able to login normally. It just seemed pointless to have the /boot partition or that it might cause problems in the future.
I’ll just try it with a boot partition and see what happens. I can always reinstall. I’m installing over Windows. So, I’m finally getting off the MS train. I never saw this coming. Especially since I’d never heard of Linux two years ago. Thanks again. Keep up the great work.
hi i tried to dual boot pardus and windows 7..
i have dual booted many linux os with windows but with pardus i cant dual boot it,..i have already installed win 7 then installed pardus..it dint work..
then i installed pardus first and win 7 later..i tried to do dual booting ,using bcd ..i created 2 options at boot..windows 7 and pardus..win 7 boots fine..but when i select pardus nothing happens..just a black screen with a blinking cursor..could u pls make a video of this and upload in you tube..
if u cant make a video then please give all the screenshots of this installation that is DUAL BOOTING WINDOWS 7 AND PARDUS.. ,,especially for selecting the partitions and using bcd..PLS HELP ME..I LOVE THAT PARDUS OS..BUT CANT REMOVE WIN 7 SINCE MY PARENTS NEED IT..
Will try and see if I can post it by Thursday.
thanx finid for the concern and ur quick reply..
unni..
A guide on how to dual-boot Pardus 2011 and Windows 7 has just been published. View it here.