Kali Linux 2 is the latest edition of Kali Linux, a desktop distribution that’s based on Debian and designed solely for security and hacking purposes.
In this tutorial, you’ll read how to dual-boot it with Windows 10 on a single hard drive on a computer with UEFI firmware.
Because the Kali Linux 2 installer, in automated disk partitioning mode, allocates disk space to partitions non-proportionally, completing the task of dual-booting Kali Linux 2 and Windows 10 on a single hard drive involves creating the Kali Linux 2 partitions manually. So you’ll need to have at least a basic understanding of disks and disk partitions in Linux. If you don’t, take a few minutes to read A beginner’s guide to disks and disk partitions in Linux and 7 tips for dual-booting Linux distributions and Windows.
The following are the steps involved in setting up a dual-boot system between Windows 10 and Kali Linux 2 on a single hard drive on a computer with UEFI firmware:
- Recover space from the hard drive
- Partition the recovered space for installing Kali Linux 2. For this tutorial, we’ll create three partitions for Kali Linux 2: One for the root partition; the second for the home partition. This is optional, but it’s always nice to have your home directory in a separate partition; the third and last partition will be for swap space, unformatted disk space that the system may use as virtual memory
- Completing related and important dual-booting tasks
To get from here to there, you need to:
- Have downloaded an installation image of Kali Linux 2, which you can grab from https://www.kali.org/downloads. Burn it to a blank DVD, or transfer it to a USB stick (recommended).
- Have a computer with Windows 10 installed. Space for installing Kali Linux 2 will be derived from the free space left on the hard drive
If you have all those in place, let’s get started.
Step 1 – Recover Free Space From the Hard Drive:
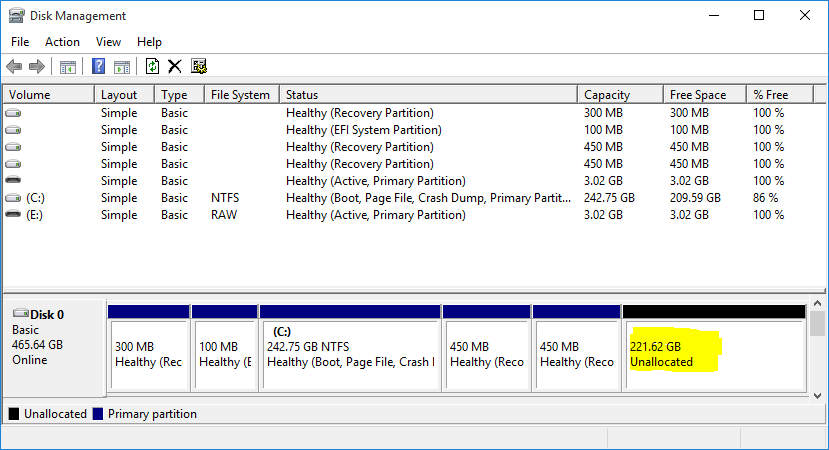
The hard drive on the test system used for this tutorial is 500 GB in size, with about half of that occupied by Windows 10. The other unused part, recovered by shrinking the C drive, will be used for creating partitions for Kali Linux 2. To shrink a Windows 10 C drive, simply right-click on it and select Shrink Volume. Follow the prompts to complete the process.
When completed, there will be an Unallocated space after the C drive, or after whatever partition you recovered the disk space from. Figure 1 shows the layout of the partitions on the hard drive used for this setup, as seen from the Windows 10 partition manager. The highlighted segment will be used for installing Kali Linux 2.

Figure 1: Windows 10 partition manager showing Windows 10 partitions and the free space
Step 2 – Booting From the Installation Media:
Boot the computer with the installation media you made in the optical drive or in a USB port. Just before it boots into the default boot disk, enter the boot menu by pressing the appropriate F-key, usually the F11 or F12 key. The idea is so the computer boots from the UEFI-aware version of the installer. It should without intervention, but just to be sure, you want to complete this step.
When at the boot menu, you should see two entries for the installation media, like those shown in Figure 2. The UEFI: PNY USB 2.0 FD 1100 entry boots into the target installer, so if you find an entry just like that on yours, select it and press the ENTER key to boot into it.
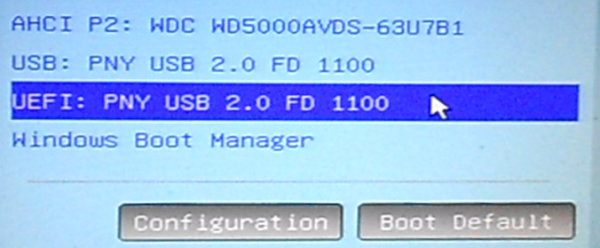
Figure 2: Computer’s boot menu
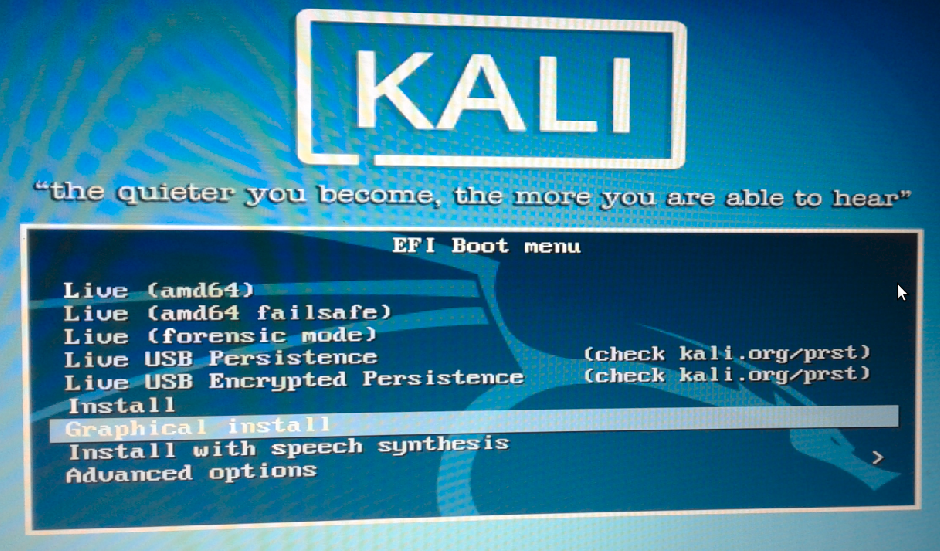
At the Kali Linux EFI Boot Menu, you’ll be presented with a bunch of boot options. The default will boot into a GNOME 3 Live desktop. This would normally be the best option to boot into, but the version of the installer you access from the Live desktop does not render properly, so I recommend that you skip the Live desktop and boot straight into the graphical installer. And you do that by selecting the Graphical Install option, as shown in Figure 3.
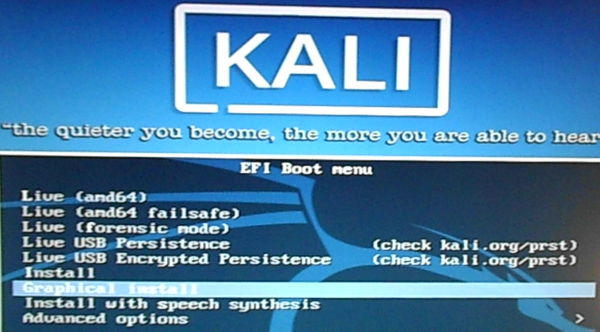
Figure 3: Kali Linux 2.0 EFI boot menu
Step 3 – The Debian Installer Disk Partitioner:
After booting into the Debian Installer, which is the name of the graphical installer used by Kali Linux 2, click through several steps until you get to the disk partition methods step, shown in Figure 4. The option to select here, is Manual. So select it and click the Continue button, or press the ENTER key.
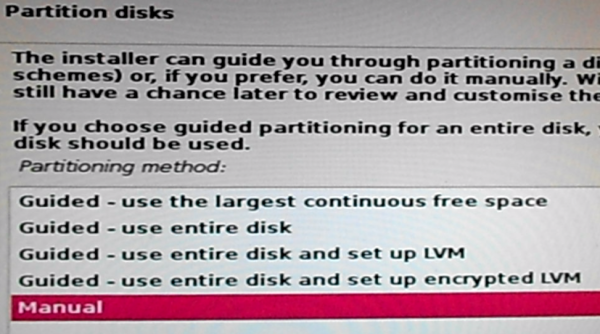
Figure 4: Disk partition options of Kali Linux 2
That should open the manual disk partitioning tool’s window, where all the detected disks should be listed, along with their associated partitions. Shown in Figure 5 are the Windows 10 partitions on the target disk, with the space recovered in Step 1 listed as Free Space. That free space will be used in steps 4, 5 and 6 to create partitions for Kali Linux 2. So select it, then click Continue.
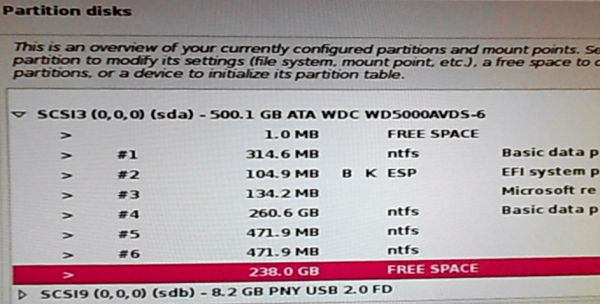
Figure 5: Manual disk partitioning window of Kali Linux 2
Step 4 – Create the Root Partition:
That should open a window like the one shown in Figure 6. We have to create a new partition, so select the first option. Continue.
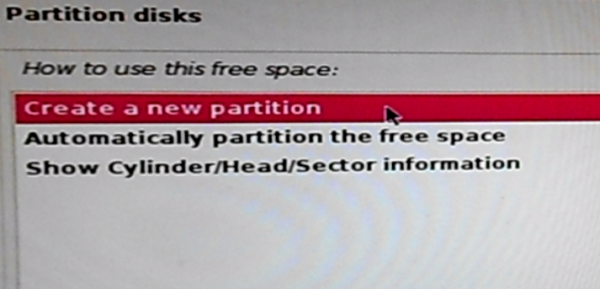
Figure 6: Creating new disk partition on Kali Linux 2
Specify the amount of disk space to allocate to the root partition. In this exampe I allocated 50 GB to it. that seems to be too much, but if you intend to use the system for a long time, 50 GB is a reasonable amount. You can go much lower, if you’re tight on disk space. Continue.

Figure 7: Specify root partition size of Kali Linux 2
Stick with the default here. Continue.
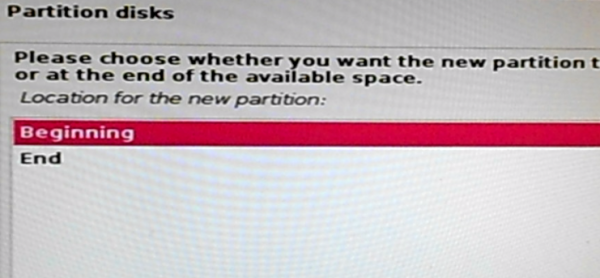
Figure 8: Specify location of the root partition of Kali Linux 2
This shows the specs of the new partition. No need to change anything, so select Done setting up the partition. Continue.
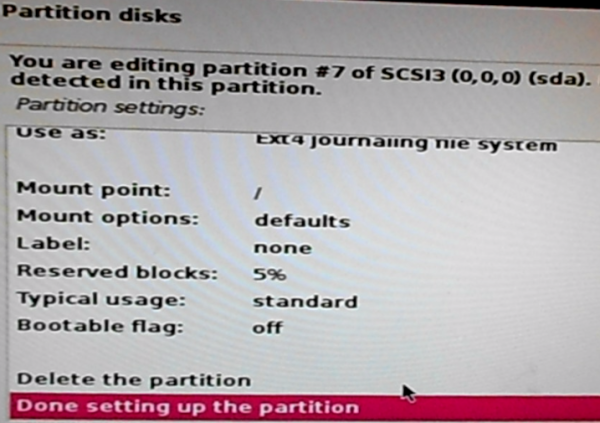
Figure 9: Kali Linux 2 root partition details
Back to the main disk partitioning window, you should see the new partition. Now you have to repeat the process to create the other partitions, so select the remaining free space, then click Continue.
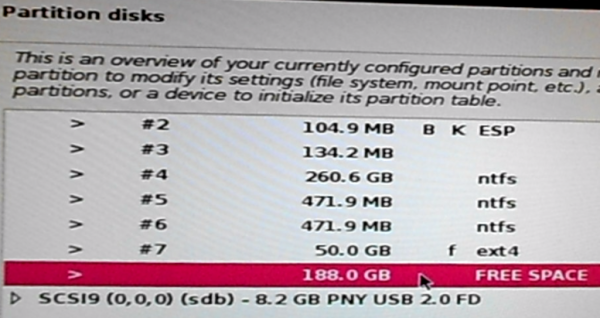
Figure 10: Kali Linux 2 free disk space
Step 5 – Create the Home Partition:
The second partition we’re going to create will be mounted at /home, and the procedure is a repeat of the one used to create the root partition. So the drill should be familiar. Here, select the default. Continue.
Figure 11: Creating new disk partition on Kali Linux 2
Specify a suitable disk space for the partition. Continue.
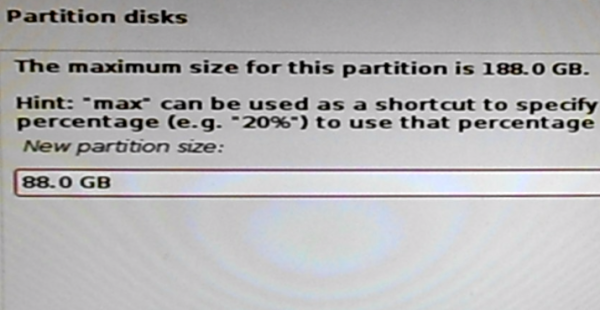
Figure 12: Specify /home partition size on Kali Linux 2
Stick with the default. Continue.
Figure 13: Specify location of the home partition of Kali Linux 2
As with the previous partition, the specs of this partition do not need to be modified, so select Done setting up the partition. Continue.
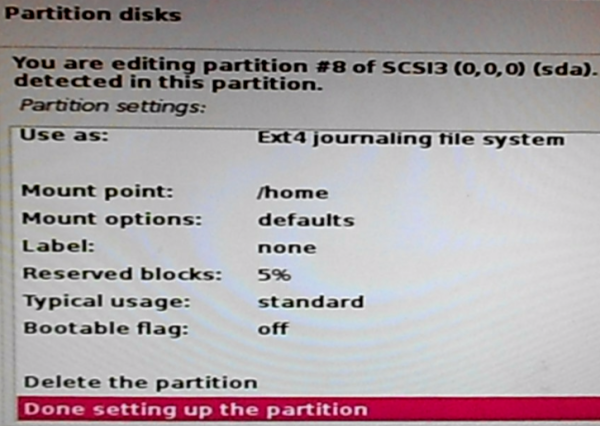
Figure 14: Kali Linux 2 /home partition details
Back one more time to the main disk partitioning window, select the free space, then click Continue to begin creating the last partition.
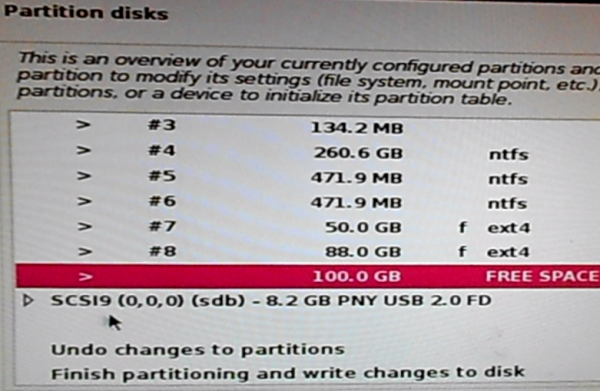
Figure 15: Kali Linux 2 free disk space


You, sir, are THE MAN!!! Thank you!!
I attempted several time following many other instructions, include Offensive Security’s.
You have my eternal gratitude.
Hi, thank you for your tutorial. I did everything, finished installation, but only one problem. When I choose Kali Linux from grub, it runs, then appears a black screen, and my monitor seems to be off. The keyboard was still working, only the monitor has no signal. I read somewhere else and they said it might be because of the graphics card (I’m using GeForce 9700?). Then I tried to install Ubuntu, this time when I boot it from usb, and choose install, the screen had a weird string of symbol flashing, and I couldn’t install it. It might be the same issue because of the GPU? Please let me know what do you think about it. I ended up installing Kali using virtual box, but I still want to be able to dual boot it with Windows. My MOBO is also UEFI
It’s most likely because of the GPU. You need to install the correct drivers. Best bet is to install it from an officiao Nvidia page. Search the Nvidia site for it. That’s what I did for a GTX 1070 that I’m using to mine Ethereum. See this article.
Sir I have installed Kali Linux 2 along with win 10 but. .on opening boot option it shows that…there are some limitations by Microsoft to don’t allow dual boot with other operating system such as Linux or Mac …
Plz help me to overcome such limitations
That limitation is most likely Secure Boot. So you need to disable it. The process of doing that is not standard, but see this guide and this one too for an idea of how to disable it.
Basically, you have to disable Secure Boot from your BIOS/UEFI utility.
I don’t have any file called EFI system partition I only have a FAT32 file that’s the same size as your EFI system partition
If you don’t have an EFI partition, then it’s likely that Windows was installed on an MBR partitioning scheme. In that case, install GRUB in the MBR.
But if you version of Windows is 10, are you really sure that you don’t have a EFI system Partition. From Windows, open the partition manager and check what system partition you have.
Hello, thanks for the help so far. When partitioning the disks in the installer is says I have an FAT32 type partition (though the name is EFI System Partition). When checking in windows it says it is an EFI partition. But in the kali linux installer I can’t choose the option to use as EFI System partition. I am using Windows 10 and the latest version of Kali Linux. I am kind of stuck on this for some time now
OK, so you do have an EFI System Partition.
Did you disable Secure Boot, if not do so, then continue from where you left off, or restart the installation. Then pay attention to the Figures 22-23 of this guide.
How to disable Secure Boot depends on the PC brand, but see this guide and this one for help.
I messed around a bit and now I don’t have an EFI partition nor a fat32 partion of that size. Only 500MB of free space. I whiped my drive and reïnstalled windows before. Is it possible my MBR should be repaired? (if so I know how to ) or what could I do? I can’t assign the EFI partition style to the free space. I am trying the manual installation right know in the hope that it will magically work
It worked! Thanks so much for the tut and the help. Greatly appreciated
So my computer will not go into grub bootloader i followed everything very precisely and have done this twice now.. I need help ive been working on this for a week now and live usb persistence is to slow for me
First, did you disable Secure Boot? How you accomplish that depends on your computer, but generally it follows the method given in here and here.
When you’re sure that’s done, make sure that you point Kali to the EFI System Partition before installing packages. That refers to figures 22-24 in step 7.
i got it to work although i didnt ask me where to install the GRUB bootloader….. all i had to do was go to bios and disable secure then a option opened where i can select a trusted EFI file to boot into and i went into that and went to hdd0 then kali the clicked grub64x.efi and it showed up in my boot manager and clicked it and BAM it worked
I installed kali linux successfylly alongside my windows 10, but after restarting it does not ask for choosing between kali linux and windows 10, and bu default loads windows 10.
Note that I tried installing EasyBCD but it says EFI detected.
Also I tried to enable Legacy and disable UEFI.
If the new system boots into Windows 10, then you did not complete the tasks shown in Figures 22-23. The Use as option must be EFI System Partition for the system to complete successfully and boot into Kali Linux.
Please, I am facing problems trying to install kali alongside my windows 10. Can you recommend a solution or tutorial to follow? Thanks.
Well, what kind of problems are you facing?
I tried installing kali using virtual box and this error popped up after creating and trying to install the vm
kernel panic not-syncing: VFS unable to mount root fs.
I think you need to describe exactly what you were trying to do.
Where does VirtualBox come into play? This is about installing Kali and Windows 10 on the same HDD, right?
When I check the EFI system partition, under “Use as:” it says “do it use”. What should I change this to?
Select EFI system partition from the Use as as shown on Figure 23 of this post – http://linuxbsdos.com/2015/10/19/how-to-dual-boot-windows-10-kali-linux-2-on-a-pc-with-uefi-firmware/2/
You have to do that or your system will not boot after installation, assuming it even installs successfully.
Hey everyone, I tried lots of other posts and videos nothing seems to be working for me on Windows 10. Doesn’t show Kali Linux on boot menu after I press f9, I tried disabling secure boot, enabling legacy, trying the EFI/boot/grub.cfg and also trying other software to install the iso to usb but nothing seems to be working for me. Also changed boot order too still nothing.
Over this weekend, I intend to redo most of these articles, including this one on Kali. So check back by Monday.
I fixed it by going in boot folder and opening the efi.img or smth and then extracted the EFI/BOOT onto the flash drive and fixed it. Also turned off secure boot.
That seems to happen, even with USB stick created on Linux, when the operating was not performed correctly. Happened to me while writing Dual-boot Kali Linux Rolling 2016.2, Windows 10 on a PC with UEFI firmware.
After hours of trying to get my USB to boot (I used Rufus to make it), I finally found out that instead of creating my own /EFI/Boot and grub.cfg etc etc like I had read in other articles, going into the boot folder one the newly created USB..use 7zip to extract the files from the EFI.img. then just copy the extracted folder named “EFI” into the root of your USB and wallah. It was smooth sailing from there on so I hope that helps someone.
+1
Thank you ! This is the answer that i was looking for. This trick works like a charm !
Only tutuioral that worked for me after struggling for 2 days
Thanks a bunch
Dear
When ever I started dual boot installation through Pendrive, after setting up language and keyboard, setup shows a window that their is no CD in CD-ROM please insert CD to mount!!! what will I do?
just try to simply unpluge your pendrive, then pluge it again. good luck
Nope, Kali is not UEFI-compatible.
But this article was written on UEFI hardware.
Kali Rolling is based on Debian, which is UEFI-compatible.
I am trying to boot Kali from a DVD that I burned. I had to disable secure boot because if I boot from DVD with secure boot on. It throws an error. But when I boot from DVD (UEFI mode) with secure boot disabled, I don’t see anything on the screen. Is Kali UEFI compatible? Any help would be highly appreciated.
Thanks
Don’t know why you’re having problem, but yes, Kali is UEFI compatible.
Just wondering what did you do with the remaining 96 GB of space remaining after you setup the partitions?
Thanks.
Noting, really, though I could have used it to install another OS in triple boot fashion, or to add another partition to either OS
i did everything as instructed and when i checked the USB from windows it shows “Run Debain GNU/Linux ” but when i reboot the PC its says (i tried pressing F12 too) no operating system found
please help fast
and please try to be as specific as possible because i am new to all this 😐
No OS found points to the system could not read from the EFI system partition.
1. Did you disable Secure Boot? See this guide
2. From the computer’s boot menu (accessed via F2 or some other F-key), do you see an entry for Kali?
3. When setting up Kali, did you verify the EFI system partition was recognized by the installer?