Kali Linux 2 is the latest edition of Kali Linux, a desktop distribution that’s based on Debian and designed solely for security and hacking purposes.
In this tutorial, you’ll read how to dual-boot it with Windows 10 on a single hard drive on a computer with UEFI firmware.
Because the Kali Linux 2 installer, in automated disk partitioning mode, allocates disk space to partitions non-proportionally, completing the task of dual-booting Kali Linux 2 and Windows 10 on a single hard drive involves creating the Kali Linux 2 partitions manually. So you’ll need to have at least a basic understanding of disks and disk partitions in Linux. If you don’t, take a few minutes to read A beginner’s guide to disks and disk partitions in Linux and 7 tips for dual-booting Linux distributions and Windows.
The following are the steps involved in setting up a dual-boot system between Windows 10 and Kali Linux 2 on a single hard drive on a computer with UEFI firmware:
- Recover space from the hard drive
- Partition the recovered space for installing Kali Linux 2. For this tutorial, we’ll create three partitions for Kali Linux 2: One for the root partition; the second for the home partition. This is optional, but it’s always nice to have your home directory in a separate partition; the third and last partition will be for swap space, unformatted disk space that the system may use as virtual memory
- Completing related and important dual-booting tasks
To get from here to there, you need to:
- Have downloaded an installation image of Kali Linux 2, which you can grab from https://www.kali.org/downloads. Burn it to a blank DVD, or transfer it to a USB stick (recommended).
- Have a computer with Windows 10 installed. Space for installing Kali Linux 2 will be derived from the free space left on the hard drive
If you have all those in place, let’s get started.
Step 1 – Recover Free Space From the Hard Drive:
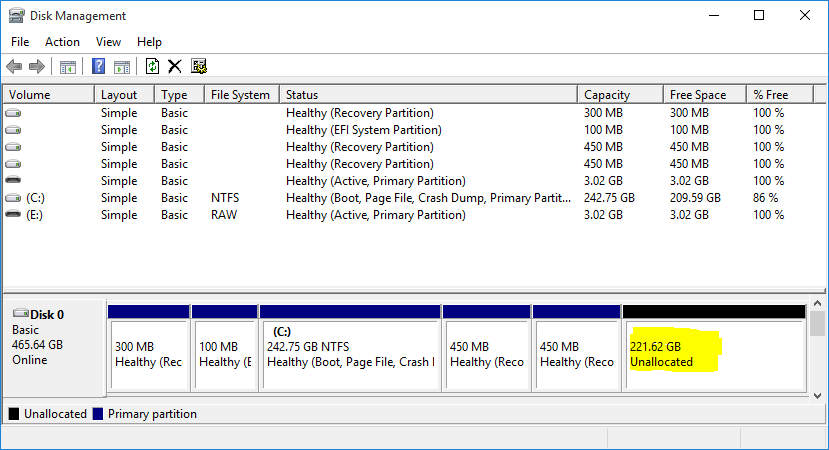
The hard drive on the test system used for this tutorial is 500 GB in size, with about half of that occupied by Windows 10. The other unused part, recovered by shrinking the C drive, will be used for creating partitions for Kali Linux 2. To shrink a Windows 10 C drive, simply right-click on it and select Shrink Volume. Follow the prompts to complete the process.
When completed, there will be an Unallocated space after the C drive, or after whatever partition you recovered the disk space from. Figure 1 shows the layout of the partitions on the hard drive used for this setup, as seen from the Windows 10 partition manager. The highlighted segment will be used for installing Kali Linux 2.

Figure 1: Windows 10 partition manager showing Windows 10 partitions and the free space
Step 2 – Booting From the Installation Media:
Boot the computer with the installation media you made in the optical drive or in a USB port. Just before it boots into the default boot disk, enter the boot menu by pressing the appropriate F-key, usually the F11 or F12 key. The idea is so the computer boots from the UEFI-aware version of the installer. It should without intervention, but just to be sure, you want to complete this step.
When at the boot menu, you should see two entries for the installation media, like those shown in Figure 2. The UEFI: PNY USB 2.0 FD 1100 entry boots into the target installer, so if you find an entry just like that on yours, select it and press the ENTER key to boot into it.
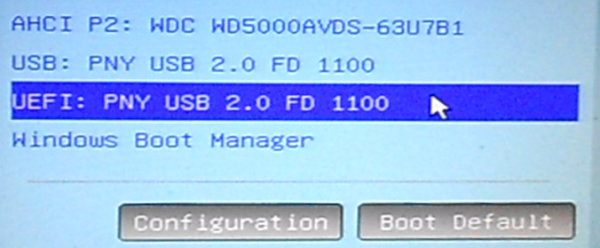
Figure 2: Computer’s boot menu
At the Kali Linux EFI Boot Menu, you’ll be presented with a bunch of boot options. The default will boot into a GNOME 3 Live desktop. This would normally be the best option to boot into, but the version of the installer you access from the Live desktop does not render properly, so I recommend that you skip the Live desktop and boot straight into the graphical installer. And you do that by selecting the Graphical Install option, as shown in Figure 3.
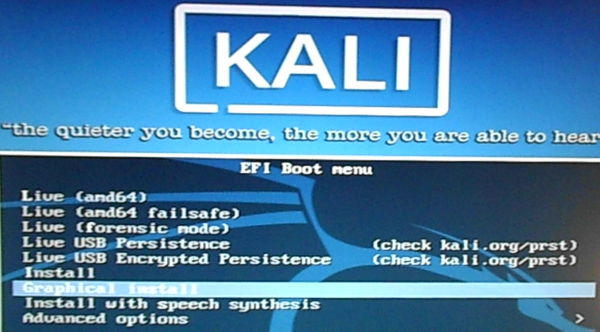
Figure 3: Kali Linux 2.0 EFI boot menu
Step 3 – The Debian Installer Disk Partitioner:
After booting into the Debian Installer, which is the name of the graphical installer used by Kali Linux 2, click through several steps until you get to the disk partition methods step, shown in Figure 4. The option to select here, is Manual. So select it and click the Continue button, or press the ENTER key.
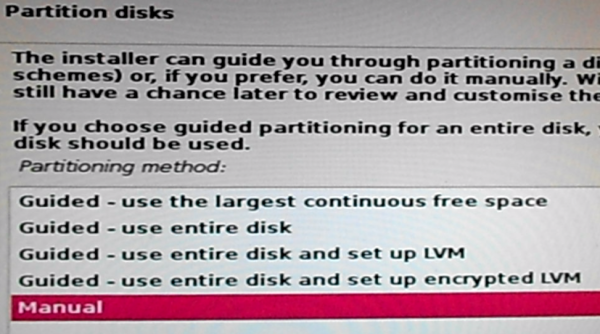
Figure 4: Disk partition options of Kali Linux 2
That should open the manual disk partitioning tool’s window, where all the detected disks should be listed, along with their associated partitions. Shown in Figure 5 are the Windows 10 partitions on the target disk, with the space recovered in Step 1 listed as Free Space. That free space will be used in steps 4, 5 and 6 to create partitions for Kali Linux 2. So select it, then click Continue.
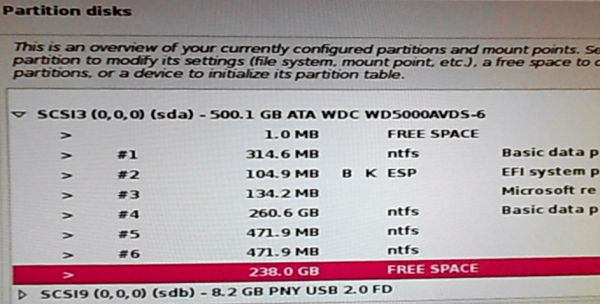
Figure 5: Manual disk partitioning window of Kali Linux 2
Step 4 – Create the Root Partition:
That should open a window like the one shown in Figure 6. We have to create a new partition, so select the first option. Continue.
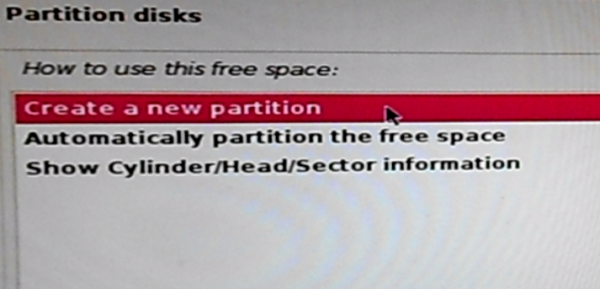
Figure 6: Creating new disk partition on Kali Linux 2
Specify the amount of disk space to allocate to the root partition. In this exampe I allocated 50 GB to it. that seems to be too much, but if you intend to use the system for a long time, 50 GB is a reasonable amount. You can go much lower, if you’re tight on disk space. Continue.

Figure 7: Specify root partition size of Kali Linux 2
Stick with the default here. Continue.
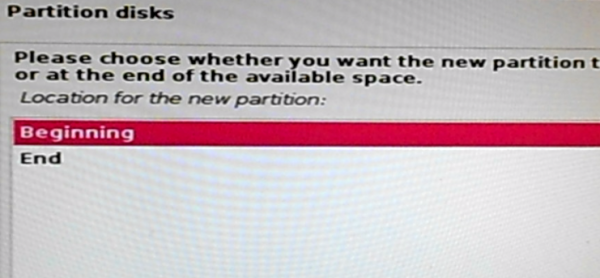
Figure 8: Specify location of the root partition of Kali Linux 2
This shows the specs of the new partition. No need to change anything, so select Done setting up the partition. Continue.
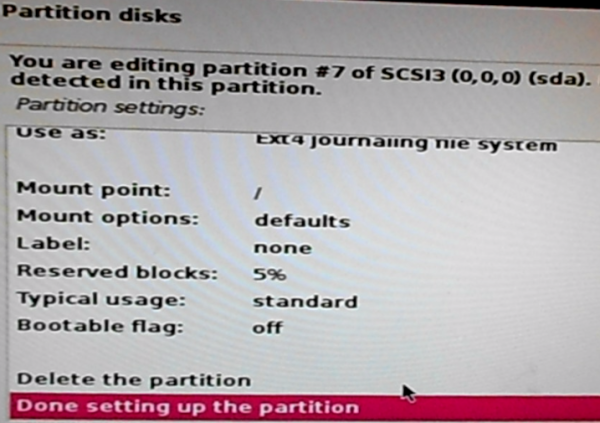
Figure 9: Kali Linux 2 root partition details
Back to the main disk partitioning window, you should see the new partition. Now you have to repeat the process to create the other partitions, so select the remaining free space, then click Continue.
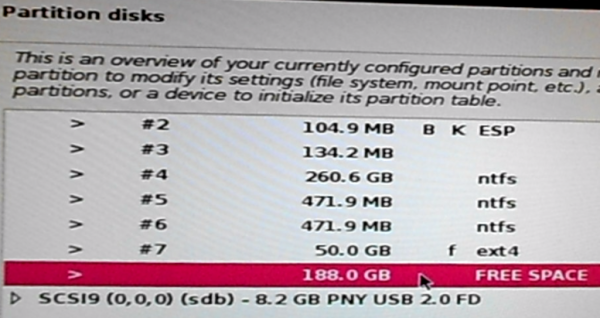
Figure 10: Kali Linux 2 free disk space
Step 5 – Create the Home Partition:
The second partition we’re going to create will be mounted at /home, and the procedure is a repeat of the one used to create the root partition. So the drill should be familiar. Here, select the default. Continue.
Figure 11: Creating new disk partition on Kali Linux 2
Specify a suitable disk space for the partition. Continue.
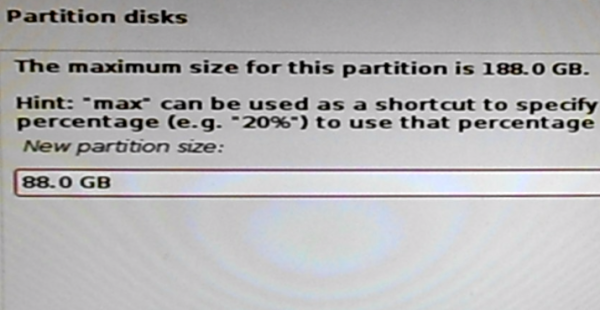
Figure 12: Specify /home partition size on Kali Linux 2
Stick with the default. Continue.
Figure 13: Specify location of the home partition of Kali Linux 2
As with the previous partition, the specs of this partition do not need to be modified, so select Done setting up the partition. Continue.
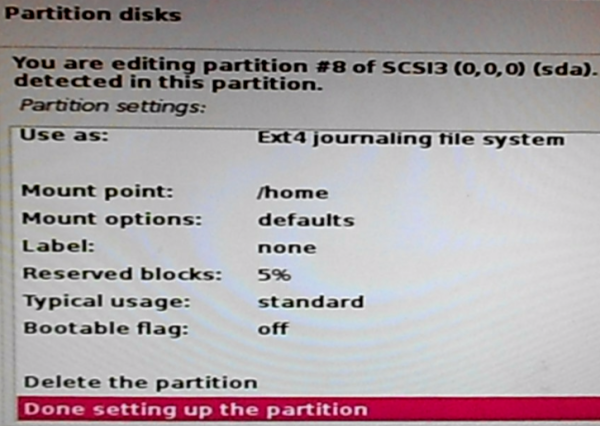
Figure 14: Kali Linux 2 /home partition details
Back one more time to the main disk partitioning window, select the free space, then click Continue to begin creating the last partition.
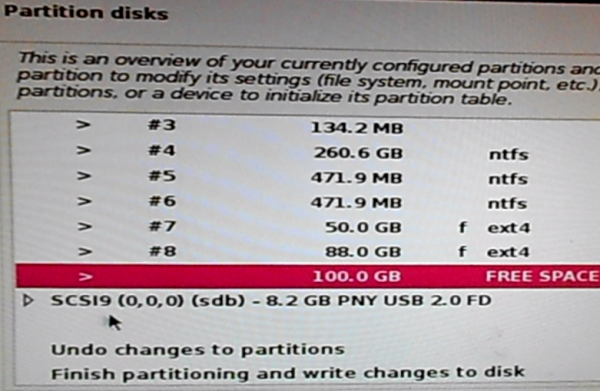
Figure 15: Kali Linux 2 free disk space


Tried it but, got an error booting the kali DVD: “uefi path1 has been blocked by the currently recurity policy”. if I boot in legacy the grub is not gonna recognize the win10 efi boot manager. What should I do?
Did you disable Secure Boot in the UEFI/BIOS utility?
See this guide for guidance.
Disabled it, but my Kali DVD won’t boot, stays in black screen.
I found out that Kali won’t work on UEFI “out of the box”, and found this guide to make a custom bootable Kali USB to fix that.
https://forums.kali.org/showthread.php?271-How-to-EFI-install-Kali-Linux
Thanks
Hello Sir, I did exactly as you have guided in this tutorial. Yet it doesn’t boot into GRUB. It directly boots into Windows 10. I tried using easyBCD but Linux option is disabled due to which I couldn’t add Kali to boot menu. When I select the EFI option (it’s set to “do not use” by default) I cannot find the EFI System Partition option there so I selected the boot option! Please help me!
EasyBCD cannot be used to add an entry for Linux in the Windows boot manager’s menu.
When you double-click on Use as, what are the options you see?
I allocated free space for the installation, but when i try to install on that space it says it is unusable space. can anybody help me?
It’s unusable likely because you’r eusing MBR partitions and you’ve exceeded the maximum number of primary partitions (4) that it can support. Are you actually using UEFI and GPT?
See A beginner’s guide to disks and disk partitions in Linux.
Guide is basically perfect ???? Good luck using Kali if you can’t follow such an easy tutorial!
Thanks
I only said “basically perfect” due to the three partitions not mathematically adding up to take full advantage of the total empty space you recovered in step #1. I do realize this is attributable to having readers possibly screw that up also, and is only worth mentioning in the interest of highly accurate technical writing. Once the Kali install is up and running; it’s an easy fix with whatever Parted the end user knows and prefers. Maybe worth a mention is all.
I used this on a new $250 Asus and some other differences due to UEFI; when initially going into BIOS you have to hold shift key and then power off the system, then hold F2 key down and continue holding it prior to pressing the power button. In the boot sequence I only got the UEFI option for the Cruzer pendrive I put the ISO on. Also, SecureBoot needed to be disabled or result was invalid image standard error.
Still pretty much perfect for anyone already familiar with this process on non-UEFI boxes.
Hello, I successfully installed Kali 2.0 with Win10 but after reboot, it still boots to Windows and no GRUB. When I hit F12, only 1 entry – Windows Boot Manager, No Debian or Kali. I boot again in USB, selected the Live version (to launch a terminal and issue grub-update) but it can’t continue, it just shows the sad smiley inside the computer and the text, Something went wrong blah blah…Please contact the system admin.
It’s likely because GRUB was not installed in the EFI System Partition. Reinstall Kali, making sure to follow instructions in step 7 of this tutorial – http://linuxbsdos.com/2015/10/19/how-to-dual-boot-windows-10-kali-linux-2-on-a-pc-with-uefi-firmware/2/
Followed the tutorial correctly but still GRUB doesn’t show up during boot or in boot menu. I keep doing this for like 10x and different tutorials I could find on the web and nothing works.
Well, then, let’s check if GRUB is being installed. Use instructions given in this guide to see if there’s a folder for GRUB in the EFI System Partition.
If it’s not there, then GRUB is not being installed. If it’s there, delete it as given in that guide, then try installing Kali again.
You said three partition for kali.
Please,i don’t have large storage
Can you tell me the recommended minimum sizes for
Those three paetitions
I want to use large volume only for the partition to storing files and not for system and recovery etc….
Can you help me?
(Sorry,i’m not good in eng)
If you don’t have enough storage to put /home and / (root) on different partitions, you can create just the root partition, so you end up with just 2 partitions – swap and root.
Swap can be very small, like 512 MB even. Then you can allocate the remaining storage to root.
Thanks you So Much????
Nice and quick reply.
Thanks for quick reply, but the i can’t see any EFI system partition option in use as field..
Sir but some how i managed to dual boot by making my system to boot from both UEFI and BIOS mode using EasyRE tool and then added the boot entry of Kali to MBR using BCD edit tool…
But now the problem is that the dual booted Kali is not having persistence. Means i saved the file on kali desktop and restarted the system and checked for the file on desktop but it was missing.
Any help will be appreciated thank you.
Help needed!!!
Sir i followed your tutorial and proceeded as instruction but at step 7 while checking EFI Boot partition(#2) bootable flag shows ‘on’, but use as field shows ‘do not use’ option.. so i didn’t proceed further and canceled installation to avoid any risk. Please guide me further. Whether i should proceed further or not as i am new to Linux.
Thank you
If the Use as field shows do not use, then change it to what’s shown in that image, that is, change it to EFI System Partition. Just double-click on it to change it.
When I do this, EFI System Partition does not show up in the options. What should I do?
In which figure/step are you referring to, and what options show up for you?
Step 7 “Use As” is “do not use” and “use as efi” is not in the options list
Options are:
– Ext4 journaling file system
– Ext3 journaling file system
– Ext2 file system
– btrfs journaling file system
– JFS journaling file system
– XFS journaling file system
– FAT16 file system
– FAT32 file system
– swap area
– Reserved BIOS boot area
– physical volume for encryption
– physical volume for RAID
– physical volume LVM
– do not use
OK, for this, I’ll have to give the installation another go, to find out what the heck is going on with Kali. Check back latest this coming Sunday.
I have 500GB hard disk Windows 10 installed in it. And I have C drive of 200 GB and 100 GB D drive and remaining is E drive.
to install Linux I have to shrink C drive.
My question is If the space left after shrinking C drive is 150 GB then Linux use 150 GB only or more? And what about the remaining D and E drive of windows?
If the space left on the C drive is 150 GB, then the freed space left for Linux is 50 GB. By the way, what’s on the D and E drives?
I have songs and videos in D and E drives.Lol
Can I access those files from the Linux ?
Yes, you can. See How to access Microsoft Windows files and folders from Linux
So I can now just make a bootable usb drive with win32 disk imager and boot it to uefi mode and install Kali with it? Or do I still need to follow this: https://www.quora.com/How-do-I-boot-kali-Linux-live-usb-in-Windows-10-UEFI-boot-menu-I-couldnt-able-to-boot-from-boot-menu
Yup, Kali now supports UEFI booting out of the box.
Cool! Thx for fast reply sir!
hello! thank you for this wonderful guide
I have a question if someone can help me out,
My system will only boot kali with secureboot disabled, is there a way I can get this working?
If you meant with Secure Boot, or Restricted Boot, enabled, I doubt. On most OEM computers, and depending on the distribution, you have to disable Secure Boot for this type of setup to work.
Great tutorial, As we speak kali is installing
5*s
Uh, so I did all that and it didnt work. I still boot right into windows. Also, step 7 didnt work like it was supposed to. You shouldve included how to fix it if it needed to be fixed.
It doesnt even show the partitioning I spent hours setting up after the install was supposedly completed. Dumb.
You’re very good at asking for help.
when i right clicked my c drive there was no option to shrink volume what should i do in this instance
What options did you get, and is there enough free space on the C drive?
When choosing to boot into usb, the only option available for me are usb: and not in uefi mode.
That can happen if the image was not transfered to the USB stick properly, or EFI mode is not enabled in the BIOS/UEFI setup utility.
UEFI is enabled and secure boot should be disabled, right?
Secure Boot should be disabled, but I don’t think not doing so will prevent the UEFI entry to show in the boot menu.
Redo the transfer to the USB stick again. That solved a similar issue I had with the Kali installer.
What did you use to transfer the ISO image to the USB?
PowerISO.
Try using Unetbootin or another such program that runs on Windows. http://unetbootin.github.io/
I used Unetbootin but it just extract the files into the usb, I can’t boot into it. I tried using Rufus with the setting GPT partition scheme for EUFI but it says Kali Linux does not support EUFI but I thought Kali supports EUFI? I tried to use the default setting but it gives an error stating that Kali uses a new version of syslinux while Rufus uses an old version of it.
Kali support UEFI, that I know, because this tutorial was written on a PC with UEFI firmware.
What software did you use to create bootable usb?
I create all my USB’s on Linux, and I create them from the command line using the dd command.
Do you have a Linux distribution running on any computer now?
No. I’ll try creating one from the command prompt and see if it’s going to work or not.
Before the end of the day, I’ll try and create one on Windows and write about it, so others may learn from it.
I followed the guide below to turn a spare usb drive into a live boot and it worked flawless.
http://docs.kali.org/downloading/kali-linux-live-usb-install