
Kali Linux is a Debian-based Linux distribution designed for security professionals and more experienced Linux users. The latest edition, released at the end of August (2016), is Kali Linux Rolling 2016.2.
In this article, you’ll learn how to dual-boot Kali Linux Rolling 2016.2 and Windows 10 on a computer with UEFI firmware. The computer used for this exercise is a Lenovo G50 laptop with Windows 10 already installed.
First Step – Get Your Windows 10 Computer Ready
1. For a pain-free and successful operation of the sort that you’re about to undertake, it is recommended that you disable Secure Boot. How this is done depends on your computer, but if you have the same Lenovo laptop I used for this tutorial, see How to disable Secure Boot on a Lenovo G50 laptop. On an HP 250 G5 laptop, see this guide.
2. From the BIOS or UEFI setup utility, configure the computer to boot from external media.
3. After that, you need to free up disk space from your computer by shrinking the C drive or other partition with enough free space on it. Getting that done is fairly simple by using the Windows 10 partition manager. When completed, the partition should show partitions and a free disk space similar to the one in Figure 1.
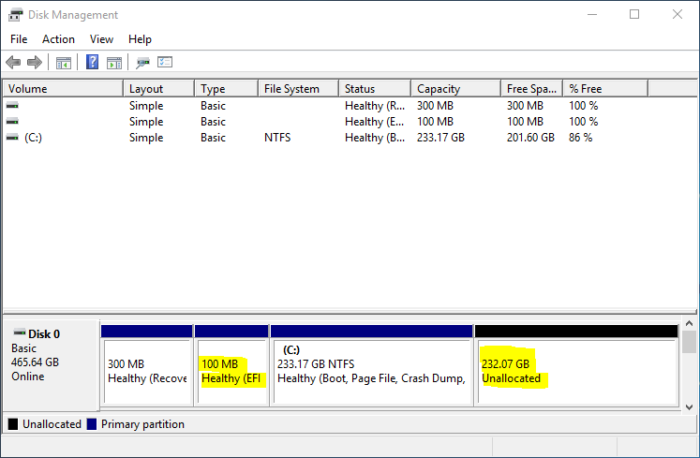
Figure 1: Windows 10 partitions and the free disk space for installing Kali Linux Rolling
Download Kali and Create a Bootable USB Stick
The next step in this operation is to download an installation image of Kali Linux Rolling 2016.2, the latest at the time of this publication. That edition comes in different desktop flavors and they are all available for download at the project’s download page.
After the download has completed, you may now use it to create a bootable USB stick. From Windows 10, use this article as a guide to create a bootable USB stick of Kali Linux Rolling 2016.2. From any Linux distribution, the simplest method is to use the following command:
# This command assumes that you're executing it from your Download directory
# If you're using the same edition as used here, you may just copy and paste.
# Otherwise, change the edition of Kali to match the one you downloaded
# /dev/sdb is the target USB stick. Yours might not be sdb, so verify before copying and pasting

sudo dd if=kali-linux-2016.2-amd64.iso of=/dev/sdb bs=1M conv=sync

#
In the next step, you’ll use that bootable USB stick to install Kali Linux Rolling 2016.2 alongside Windows 10.
Install Kali 2016.2 Alongside Windows 10
Here’s the fun part – actually installing Kali Linux Rolling 2016.2 alongside Windows 10 on the same hard drive. If you follow the steps as given here, you should have yourself a dual-boot system running Kali Linux Rolling 2016.2 and Windows 10 in about 12 minutes. No need to copy any files manually.
To make things easier and to reduce the number of images used in this article, I made use of the automated disk partitioning feature of the Kali Linux installer. For most users, this should be good enough, but if you need to create a custom set of partitions, the installer also has a manual option.
So if you’ve not done so already, insert the bootable USB stick you created in the previous step in a free USB port and reboot the computer. If it’s been configured in the BIOS or UEFI setup utility, it should boot into the USB stick. If it does not, access the computer’s boot menu and select the appropriate entry. In Figure 2, that entry is EFI USB Device (USB Flash Disk), and it should be the same on your computer.
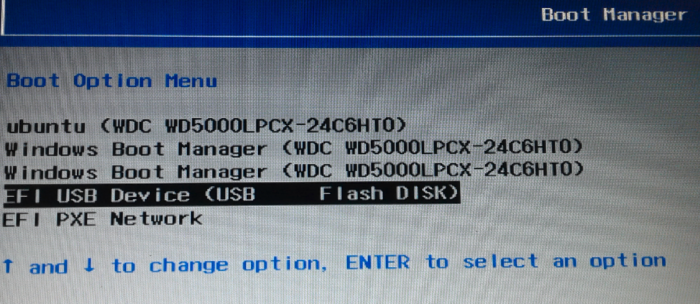
Figure 2: Computer boot menu showing the boot options
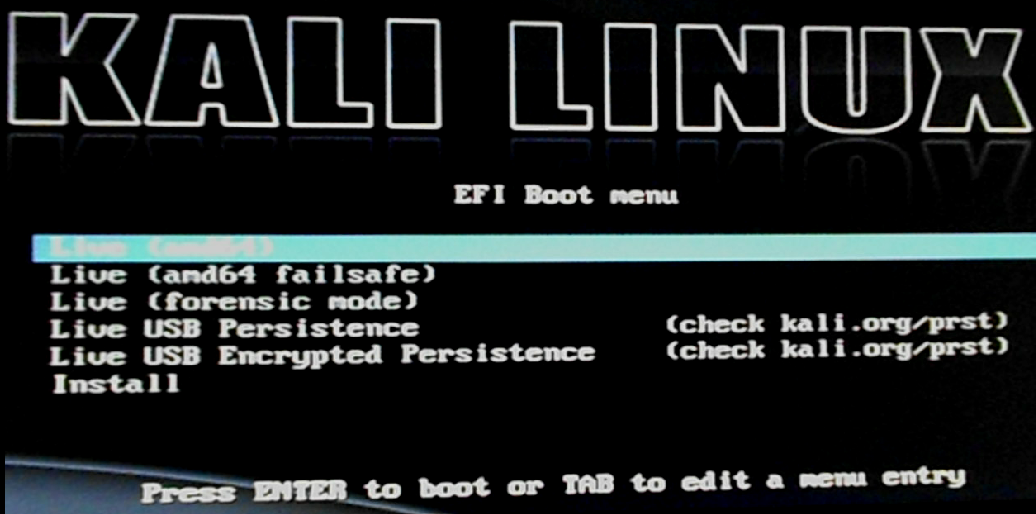
The EFI Boot menu of the Kali Linux installer has several options, but the recommended one is Graphical Install. So select it and press the ENTER/Return key.
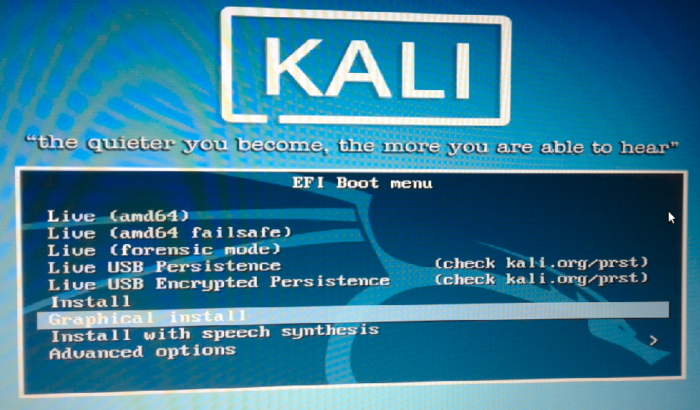
Figure 3: Boot options of Kali Linux Rolling 2016.2
Click through and optionally configure what’s needed in the next few steps (about nine) until you get to the disk partitioning step shown in Figure 4. We’ll be using a plain-vanilla set of partitions for this tutorial (no LVM or disk encryption), so select Guided – use the largest continuous free space. With that option, the installer will auto-partition the disk space you freed up in step 1. Your C drive and other Windows 10 partitions will not be touched. Click the Continue button to move to the next step.
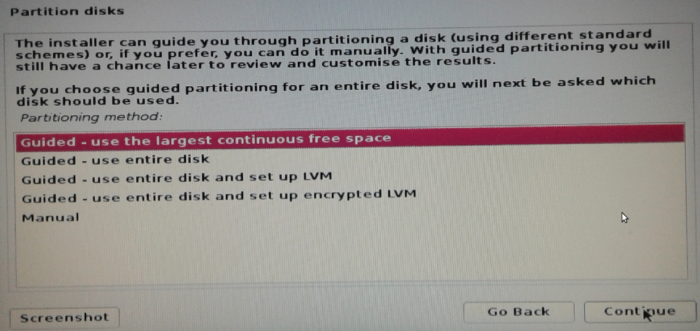
Figure 4: Disk partitioning options of Kali Linux Rolling 2016.2 installer
At the next step, shown in Figure 5, you have the option of customizing the type of partitions that will be created by the installer. By selecting Separate /home partition, the installer will create a partition mounted at /home, besides the root and swap partitions, for a total of three partitions. Continue
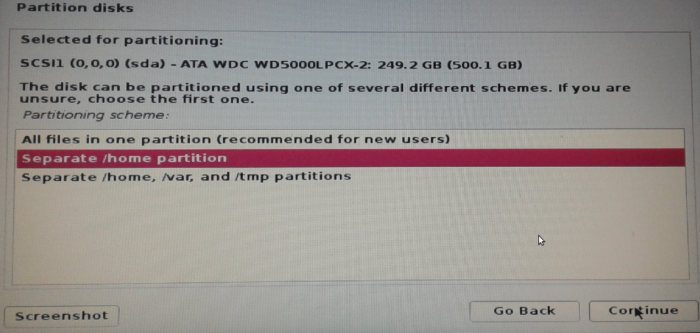
Figure 5: Choice of disk partitions on Kali Linux Rolling 2016.2 installer
At the step shown in Figure 6, the new partitions created by the installer will be listed below the existing Windows 10 partitions. In this image, the partitions are numbered from 5 to 7. The next task is to make sure that GRUB, the boot loader/boot manager, will be installed in the EFI System Partition (ESP).
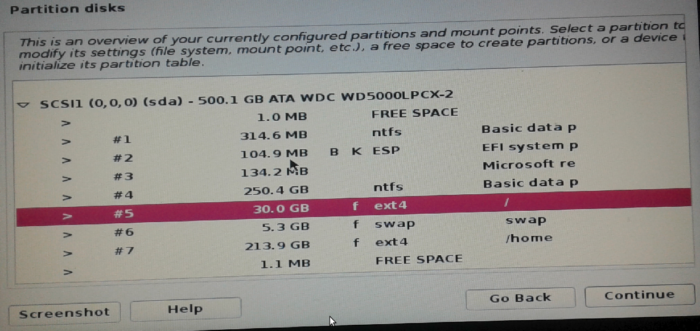
Figure 6: Automatically-created disk partitions on Kali Linux Rolling 2016.2
So double-click on the partition that corresponds to ESP on your system to make that verification.
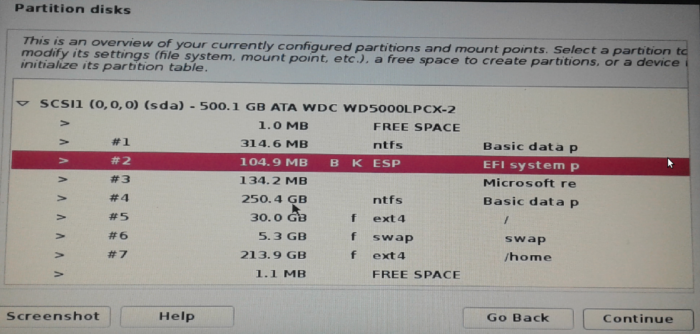
Figure 7: Kali Linux Rolling 2016.2 EFI System Partition
That should open the window shown in Figure 8. If the value for the Use as option is not EFI System Partition, double click on it to see the available choices. If it’s not listed in the available options, then your system does not have one, which means that your hard drive was not partitioned using the GPT partitioning scheme. For more on GPT, the GUID Partition Table, see A beginner’s guide to disks and disk partitions in Linux
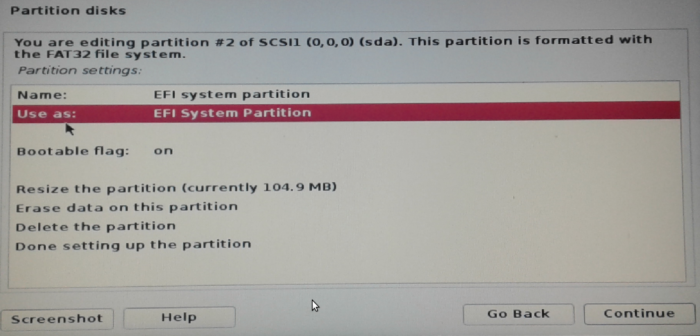
Figure 8: Configure Kali Linux Rolling 2016.2 EFI System Partition
Still on the same window as in Figure 8, select Done setting up the partition and click Continue.
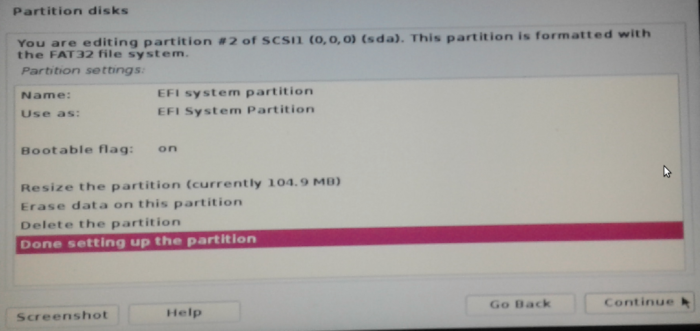
Figure 9: Configure Kali Linux Rolling 2016.2 EFI System Partition
That should take you back to the main disk partitioning window. All is now set on that front, so select Finish partitioning and write changes to disk. Continue.
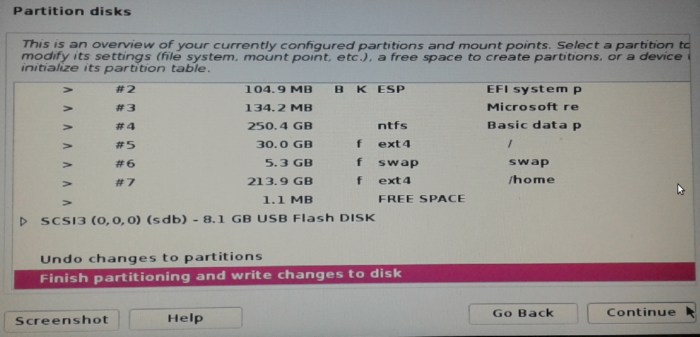
Figure 10: Complete set of Kali Linux Rolling 2016.2 partitions for dual-booting with Windows 10
The default option at this step is No, so select Yes. Continue.
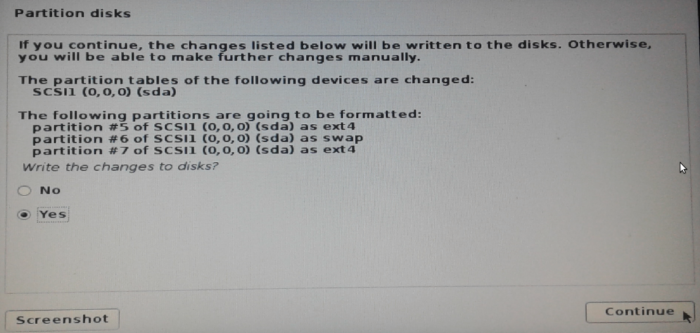
Figure 11: Formatting partitions for installing Kali Linux Rolling 2016.2
In less than 10 minutes, you should see the window shown in Figure 11. Continue. After all the post-installation tasks have been completed, reboot the computer.
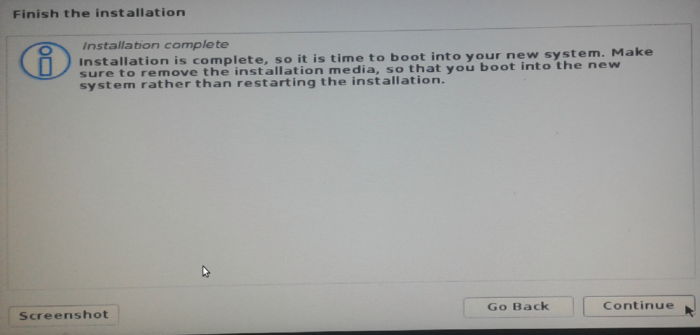
Figure 12: Successful installation of Kali Linux Rolling 2016.2
Boot Into Your New Dual-boot System
If all went well in the previous step, rebooting the computer should bring up the GRUB boot menu of Kali Linux Rolling 2016.2. The first entry should be Kali GNU/Linux, and one of the others should be Windows Boot Manager…. Take turns booting into each operating just to make sure that installing Kali Linux did not break anything.
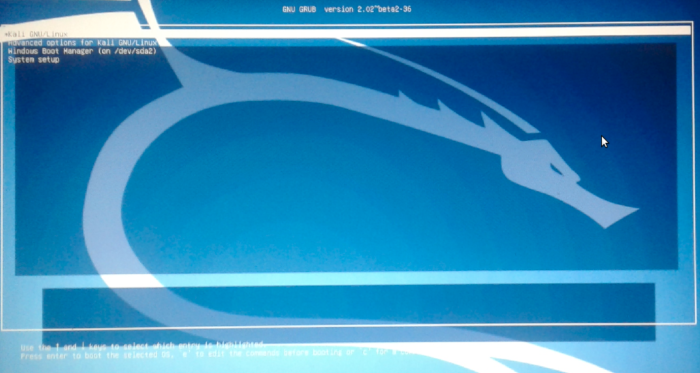
Figure 13: GRUB boot options of Kali Linux Rolling 2016.2
When attempting to log into Kali Linux Rolling 2016.2, the username is root.
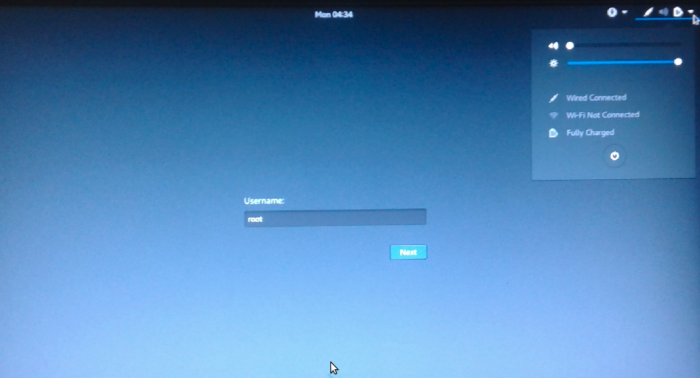
Figure 14: Login screen of Kali Linux Rolling 2016.2
And the password is whatever you set it to during installation.
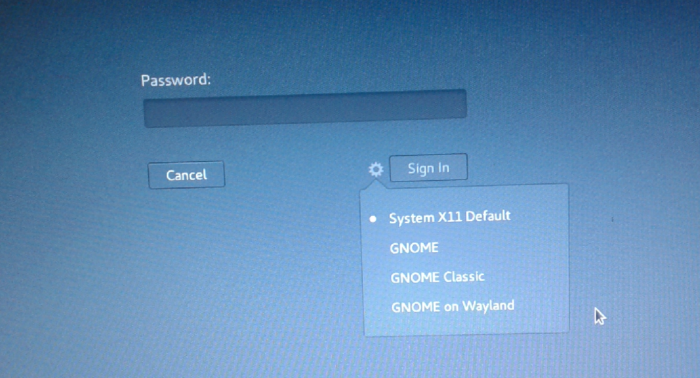
Figure 15: Login screen of Kali Linux Rolling 2016.2
Note that the default boot manager of the computer should be Kali, but you can always change it to the Windows 10 boot manager at any time. It is recommended that you live it at Kali/GNU Linux, because the entries in Kali’s GRUB menu make it easy to boot into Kali Linux or Windows 10 or to access the UEFI setup utility (that what the System setup option is for). If you ran into any issues while trying to use this guide to set up a dual-boot system, post a comment. For making GRUB the default boot manager of a dual-boot setup on an HP 250 G5, consult this article.
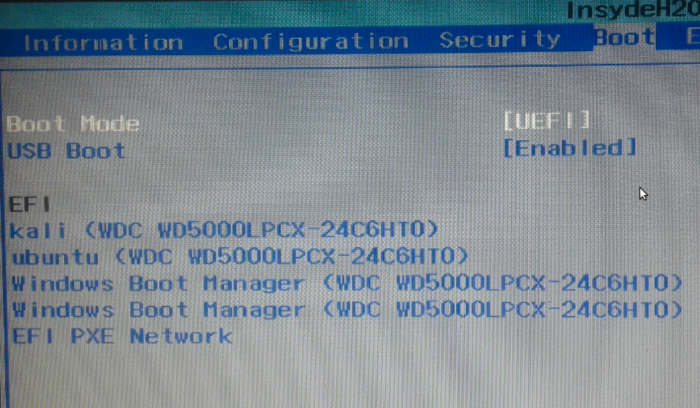
Figure 16: Boot manager options on a computer with UEFI firmware


i have gpt disk partition but i did not find “use as EFI system” What should be the further process to solve the problem ?
i have done install Kali but i want to GRUB directly boot to Kali without chose windows or kali. So what must i do?
The Kali boot manager should already be the default, so when you boot, it would stop at the GRUB menu, then boot into Kali if you don’t do anything else. If that’s not happening, make the Kali boot manager the default in the BIOS/UEFI interface.
After installing linux, it just directly go to windows 10. I disabled secure boot, and how to knows that my kali know the efi partition?
I have a dual boot setup , win 10 and Kali, on my lenovo yoga 900. Previously I could go into the boot menu and select win 10 or kali with no problem. Today I tried and kali has disappeared from the boot list. I checked and secure boot is still disabled and my HDD partitions seem to be intact, just no Kali option in the boot menu. Any ideas? Thanks in Advance
Leon
When you say Kali is no longer in the boot menu, are you referring to the GRUB boot menu?
What about the computer’s boot menu? Try booting from that.
Once you can boot into Kali again, run the following command to reinstall GRUB: update-grub
Thanks for the reply finid,
I am not using GRUB, I am using the computer/bios boot menu. The laptop I use has a massive resolution so the GRUB text is so small I cant read it, and the laptop has a handy button to go straight into the boot menu/bios. it boots into windows when I press the power button but will go into a menu that gives me bios and boot options when I press the other little button, every handy.
I have an ASUS laptop preinstalled with Windows 8.1 and using UEFI firmware. I have a partition with the name EFI System Partition (fomatted with FAT32) but under use as label it says “do not use”. When I view the choices for that field, I have a lot but none is EFI System Partition. What should I do? I read A beginner’s guide to disks and disk partitions in Linux.
Did you disable Secure Boot? If not see Disable Secure Boot on HP 250 G5 laptop and How to disable Secure Boot on a Lenovo G50 laptop.
same here! any way to solve this issue?
I have disabled the Secure Boot. I don’t see the EFI USB Disk in boot menu. I see Sandisk USB Drive and my kali linux menu is simply “Boot menu”. Rather than EFI boot menu. ?
On the latest distributions, there’s no longer separate EFI and USB versions of the installer, so just select the only one you see – Sandisk USB Drive.
i have a pc with windows 10 preinstalled in uefi mode. so this will work right? as i have heard that the pcs which have windows preinstalled in uefi mode will have boot problem and switching prb after installing kali
Disable Secure Boot and you won’t have any problems. See how to Disable Secure Boot on HP 250 G5 laptop and How to disable Secure Boot on a Lenovo G50 laptop.
Also Try ctrl+f10 or any other variant specific to your board to access the boot options?
Did You try to change the timeout on boot in msconfig from zero to 30 or greater?
after installing linux…it doesnt entry to kali gnu linux….but direct to windows 10
Did you verify that Kali knows about the EFI System Partition? That’s covered on figures 8 and 9 of this article.
Also, did you disable Secure Boot?
I have tried various usb tools to burn kali-linux-kde-2016-W46-amd64.iso and every time it directly boots into windows.Any suggestions?
Are you trying it on Windows or a Linux distribution?