Upgrading a distribution’s kernel is something I tend to shy away from. There was a time, though, when recompiling the Linux kernel was fun. But that was years ago. Now, I just use the version that’s installed and let the system take care of upgrading to the latest stable version.
But after I found out that my Linux Mint-powered-laptop, which I had just upgraded to Linux Mint 17.1, was still using kernel version 3.13, I decided I needed to be running a more recent kernel version and upgraded it to kernel 3.16.
After that, I took a look at a test installation of Ubuntu 14.10 and found that it was using kernel 3.16. A visit to http://kernel.ubuntu.com/~kernel-ppa/mainline/ revealed that kernel 3.17.1 was available, so I decided to upgrade to that.
That’s the gist of this tutorial – how I upgraded the kernel in Ubuntu 14.10 from 3.16 to 3.17.1. It’s a very simple task, but one that can cause a minor headache – if you’re using some fancy hardware that requires special drivers.
Even at that, it’s still worth trying, because the worst that can happen after upgrading is your system will boot, but certain features will not work. If that happens, you can always remove the offending kernel. The commands for doing that are given at the end of this tutorial.
So, to upgrade to kernel to the latest mainline Ubuntu 14.10 kernel, which at the time of this writing is version 3.17.1, visit http://kernel.ubuntu.com/~kernel-ppa/mainline/v3.17.1-utopic/ and download the three required files. Those three files are shown in Figure 1.
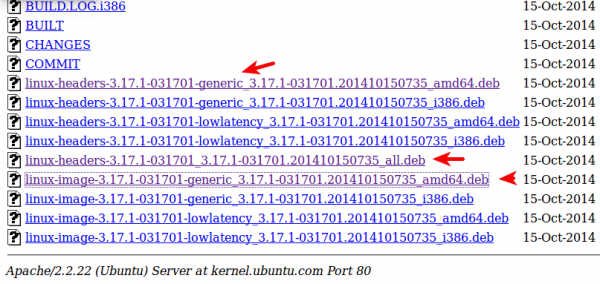
Figure 1: Kernel files to download for upgrading to version 3.17.1.
In that link, you have the option of download a generic or low-latency kernel. Unless you have a very low-end computer or have the need for real-time features, the generic version is what you’ll download. So download all three files to your Downloads folder, open a shell terminal and cd (change) into it. The following code block shows the sequence of commands you’ll use to install it.
# Change to the Downloads folder

cd Downloads

# Verify that the files are there

ls | grep *deb

linux-headers-3.17.1-031701_3.17.1-031701.201410150735_all.deb
linux-headers-3.17.1-031701-generic_3.17.1-031701.201410150735_amd64.deb
linux-image-3.17.1-031701-generic_3.17.1-031701.201410150735_amd64.deb

# They are. Cool! Let's install them.

sudo dpkg -i *deb
After that, reboot the computer. Once logged in, you can verify that your system is using the new kernel by typing:
# Verify running kernel

uname -r

3.17.1
If for any reason you want to remove the just installed kernel, follow the sequence of commands in this code block.
# What are the installed kernels?

dpkg --list | grep linux-image

ii  linux-image-3.16.0-23-generic
ii  linux-image-3.17.1-031701-generic
ii  linux-image-extra-3.16.0-23-generic
ii  linux-image-generic

# Remove the one you just installed

sudo apt-get purge linux-image-3.17.1-031701-generic
After that last command has completed, reboot the computer and you should be using the previous kernel.




These are good instructions but I wonder why you decided on 3.17.1 when 3.17.6 and 3.18.0 kernels were released yesterday. I chose to upgrade to 3.18.0 and all seems good.
If you look here, you’ll see that version 3.17.1 is the latest stable version available for Ubuntu 14.10.
I wonder what goodies 3.18 brings to the table!
If you could change the kernel for LinuxMint 17.1 from 3.13 to 3.17.1, I suppose the same procedure could also apply for Xubuntu 14.04?
Once done, what would happen on System update? Would it see that the kernel (now 3.17.1) is different than what there is in the repo 3.13.x. Would system update overwrite the manually installed kernel?
Thanks for any clarification
Unless there’s something I’m missing about kernel updates, the system won’t remove a kernel that’s NEWER than what’s in the repo.