After reviewing PC-BSD 10.1 and installing it on an encrypted hard drive, the next logical thing to do is attempt a dual-boot setup between it and Windows 8 and publish an article showing how to go about it.
Unfortunately, multiple attempts to setup such a system failed, so instead of writing about how to set up a dual-boot system between PC-BSD 10.1 and Windows 8, I can only write about those attempts failed.
The test system I used is the same one I used to install PC-BSD 10.1 on an encrypted disk. And that system has a UEFI firmware. Because it is a self-built unit, I had to install Windows 8 before attempting to install PC-BSD 10.1 alongside it on the same hard drive.
There was no problem installing Windows 8. However, during the disk selection step, I chose to assign the amount of disk space that Windows 8 should use manually. That was just to make up for the inability of the PC-BSD 10.1 installer to auto-shrink an existing partition that has another OS on it. Figure 2 shows how the Windows 8 installer partitioned the disk – a 500 GB unit. Drive 0 Unallocated Space was intended for use by PC-BSD’s installer.
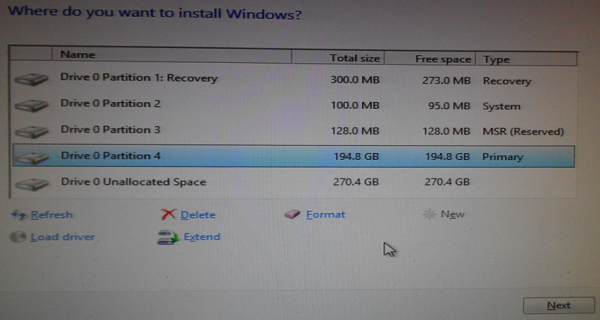
Figure 1: Manual disk setup during Windows 8 installation.
After the installation of Windows 8, Figure 2 shows the partitions on the target disk as seen from Windows 8’s partition manager. Again, that Unallocated space (highlighted) was intended for PC-BSD 10.1.
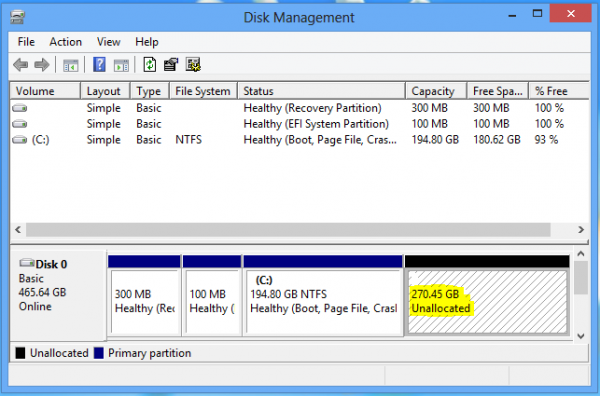
Figure 2: Windows 8 partition manager showing Windows partitions and unallocated space.
Time to install PC-BSD 10.1. The installation image, downloaded from here, was transferred to a USB stick using the dd command. With Linux distributions that have support for installation on computers with UEFI firmware, accessing the computer’s boot menu with the installation media attached allows one to choose what version of the installer to use for installation – the standard version or the UEFI-aware version. In Figure 3, the PNY USB 2.0 FD 1100 entries are the options for the installation media, where the UEFI PNY USB 2.0 FD 1100 entry should give access to the UEFI-aware version of the installer.
However, with PC-BSD 10.1, selecting that option leads to a boot failure and a GRUB error. Selecting the USB: PNY USB 2.0 FD 1100 entry does the trick. And it boots into a UEFI-aware installer.
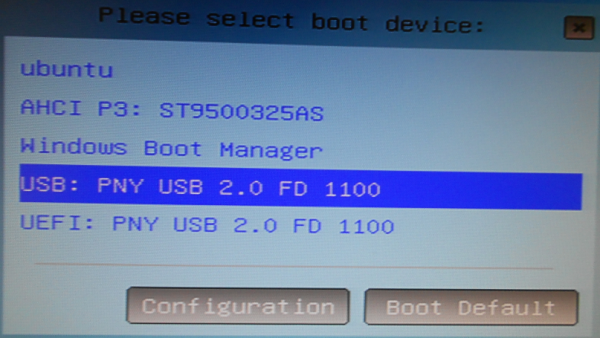
Figure 3: Computer’s boot menu showing the boot options.
Figure 4 shows the Disk Selection step of the PC-BSD 10.1 installer. Because the installer cannot auto-shrink a partition that has another operating system’s data on it, I had to click on the Customize button to select the unallocated space that I had prepared for it. I was actually surprised that the installer did not find that space automatically.
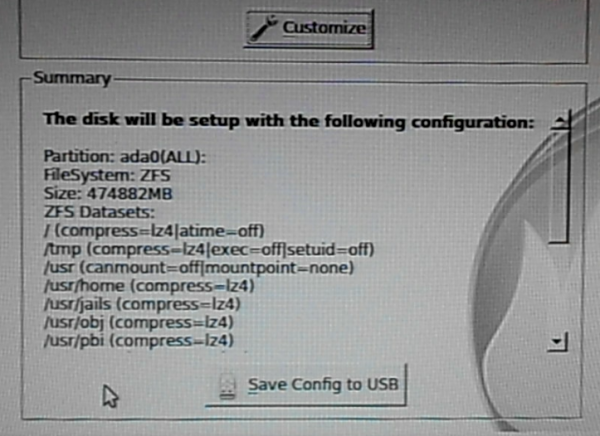
Figure 4: Disk Selection step of PC-BSD 10.1 installer.
Clicking Customize opened the window shown in Figure 5. Whether I selected Basic or Advanced and clicked the Next button, the unallocated space was missing from the list of partitions detected by the installer. Consequently, there was no place to install PC-BSD 10.1. I thought that if I logged back into Windows 8 and formatted the unallocated space as a Windows partition using either NTFS or exFat, that perhaps the installer (PC-BSD’s) will be able to detect it. So that’s exactly what I did.
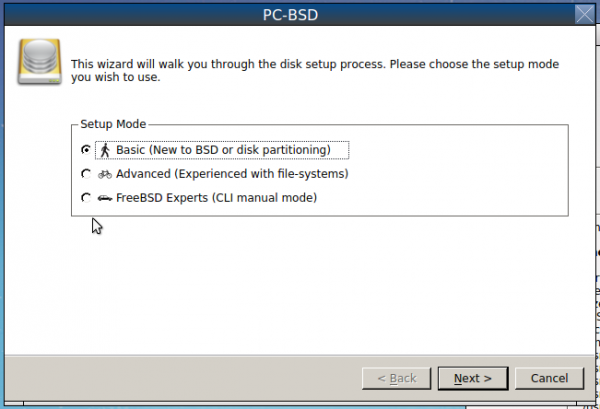
Figure 5: Basic, Advanced and Expert disk partition options of PC-BSD 10.1 installer.
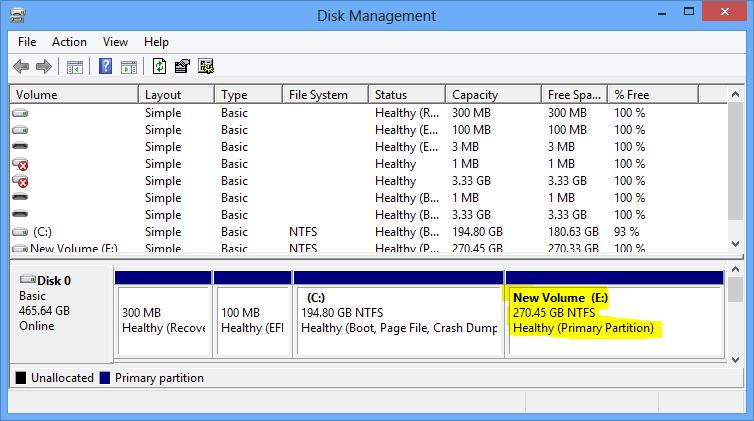
Figure 6 shows the now formatted space (highlighted) as seen from Windows 8’s partition manager.
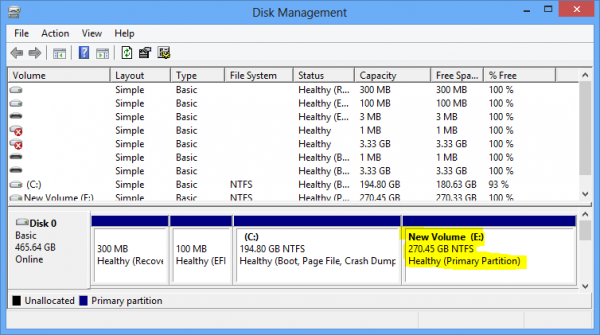
Figure 6: Windows 8’s partition manager showing formatted free space (highlighted).
Back in PC-BSD’s installer and clicking the Customize button opened this window. Now the installer detected the formatted space. In this figure, the target space intended for use by the installer is ada0p5: 276983MB ms-basic data. That’s a 276 GB disk partition. Selecting it and clicking Next opened another window…
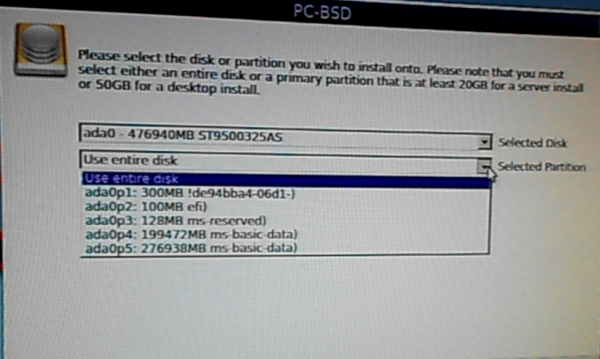
Figure 7: Disk partitions detected by PC-BSD’s installer.
Where the installer showed how it was going to partition the space. That was fine by me, so I clicked Finish.
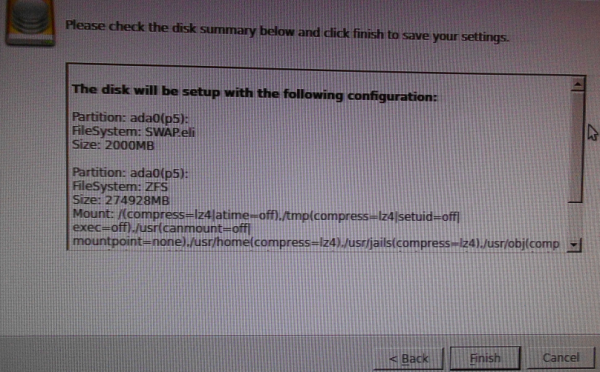
Figure 8: Partitions set up by the PC-BSD installer.
That dropped back to the main installer’s window. Clicking Next there to continue with the rest of the installation triggered a failed, with this error message.

Figure 9: PC-BSD 10.1 failed installation error message.
The most important snippet from the error report is shown in this output.
kern.geom.debugflags -> 16

kern.geom.label.disk_ident.enable: 1 -> 0

Running: gpart modify -t bios-boot /dev/ada0

gpart: Option 'i' not specified

...

EXITERROR: Error 1: gpart modify -t bios-boot /dev/ada0

Unmount: /mnt

Running: umount -f /mnt

umount: /mnt: not a file system root directory
So it appears that the installation attempt failed at that point because the correct gpart option was not specified. The -i option is used to run gpart interactively, but why it’s necessary to use it in the graphical application? In any case, I’ll be logging a bug report.




I have a same errors, on GPT, MBR, old and new machines with BIOS, UEFI, Apple EFI. Next Mouse not work, PCBSD team says is freeBSD problem, but i install FreeBSD on same machines without problem.
So a temporary solution would be to install a FreeBSD core and install KDE on top of it.
PCBSD must be installed into a primary partition. See Section 5.5 of the PCBSD 10.1 Handbook. The “old” bios limited disks to four primary partitions. You already had four partitions before you formatted the unallocated space to make partition #5. Although you have UEFI, perhaps your hard disk was configured under the old bios method which would account for you being unable to install into the fifth partition.
The probable reason that you could not install PCBSD is the lack of sufficient primary partitions.
The rule is that PCBSD must be installed to a primary partition. See Section 5.5 of the PCBSD 10.1 Handbook. Here, your Windows installation had already used four primary partitions (Recovery, Reserved, MSR, and “Primary”). Thus PCBSD would not install to the 5th partition labeled ad0p5.
There must be some other reason, because the partitioning scheme used by Windows 8 is GPT, which means all partitions are primary. I’ll give this another shot when time permits.
I have made this installation – PCBSD 10.1 on dual boot with Windows 8.1. It worked. As much as I could understood from your long presentation (it seems to be accurate), it is strange for me how come to select PCBSD installation on ada0p5 when you have only 4 partitions on Windows 8’s partition manager.
On my windows 8 hard drive of 500GB I installed PCBSD 10.1 on ada0s4 – that means ada0s4a for / and ada0s4b for swap) selected by Advanced (experienced with ..)
Unlike Windows, I guess freeBSD automatically format the partition before installation.
Windows 8’s partition manager will not show the MS Reserved partition. That accounts for the difference in the number of partitions you see in PC-BSD’s installer and the Windows Boot Manager. It’s the same with Linux installer’s.
But glad you got it working. Is your PC an OEM unit?
OEM unit? No, I don’t think so. I have an ASROCK H81M motherboard with an INTEL core i3-41240 @ 3.5GHZ with 8GB RAM on Windows 8.1 license separately. I am looking for definitely switch to FreeBSD, after few year of trying different Linux versions (Slackware, Ubuntu 12, 13.04, 13.10 14.04 and DEBIAN 7.60). The DEBIAN was the slower. PCBSD is a little different and I am trying to understand ZFS working principle .. thank you for asking
About the “And that system has a UEFI firmware. Because it is a self-built unit, I had to install Windows 8 before attempting to install PC-BSD 10.1”, I have to mention I tried it. The windows installation after PCBSD is installed will not add that BSD partition as a boot option, as windows do not read FreeBSd partition. Dual boot work only if PCBSD is second install. So installing Windows (first) can’t you install a smaller partition for it or can’t you use gpart bootable CD to shrink partitions?