Deepin is a desktop distribution that’s based on Ubuntu Desktop. It used to be called Linux Deepin, but the new name is just Deepin.
Deepin 2014, the latest version, which was released about two weeks ago, uses a custom desktop environment called Deepin Desktop Environment (DDE). And it is the first version that shipped with the second edition of that desktop. It is also the first version that shipped with a new graphical installer.
I like Deepin and what the developers are trying to do – build a desktop distribution that just works and is fun to use. With this review, I’ll take you through the different aspects of Deepin 2014 and what I think about them.
Let’s start with The Installer: Deepin’s brand new graphical installer, like every custom application from Deepin, is simple to use and cool to the eyes. However, it lacks some very important features. For example, there’s no support for LVM, the Linux Logical Volume Manager, full disk encryption, or even home folder encryption. I’m sure those features are in its roadmap, but right now, they are not supported.
Most of the features that it does have work as expected. This screenshot shows the installer’s user setup step, which also happens to be the first step of the installation process. It has the basic features, nothing more. What I’ll like you to see at this step is an option to encrypt the home folder. A password strength indicator would be nice, too.

This screenshot shows the installer’s second step, which is also its disk partitioning step. It has a Simple Mode and an Expert Mode. The simple mode is supposed to be the automated disk partitioning mode, but you have to be careful if there’s an existing OS on the target disk. Depending on the layout of the existing partitions, an attempt to set up a dual-boot system could leave you with an unbootable system. For such a setup, it’s better to have a free space that you can partition manually. (See Manual disk partitioning guide for Deepin 2014 and Dual-boot Deepin 2014 and Windows 7 on a PC with UEFI firmware.)

And this shows the expert mode. A number of features are missing here. There is, for example, no support no GPT partitions when creating partitions manually. And there’s no option to create a new partition table on the target disk, if you ever need to. Now you see that this graphical installer still needs a lot of work. I hope it gets all the missing features before Deepin 2015 is released.

The Desktop: Deepin Desktop Environment 2.0, which made its debut on Deepin 2014, is a redesigned version of what shipped in Deepin 2013. (See Linux Deepin 2013 review.) Not only does it look better than the earlier version, but it feels just right. There’s no fighting the desktop just to get stuff done. There’s a natural flow as you move from one task to the another. True, there are features that have not been implemented and a few that are buggy, but in general, the DDE 2.0 is a beautiful thing. And most of that stems from the design and location of the Control Center. Before getting deeper in to what makes the desktop fun to use, let’s make a brief stop at the login screen.
The Deepin 2014 Login Screen
This screen shot shows the default login screen.

And this one shows the same screen after the built-in guest account had been enabled. How to use Deepin 2014 Guest account shows how to activate it, a process which should not need a guide to setup, but which took me more time than I’ll like to admit to figure out.

Now to the desktop itself. In terms of look-and-feel, the desktop is simply the best I’ve come across. Yep, that includes Cinnamon. Yes, it still has some rough edges, but the design and layout are about as intuitive as it gets. It feels just right. And the three features that make it feel that way are the dock, the launcher and, most especially, the Control Center. Below is a view of the default desktop without the default wallpaper.

Three of the desktop’s corners are hot corners. Right-clicking on the desktop and selecting Corner navigation from the context menu gives you a view of the hot corners. Modifying the action of a hot corner is just a matter of selecting a different option from a list of available actions. Part of what makes the desktop a joy to use is that most aspects of the system can be configured and customized without opening a window. This screenshot shows the hot corner view of the desktop.
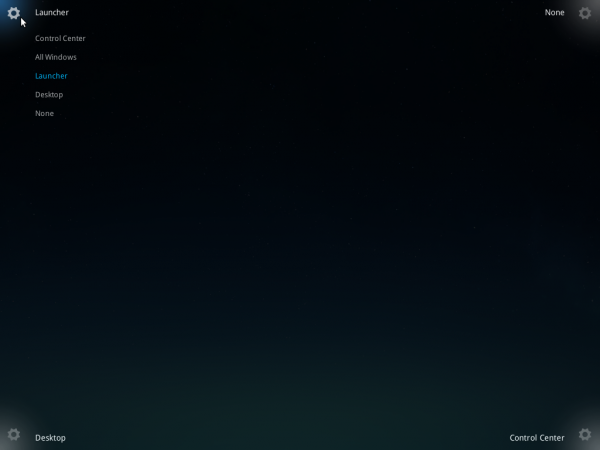
Three of the four corners in Deepin 2014 are active Hot Corners.
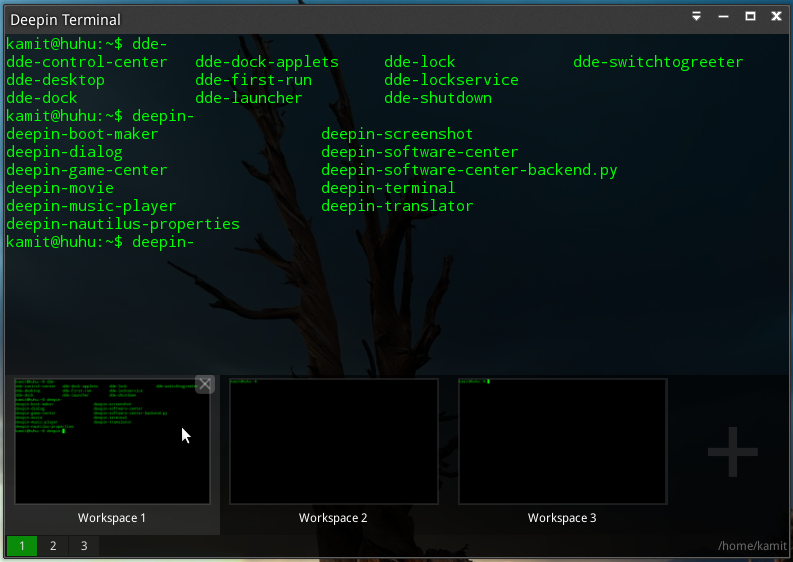
Out of the box, Deepin 2014 comes with four workspaces (virtual desktops) activated, but the only out-of-the-box method of showing them is to use keyboard shortcuts (Ctrl 1 to Ctrl 4). However, the unused corner (top-right) can be configured to show all open application windows of the active workspace or all four workspaces. Once configured, bounce the mouse cursor off the hot corner to show open windows on the current workspace. While still in that view, repeat the mouse action to show windows from all four workspaces. As cool as that feels, I think it will be better to also have icons on the dock for navigating between workspaces.
The open application windows visible in this screenshot are from all four workspaces.

The Deepin 2014 Dock
The dock is not the fisheye type and is glued to the bottom-edge of the desktop. There’s nothing flashy about it. It just works, though it could use a bit more customization options. As it is now, the only thing you can do to the dock is hide or autohide it. You can’t flip its position to any other edge of the desktop or reduce the size of the icons. Both those customization options would be really nice to have.

Out of the box, there are 13 applications on the dock. They are for the launcher, Deepin Store (graphical package manager), Deepin Games, Deepin Movie, Deepin Music, Chromium (default Web browser), Files (file manager), Control Center, calendar, Network Manager applet, volume controls, and Trash icon. Applications may be added to it by right-clicking on the application’s icon from the launcher and selecting Send to dock. You could also achieve the same effect simply by dragging and dropping an application’s icon from the launcher (to the dock).

To remove an icon, right-click on its icon and select Undock. The same effect can also be accomplished simply by dragging the icon out of the dock.


no internet connection. wifi on liveDVD 2014.1 doesnt work.
Made the jump to linux about 2 years ago, in that 2 years i have been through various distro’s always settling for ubuntu. Downloaded Deepin yesterday and was surprised how quick it is and easy to get around. The look and feel of it is just great.
Yes, Deepin is cool, but they still have hardware compatibility issues to iron out. The UI is definitely the most intuitive available.
Read a lot about Deepin and tried it on a virtual machine. It looks GREAT but in the virtual machine it does not run that good. The typical american reaction above (oh no.. its from China) sparked me to realy give it a try. As European i dont trust anything from the USA anymore. All my hardware is from China anyway, no complaints there. It will be my first switch (from Mint) ever. Now downloading the correct image… cant wait…
can you solve the problem which i have shared with you on Oct. 30 2014 ?
my computer’s configuration is intel dualcore 3GHz processor, 3 GB ram, intel 945 mother board i want to connet internet through nokiaX3-02 or zte mf190 usb modem. thanking u
If you’re trying to use the smartphone (Nokia X3-02) as a hotspot, it should work. Have you tried it with other distributions? I don’t have that phone, so I’m not in a position to help.
Ditto for the ZTE USB modem. Have you tried it with other distributions?
I tried it out in “live” mode and I liked the look and feel, but i tried 3 different computers and both the 32 and 64 bit versions failed at the end of the install leaving it unbootable!
Hmm… What’s the specs on your hardware?
it not work with neither nokiaX3c2 nor zte mf190 as modem
I haven’t had great experiences with Deepin 2014.1 unfortunately – which is a shame, as I had high hopes for it. It’s marketed as an intuitive, user friendly and stable OS, but I haven’t found it to be as effective in any of these categories as Mint or Ubuntu.
The layout of the installer is nice, but tooltips are vague. It took me a while to figure out that my username needed to be in lowercase, for instance, during the first stage of the installer, as the pop-up message only gave me “invalid username” to go off. Installing to a partition was more awkward than in Mint, in either Simple or Expert mode, and it was never fully clear from the instructions whether or not I was going to be overwriting something else in the process.
I tried to install Deepin on two systems – one a powerful desktop, with an ivybridge i5 processor, GTX 670 and 8GB of RAM. On 2014.0, 2014.1, 32-bit or 64-bit, the Dock never loaded properly, everything lagged and my system crashed on opening the control centre. I didn’t find the Deepin community to be as helpful as Mint, and it was quickly put down to a driver issue (possibly related to NVidia cards) and left at that.
On the second system, an Advent Milano netbook with a 40GB SSD, N270 Atom and 2GB RAM, Deepin ran, but slowly. More slowly than Ubuntu or Mint. I always prefer speed and simplicity over eye-candy, so this was a shame. My webcam and wifi did work out of the box however, so this was good news, but the again it did on the other distros I have tried.
I’ll revisit Deepin in about 6months to see where they are, but currently I wouldn’t be able to recommend to someone who was (for example) looking to change to an easy to use and stable Linux OS from Win XP.
Made in China and by Chinese….hell to the NO. No thank you, no thanks, and no way!
Ok, then, throw that computer you used to write your comment away since it was “Made in China and by Chinese.”
The backdoors in a chinese product and software are different as the backdoors made and designed par americans in chinese factory.
If you don’t understand that you have a HUGE problem.
And somewhere in China, a concerned Chinese citizen says: “The backdoors in an American product and software are not in the same category as the backdoors made and designed by the Chinese government in Chinese products. If you don’t understand that, you’re not a patriotic Chinese”.’
But seriously, Deepin is based on Ubuntu and is Free Software. So what backdoor are we worried about? Maybe in systemd…
I think deepin can be a good alternative to mint & …
This is the first time since 2008 that I’ve moved away from Ubuntu for a significant amount of time. Deepin is simply fantastic. One of the main reasons I left Ubuntu in the end was that I couldn’t take the clutter in the dash. The recommended programs, amazon search results, etc etc. I found deepin was clean and clutter free and yet it looks like a modern 2014 OS.
I love that you can edit the grub menu so easily, and add a background image- that is also a nice touch.
Their default apps are okay, but I ended up returning to my trusted apps.
There are a few minor niggles that need to be sorted out- one being that I keep bumping the smart corners by accident, making it ultimately better to disable them- I have no idea how they can sort that out, perhaps by adding options to activate with a bit more force, pressing a key while bumping, or double bumping.
I found the store to be completely bug ridden, to the point that 90% of the apps failed to install, and in the end I had to use synaptic to get all my programs up and running.
The launcher at the bottom of the screen needs a few more options- change size, arrange icons etc, but other than that, I have had very few irritations with this OS. It just works.
Ultimately, I think this is a real contender- definitely one to watch.
I and many others had the same problem. This forum post helped to take care of that.
Thanks for the heads up- Installed three programs and so far that seams to be working- *cross fingers.* They should think about doing that automatically on install.
I found deepin is apart other distros and looks like a new concept