Antergos is a Linux distribution based on Arch Linux. Formerly known as Cinnarch, it is a relatively new project and is poised to do for Arch Linux what Ubuntu did for Debian.
Like it’s parent distribution, it uses a rolling-release development model, which means that existing users do not have to reinstall to get the latest and greatest kernel and software packages. The simple act of regularly installing updates gives you the latest packages and features available from a new ISO installation image.
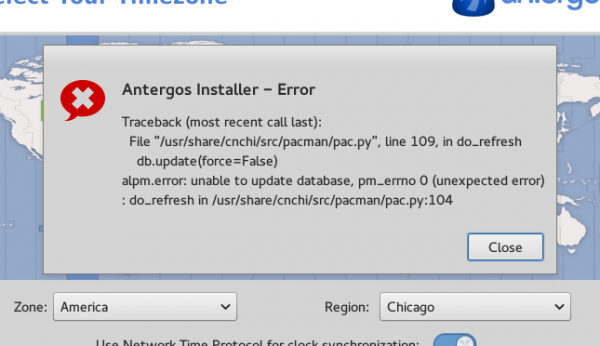
The latest edition is Antergos 2013.11.17. When it was just released, activity on the project’s community forum indicated that users were having a problem booting into the Live desktop. I didn’t have that problem, but every attempt I made to install a new system using a 64-bit version of the 2013.11.17 installation image failed with the error shown in the image below.

So it seems that there are major problems with that ISO image. A message posted on the project’s forum on November 18 (2013) said that a new image was being prepared for the main download server, and directed users to download a copy from a testing server until the main download server received the new image. However, every attempt to download from that testing repository gets aborted after less than 270 MB of the almost 750 MB file has been downloaded.
So trying to download and install the latest released of Antergos calls for a lot of patience. Finally, I decided to try the 32-bit installation image. Luckily, the installation was completed successfully. The rest of what follows comes from a test installation using that image.
UPDATE: Replacement installation images are now available from the main download server and I was able to install a test system using a 64-bit installation image.
Ok, now to the review, starting with a look at what the Cnchi, the graphical installer offers. Antergos comes as a Live installation image. Whether you elect to boot into the installer straight from the boot menu or launch the installer from the Live desktop, this screen shot show the options that will be presented to you. The graphical installer is still a work in progress, but I don’t think new and inexperienced users want to be messing around with a command line installer. So like a new user, I always go with a graphical installer.

A friendly message lets you know that there are certain features that are not yet supported by Cnchi, the graphical installer. So, if you need to install a system that uses RAID or btrfs subvolumes, you might want to try the command line installer or another distribution that supports those features.

Though GNOME 3 is the default desktop environment, Cnchi lets you choose from a list that also include Cinnamon, Openbox, Razor-qt and Xfce.

Though it says that the minimum disk space required for a successful installation is 3 GB, that is information is misleading, because a default installation of the desktop using Cinnamon or GNOME 3 or Razor-qt takes up between 3.5 GB to 4.0 GB of disk space.

This image shows the features you could enable or disable from the installer. The first two are enabled by default. I’ll also recommend that you enable Proprietary Software because you are going to need them.

This shows the default firewall rules. Uncomplicated Firewall (ufw) is the same firewall application used by Ubuntu and its derivatives. Even though there is a rule for SSH, the SSH server itself is not installed by default.

Like the graphical installation program of Ubuntu, Cnchi supports setting up disk encryption and LVM, the Linux Logical Volume Manager. LVM is not the default disk partitioning scheme.

If the disk encryption option is enabled, you will be required to specify the disk encryption passphrase. That’s to be expected, however, I did not expect that the passphrase will be readable as it is being typed.

This screen shot of the manual disk partitioning tool shows the partitions created by default, that is, when LVM is not used. This screen shot was taken from an installation using the GNOME 3 desktop. Notice the disk space used by the root partition. It’s clearly more than the minimum of 3 GB that the installer recommends. Note also that all three partitions are primary partitions.

This one shows the partitions created when LVM is used. In either LVM or non-LVM mode, the installer does not create a separate home partition or logical volume, and offers no option to create one in its automated disk partitioning options.

Package Management: Since Antergos is based on Arch Linux, pacman is its package management system. And the installed graphical interface on all its supported desktop environments is PacmanXG. This screen shot shows its main interface.

And this one shows the package management interface. PacmanXG does not have a fancy graphical interface, though it could use one. However, it’s live search feature is about the most responsive that I’ve seen in any graphical packager.

The range of tasks you can perform using PacmanXG.




Stephen sorry to said that … In your face!
How to know that a car is a lemon if nobody tries it ?
Thx finid for did the dirty job for us.
By the way, if the it is too incomplete to be reviewed, it is too incomplete to provide to public download !
Espacially when a a distro download filename don’t have a version number such as antergos-2013.11.17-x86_64.iso …
Don’t put yourself to far ahead here with your review of an ‘incomplete distro’.. I’ve tried it and it’s a waste of time
in the 64 bit. Why would you test something like this just to fulfill your job..?
But how would I know that it is “incomplete” without testing it. Publishing the result just helps others know the pros and cons of the distro.
Btw, there are a lot of “incomplete” distros and operating systems out there, but people still use them. Is any version of Windows complete?