Installing Ubuntu 13.10 on an external hard disk drive (HDD) connected to a computer that’s already running another operating system like Windows 7/8 or another Linux distribution is the subject of this article.
Installing Ubuntu or any other Linux distribution in standalone mode on an HDD is normally a simple, point-and-click operation. To do it on an external HDD connected to a computer running another operating system require a little bit more care, if you don’t want to overwrite the contents of the internal HDDs Master Boot Record (MBR). It’s still a simple process, but you have to watch out!
This tutorial gives those new to Ubuntu and Linux a step-by-step guide on how to complete what should be an easy task. The computer to which the external HDD used for this tutorial is running a self-installed copy of Windows 8. And note that the result of this operation is not the same thing as dual-booting, even though the Ubuntu installer will append an entry for the internal HDDs OS to the boot menu of the external HDD.
To start, you, of course, need an external HDD connected to the computer you are going to use and an installation image of Ubuntu 13.10, which is available for download here. Burn the downloaded image to a CD/DVD or transfer it to a USB stick. To avoid wasting a CD or DVD, transferring it to a USB stick is the recommended option. See Install Ubuntu 13.10 using a USB key from Window or another Linux distribution if you need help with that.
One last thing: Set the computer to boot from an external media. Reboot (the computer) and let’s get started. By the way, if you are new to disk partitioning in Linux, read guide to disks and disk partitions in Linux. It will make it easier to understand what you will be doing.
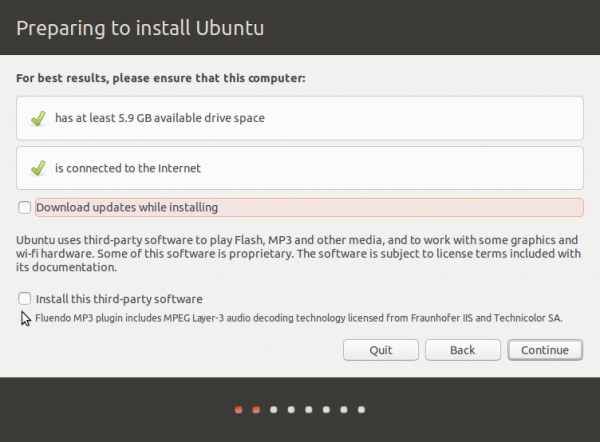
1. Installation Requirements: When you boot from the installation disc or USB stick, you are given the option of booting into a Live desktop or straight to the installer. Which ever option you choose, click past the first step of the installer to get to the step shown in this screen shot. You may opt to enable the two choices available at this step. Continue.

2. Be Aware!: You need to click Yes here. Why? Because sdb is the external HDD, which is the target device.

3. Partition Methods: This step shows available partition methods. As noted earlier, the computer used for this tutorial is running Windows 8 on the internal HDD. And I have two Linux distribution – in dual-boot fashion, on the external HDD. What all that means is that I’ll need to be doing a manual partitioning of the target HDD. That is the only way you can be sure that you will not be erasing the contents of the internal HDD. So, click on the Something else option. Continue.

4. Advanced Partitioning Tool: That will bring you to the Advanced Partitioning Tool’s window. This step shows all the HDDs detected by the installer and their partitions. For the computer used in this tutorial, there are just two HDDs – sda and sdb. The target HDD is sdb, so don’t touch any of sda’s partitions.

5. Erase Unwanted Partitions: This screen shot shows all the partitions on sdb. You can see that there are two Linux distributions on it already. Since I don’t need them, the task here is to delete all of its partitions. To delete a partition, simply select it and click the – button on the lower-left corner.

All partitions have been deleted, time to create partitions for Ubuntu 13.10. Notice that the size of the external HDD is 320 GB. However, I do not intend to use all that disk space for Ubuntu 13.10, just about half of it. With regards to creating the partitions, the goal is to create the same set of partitions on a default installation of Ubuntu 13.10. That means creating just two partitions; the main partition mounted at / (root) and a Swap partition.

6. Partition Editor: This is the partition editor’s window. With no existing partitions on the HDD, the installer will set up the options to create a primary partition. And that’s just fine, at least for the first partition. The only fields you need to change are the size and mount point. The default file system is ext4, which you don’t need to change unless you have a specific reason to.

7. Create Root Partition: For the root partition, I chose to allocate 150 GB to it. This is just an example. Assign whatever you think is appropriate for your installation, keeping in mind that the minimum disk space required is just under 6 GB. Select the mount point as shown and click OK.

8. Back to the main partitioning window, the partition just created should be listed below sdb. Select the free space and click the + button.

9. Back here again. By default, the installation will want to create the next partition as a logical partition. That, too, is fine. However, I chose to create the Swap partition as another primary partition. Whether the partition is primary or logical will have no impact on the system, so if you don’t want to mess with the default, don’t.

10. Create Swap Partition: So I allocated the Swap partition just 2000 MB (2 GB). That should be more than enough for any desktop system. Select swap area from the “Use as” menu and click OK.

11. Back to the main partitioning window, you see the two partitions you just created. Notice also that I left a lot of free space unallocated. I didn’t have to, just did it in case I have to create an extra partition after installation. This free space could also be used to create a shared NTFS partition.
The most important thing you need to do here is ensure that the external HDD is the device where the boot loader will be installed. You do that by selecting /dev/sdb from the menu.

12. Install Now: Here’s the menu just before you click Install Now.

After installation, reboot and verify that the installer did not mess with the MBR of the internal HDD. If you can boot from it, you are good to go. And if you see an entry for the OS on the internal HDD in the boot menu of the external HDD, all is good, too.


I installed Linux Mint 18.1 Cinnamon to an external hard drive this way. First I took the hdd out of its enclosure. Next I installed it in the desktop and disconnected the windows hdd. I installed Linux Mint. I then removed the external hdd and returned the windows hdd. I then installed the external hdd in the case attached it to the desktop with the USB and set BIOS to boot from the external. Everything is working fine. I would like a boot loader that allows me to select the operation system at start up. Sometimes I just gotta use windows.
Well, with that setup, you only need to run sudo update-grub while logged into the Linux distro on the external drive. That will add any OS it detects, including Windows, to the GRUB menu,
it will be easier if you show us the steps in a video.
Hello I followed your tutorial and it worked fine… But I changed the default boot settings in the boot launcher of osx. Since then, the system does not recognize the external hard drive like if Grub is not the default boot manger anymore. Is there a way to fix that without reinstalling Ubuntu? I did that because I was not able to boot in windows and Mac anymore. Thanks for this tuto!
That all depends on where the boot loader was installed. If it was installed on the internal hard drive, then Ubuntu will only boot as long as the external hard drive is connecte to that computer. GRUB should be installed in the MBR or EFI Boot Partition of the external hard drive, otherwise you risk problems booting the OS on the internal hard drive if the external drive is not connected.
Do you know exactly where GRUB was installed?
I followed the tutorial exactly and still messed my internal hdd.
Booting to black screen with
“grub>”
terminal where i can write comamands
I did that on macbook pro 2011 that had just ubuntu on the internal drive before that.
The whole partition was encrypted when installing it.
I installed the second ubuntu on a USB stick and it works just fine there.
I will have to reinstall now I guess?
Try to type “exit” on the black screen.
The system will try to find a bootloader in other (internal) drive.
I have this problem too having exactly followed the instructions in this article with particular care to ensure “sda” was not selected for the bootloader.
When I type exit at the “grub>” prompt a big message box, in the ugly PC/BIOS font, appears saying “no bootable device found.”. When I hit enter I get a boot menu from BIOS from which I can select Windows boot manager. However this is a PITA. How can this be fixed so when the external HDD is not plugged in the PC simply boots to Windows?
BIOS shows the following boot order: 1. “ubuntu”, 2. “Windows boot manager”, 3. “USB HDD” (which changes to include the disk name when the USB disk is connected). If I swap 1 and 2 it always boots into Windows. If I change the order to 3, 2, 1, it won’t boot linux when the external HDD is plugged in.
Seeing as how there’s been no response, allow me to add some specifics. I want to install ONLY Ubuntu Linux onto my external HDD (no other OS, so Swap Space really would not be necessary). I have been able to do this with a USB flash drive, but for some reason with my external hard drive I receive an error on (re)booting into the external drive stating: “error: attempt to read or write ourtside of disk ‘hd0’.
Entering rescue mode.
Thus far, nothing online has provided a viable solution. The only two conclusions I can come to is that either some jack*** who made the drive thinks it’s funny; or a 300 GB external hard drive is less capable than an 8 GB flash drive to perform this…making the company that made the hard drive a bunch of overpaid morons.
Once again, if someone can provide a workable solution, it’d be appreciated.
Did you really install it to a USB stick or you just transferred it to the USB stick? Big difference, there.
From my experience, the main problem with installing a Linux distro to an external drive connected to a recent PC, that is, one with UEFI firmware, is that you stand a good change of messing up both the internal HDD and the external one. And it comes from how the boot loaders are handled and/or the failure of the installer to install the bootloader in the proper place.
Try this: Access the computer’s boot menu (I think the F11 or F12 will get you there). You should see a list of attached HDDs and also a list of boot managers for all the OSs that have been installed on that system. you should see one for Ubuntu. Select that and see if it will boot.
The reason why this is a trial and error thing, is that each PC vendor implements UEFI in a different way. So on some PCs, you can boot an OS by selecting the entry for the HDD on which the OS is installed on, but not on others. This is why moving a Linux external HDD from one PC to another has become a major pain. As far as I’m concerned, UEFI is a curse, for Linux, that is.
All this is assuming that your PC has UEFI firmware.
Keep me posted.
I don’t misspeak. I’m very literal. I have a 16GB flash drive which has the Ubuntu Linux OS installed on it and runs just fine. For some reason, the external hard drive I have is just (expletive) stupid and will not install the same way. It comes up “No filesystem found” no matter how it is installed.
With the flash drive, accessing the boot menu (F9 on an HP Probook) is how I boot into Linux on the flash drive. The 300GB external HDD doesn’t seem to want to do the job though. It’s how I’ve always done it, though. Install just to an external drive (I’ve done Ubuntu and Fedora on flash drives) and after install, use the boot menu options to boot into Linux. (If I don’t go to the boot menu options Linux isn’t even listed. That’s how I set it up in the first place, and how I want it. Too see more clearly what I mean, you can view my video on how to install it to a flash drive at https://www.youtube.com/watch?v=rYWlUNSMJrY&list=UUqlWSPlnC9XmWrrXY_TfdhQ
On a sidenote, I did mention that it’s listed, but it provides the error: “error: attempt to read or write ourtside of disk ‘hd0′.
Entering rescue mode.
Though, comparatively, the error should read, “The people who made the hard drive are a bunch of overpaid idiots…but we keep them on staff because…’merica.” The external HDD is made by Maxtor/Western Digital/or Seagate…what ever you choose to call those ****-ups.
I don’t think it’s the fault of the disk. Blame on your PC vendor’s implementation of UEFI.
Can’t….as I said (and my linked video shows), it works just fine if installed onto a flash drive. For some reason, the Maxtor OneTouch does not feel it should function as well as an 8 or 16 GB flash drive though. If it were the PC’s implementation of UEFI, it wouldn’t work via flash drive neither…but it does.
Hi Xander!
I come a very similar experience, and guess what, my flash card worked and still works like a charm! Whereas the hard drive (500Gb) all of the sudden would not boot and enter grub rescue mode…..So to make the long story short, you better make sure that the USB cable is very short and of good quality!! That solved the problem for me.
Cheerio
Paolo
Honestly, if my cable were any shorter, it’d be an internal drive. For some reason, as I mentioned on a YouTube video about this, the solution seems to be the definition of insanity…doing the same thing repeatedly expecting a different result.
The problem, me thinks, is the installer not installing GRUB on the correct HDD. I should try this using Ubuntu 15.04 and see if it works as expected.
Hey, I was having the same problem. In bios i change my boot to CSM from UEFI. The stupid hard drive wanted to be stupid the first time i tried. so to make sure that it was not my external being dumb. i removed my internal HDD and booted. To my surprise it started up with Ubuntu. I am curious to know how it will react when i put the internal hdd back in.
Nope…didn’t work. When trying to boot the external drive, it goes right to rescue mode. Any insight? Working insight, that is. No just guessing.
Thanks a lot finid. The F key is magical.
My Vaio came with 6 partitions from factory, I don’t even get the “install alongside” option and I’m really scared about installing Ubuntu (I have done it many times) because I’m suspecting I’m about to destroy my installation and I don’t want to spend days repairing my laptop. Do you know if there’s a problem with Ubuntu with multiple partitions (the partitions are from Sony and Windows)?
For my computer I believe the Device for boot loader should be the hard drive (not a partition), and then I should just use both / and swap normally but again, the gazzilion partitions (recovery, and who knows what) are making me nervous
Sorry this is slightly off-topic.
I’m guessing that the Vaio uses UEFI firmware and that those 6 partitions are GTP partitions. Is that right?
When you boot the PC from the Ubuntu install CD, list the device names of the partitions you see from Ubuntu’s advanced partition tool.
Thank You for the great article. I followed your instructions and it (mostly) worked, but
I have a question, I can not find answer for in the message boards. I installed Ubuntu 13.10 from Live USB flash stick to another USB flash stick(128GB). Since I am new to Linux, I did not want to mess with the Windows 8.1 on my computer, trying to create a dual boot. So as a training facility I thought I can install Ubuntu on a USB drive first.
I followed exactly the same path as described. Well first I disabled secure boot in my UEFI BIOS, set the external drive to be the prime bootable source, then let the install create /, /home and SWAP area, and made sure the boot loader installation to be on dev/sdc (the USB where I was installing). Everything went well – with the USB plugged in when I reboot grub offers me Ubuntu or Windows and both load up and seem to work. But when I shut down and reboot with no USB plugged, instead of going directly to Windows I get a black screen and grub> prompt. Did I somehow damaged by internal HDD boot, or is this some setting in grub that I have to change? Any lead is greatly appreciated!
When installing a Linux distribution to an external HDD connected to a PC with UEFI firmware, it’s always a good idea to disconnect the SATA cord from the internal HDD.
But we are past that point in this case, so here’s what you can try, before you hit the mild-panic button: As the PC boots, press the appropriate F-key that will take you to the boot menu. If your computer is anything like my testing unit, you should see an entry for a Windows Boot Manager and Ubuntu on there. Select the former and see if it will boot Windows.
Thank You finid! I did this installation to an USB as a precursor to installing 13.10 to the Internal HDD (creating a dual boot), so did not occur to me to isolate it that much. Later I found the suggestion here and there.
But I have been reading and people say the fact that grub> shows up, means grub starts, but can not find the correct continuation.
Actually I managed manually to start Windows by following the commands from grub.cfg that is on the USB. I just do not know where to recreate it on the boot partition on the HDD (if it is possible of course).