How to dual-boot Fedora 18 and Windows 7 with full disk encryption (FDE) configured on both operating systems stems from a request from K. Miller. The dual-boot system will be on a single hard disk drive (HDD), GRUB will be installed in Fedora’s boot partition, and Truecrypt will be used to encrypt the Windows 7 end of the installation.
Encrypting Windows when dual-booting it with a Linux distribution is not something I’ve ever considered doing simply because I don’t care a whole lot about that operating system. But K. Miller’s request and suggestion prompted me to take a look at the possibility.
And I didn’t think it was going to be a difficult process until I started. First, I tried Fedora 18 and Windows 8 Pro, with UEFI enabled. That didn’t work. Then I tried Ubuntu 12.10 and Windows 8, also with UEFI enabled. That proved to be even more difficult, mostly because of the issue I wrote about in Why is Windows 8 on SSD invisible to Ubuntu 12.10′s installer?. That problem also affects HDDs.
After almost one full day of trying, I decided to honor K. Miller’s original request, which was for a tutorial on how to “dual boot a Linux (Fedora 18) encrypted partition alongside a Windows 7,” with “full disk encryption for both installations.”
We all know the benefits of dual-booting, but why is it necessary to encrypt both ends of such a system? You’ll find the answer in How Fedora protects your data with full disk encryption. Extending disk encryption to the Windows end of a dual-boot system makes for a more physically secure system.
This is a long tutorial, but keep in mind that the approach I used in this article is not the only way to go about it. It should provide a template for how this can be done.
So, if you want to go along with me, here are the tools you’ll need:
- An existing installation of Windows 7, or if you are willing to reinstall, a Windows 7 installation CD. Since I don’t keep a running Windows system, a fresh installation was used for this tutorial.
- Truecrypt. This is the software that will be used to encrypt Windows 7. It is an “open source” software available for download here. Note that Windows has its own disk encryption system called BitLocker. So why not use it instead of a third-party tool like Truecrypt?
To use BitLocker, your computer must have a compatible Trusted Platform Module (TPM). The other reason not to use BitLocker this: It is a Microsoft tool. As such, you can bet your left arm that it has a backdoor. And no, I don’t have any evidence to back that up, but this is Microsoft we are talking about.
One more thing to note: Though Truecrypt is listed on the project’s website as an open source software, its license, TrueCrypt License 3.0, is not listed under GPL-Compatible and GPL-Incompatible Free Software Licenses available here. It is also not listed as an OSI-approved license. Just two points to keep in mind.
- An installation image of Fedora 18, which is available for download here.
If you have all the pieces in place, let’s get started.
1. Install Windows 7 or shrink an existing C drive: If you are going to install a fresh copy of Windows 7, be sure to leave sufficient disk space for Fedora 18. If you have an existing installation of Windows 7, the only thing you need to do here is to free up disk space for the installation of Fedora 18.
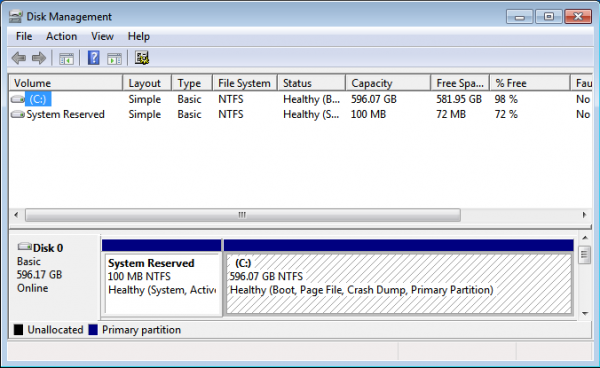
The HDD I used for this installation is 600 GB in size. The next screen shots show how I used Windows 7’s partition manager to recover disk space that I used for Fedora 18. How you divvy up your HDD is up to you. For my test system, I split the HDD in half, one half for Windows 7, the other half for Fedora 18. This screen shot shows the partitions as seen from Windows 7. Right click on C and select “Shrink Volume.”

And this is the Shrink Volume window. Make your selection and click on Shrink.

Here’s the result of the shrinking operation. That unallocated space is what will be used to install Fedora 18. Reboot the computer with the Fedora 18 installation CD or DVD in the optical drive.

2. Install Fedora 18: I know the latest version of Anaconda that shipped with Fedora 18 has received muchas bad press, but that is not going to be an issue here. Well, in a sense, it will be, but the difficulty it presents is just a minor bump on this road. The difficulty stems from the fact that the installer does not give you the option to install GRUB, the boot loader in a custom location. But that is a minor issue, as there is a simple solution to it. It involves working from the command-line, but trust me, it’s a piece of cake.
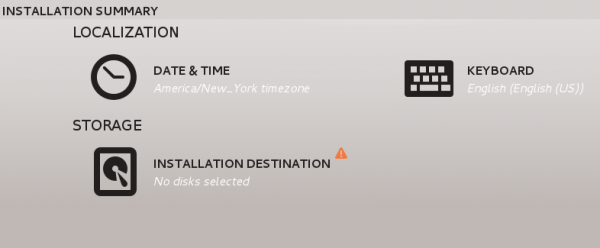
This screen shot shows the main Anaconda window, the “hub” in the hub-and-spoke installation model. The only thing you’ll have to do here is click on Installation Destination.
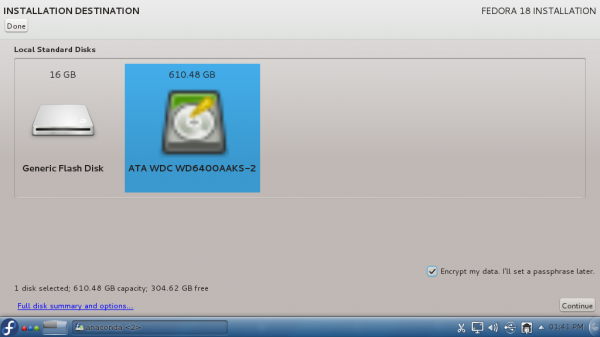
If you have more than one HDD attached to the computer you are using, they will all be shown at this step. Select the one you wish to use and check “Encrypt my data. I’ll set a passphrase later.” Click on the Continue button.
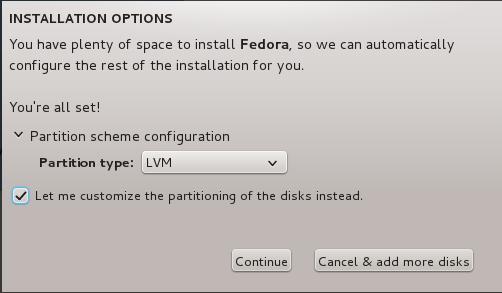
LVM, the Linux Logical Volume Manager, is the default disk partitioning scheme. No need to change that, but you’ll have to check “Let me customize the partitioning of the disks instead.” Continue.
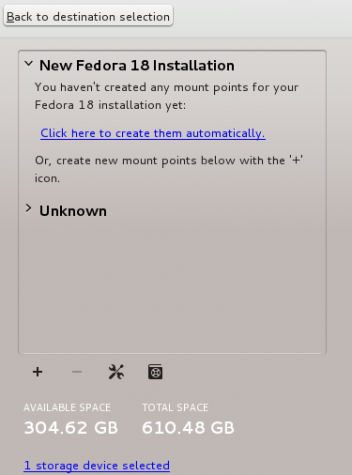
This is a partial screen shot of the manual disk partitioning step. But don’t worry. There will be no need to do the partitioning yourself. Anaconda will take care of it. We just need to make sure that it will be using the free, unpartitioned space on the disk. The “Unknown” is actually Windows 7. You can see its partitions.

This is another partial screen shot from the same step. This one is, however, showing the options available for Fedora 18. At the bottom of the window you can see the free space available for use. If you let Anaconda partition the space automatically, that is the space it will use. The Windows 7 half of the disk will be untouched. Since there’s no need to create the partitions manually, click on “Click here to create them automatically.”
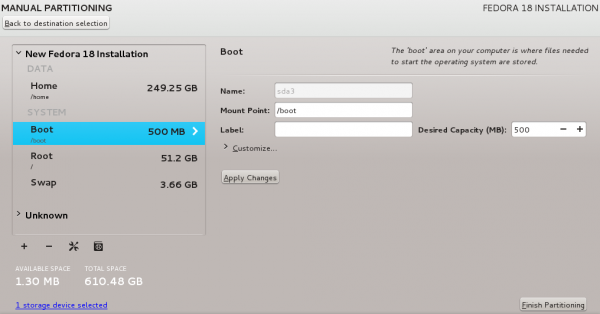
Here are the Fedora 18 partitions that Anaconda just created. Nothing to do here, so click Finish Partitioning.
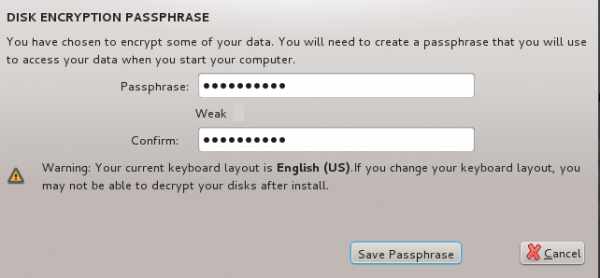
Because you elected to encrypt the space used by Fedora 18, Anaconda will prompt you to specify the passphrase that will be used for encryption. As I noted in Fedora 18 review, Anaconda will insist on a strong password. Save Passphrase.
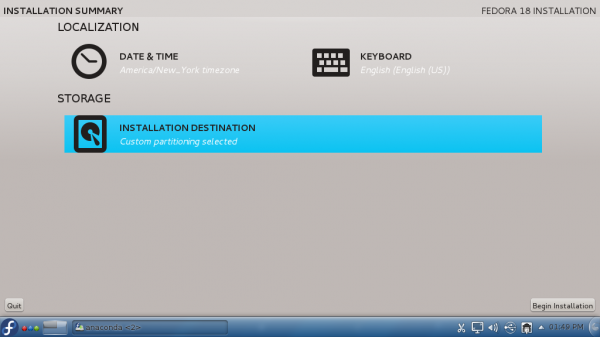
Back to the main Anaconda window, click Begin Installation. On the window that opens after this, be sure to specify a password for the root account.
Throughout the Fedora installation process, I’m sure you noticed that Anaconda did not give you the option to choose where to install GRUB 2, the version of the GRand Unified Bootloader used by Fedora. Instead it installs it in the Master Boot Record (MBR), the first sector of the HDD, overwriting the Windows 7 boot files. So when you reboot the system – after installation has completed successfully, you will be presented with the GRUB 2 boot menu.
At this point, you might want to boot into Windows 7 just to be sure that you can still do so. Then boot into your new installation of Fedora 18. Complete the second stage of the installation process, and log in when you are done.


I am unable to proceed further after “Number of System Drives” menu. After I select the number of drives as ‘1’, TrueCrypt comes with an error mentioning that “True Crypt does not support encrypting a whole drive that contains multiple operating systems” and comes up with two possible solutions of “encrypt single system partition as opposed to encrypt entire system drive” and “move other system to other drive”. Not sure if I have missed anything. Any help is much appreciated.
This tutorial has a flaw.
1. We should select to encrypt System partition only, and not Whole drive.
2. Select “Number of System Drives” 2 or more
A correct tutrial is here:
http://www.7tutorials.com/how-encrypt-your-system-drive-truecrypt-multi-boot-configuration
If you are only encrypting the System Partition, what about the C drive?
And Number of System Drives? 2 or more implies that there are other OSs installed on a second drive, which is not the case in this tutorial.
If you have only one drive (doesn’t matter how many partitions and OS are installed on those partitions), then first try “1”. If it gives error, then select “2 or more”. Simple.
If we encrypt whole drive using Truecrypt then wudn’t it become a double encryption when we run fedora! as fedora is encrypted too
1. How do I make a bootable flash drive of the desktop version of fedora 18 (4.5GB)?
2. I have win7 installed on c drive. On D drive, I’ve my media files. And I can install Fedora on E Drive (100GB). After installing fedora 18 with a DVD, will I see a proper entry of windows7 on the list?
Answer to “2” is yes.
For “1”, use Unetbootin. You can install it on Fedora. And there are better options that run on Windows. See this article and the comments under it.
thanks. Somehow, Unetbootin fails to boot the installer of fedora 18. It shows some error – /dev/root does not exist – and is stuck on it forever. I’ve tried other software in that link you provided, all are for live installation, not the desktop installation. (sorry I don’t know what exactly that is called).
They are all designed to load the ISO image on the USB. Then after you boot from the USB, you can install the OS just like you would from a CD/DVD.
no. it never works with fedora this way.
Excellent article. The only drawback I can think of is losing access to windows partitions from Linux. Is there any workaround.
not true, you can mount the windows partition from linux using truecrypt.
that’s a great tutorial. does it limit the installation of new operating systems?
I currently dual boot windows 7 and Fedora 18. I want both encrypted.
I am also thinking of having a small 3rd OS installed which will have no personal data but will allow easy access to the internet so as to make recovery of a stolen laptop through something like Prey more likely.
Am I correct in thinking that your method wouldn’t allow that?
If you install the 3rd OS on the same HDD as another OS whose partition is encrypted, obviously, the 3rd OS is not affected by the other OS’ encryption scheme. So Prey will work on the 3rd OS.
The trick in your case, with Windows and Fedora on the same HDD, is recovering enough space to install the 3rd OS. It can be done, though. Just resize your home or root logical volume.
If I have Ubuntu 12.04 and Fedora 18 along with Windows 7, does creating auto configured Grub 2 menu for Windows Boot loader using EasyBCD will work ?
Yes. The devil, however, is in the details.