Linux Mint 13 Cinnamon and Linux Mint 13 MATE are the latest editions of the popular Linux desktop distribution based on Ubuntu Desktop. This tutorial presents a step-by-step guide on how to dual-boot either one with Windows 7 on a computer with a single hard drive.
Because the Cinnamon and MATE editions of Linux Mint 13 share the same installation program, the steps involved are the same regardless of the edition you use. For this tutorial, a 32-bit installation image of the Cinnamon edition was used.
If your computer is running a self-installed copy of Windows 7, the default number of partitions will be just like the ones shown in the image below. Keep in mind that the partitions on an OEM (Original Equipment Manufacturer) installation could be different. For this tutorial, the operating assumption is that you computer is running a self-installed copy of Windows 7. Note: On your computer, make a mental note of the amount of free space on the C drive listed on this image. You will need the information during the installation of Linux Mint 13.

The objective here is to install Linux Mint 13 on the same hard drive, with GRUB, Linux Mint’s boot loader, installed in the boot partition (of Linux Mint), leaving Windows 7’s boot programs in the hard drive’s Master Boot Record (MBR) untouched. Then using another application to add an entry for Linux Mint 13 in Windows 7’s boot menu, so that at boot time, you will be able to choose which operating system to boot into. Selecting Windows 7 will cause the computer to boot into Windows 7 and selecting Linux Mint 13 will boot the system into your newly installed copy of Linux Mint 13, but not after a brief stop at Linux Mint’s boot menu.

After creating partitions for and installing Linux Mint 13, the new partitions as seen from inside Windows 7 will look a lot different. This image shows the partitions from the computer used for this tutorial after the dual-boot operating has completed.

For this tutorial, the partitions that will be created for Linux Mint 13 are: a partition mounted at /boot; root partition mounted at /; a partition mounted at /home; and a Swap partition. You do not need to create all four, but that is what will be done for this tutorial.
What do you need to complete this tutorial? Just five items:
- This tutorial
- You, and an Internet-connected computer, needed to read this tutorial.
- An installation image of Linux Mint 13 (MATE or Cinnamon edition). You may download it from here. Burn the downloaded image to a DVD, or transfer it to a USB flash drive.
- The target computer running Windows 7 (Note: you may opt to reinstall Windows 7 anew)
- EasyBCD – a free software from NeoSmart Technologies that will be used to add an entry for Linux Mint 13 in Windows 7’s boot menu
Note: If you are not familiar with disk partitioning in Linux and how to dual-boot operating systems, it is highly recommended that you read guide to disks and disk partitions in Linux and tips for dual-booting Windows and Linux before continuing with the rest of this tutorial.
Now that we have a pretty good idea of what we need to accomplish, time to get it done. To start, boot the computer from the Linux Mint 13 DVD installation image that you made. Linux Mint 13 DVD is a Live DVD and by default, will boot into a Live desktop environment. Click on the installer’s icon on the desktop to start the installation process. When the installer starts, click through the first steps until you get to the one shown below. You definitely do not want to select the second option. Like the second option, selecting the first option will lead to an automatic partitioning of the free space needed to install Linux Mint 13.

Selecting the first option will actually bring you to this step, where you can see how the installer will resize the main Windows 7 partition (the C drive). The problem with selecting the first option, is that GRUB will be installed in the MBR of the hard drive, where it will overwrite Windows 7’s boot files. Since this is not what we want to do, the only option left, is the last option (Something else). So, if you are at this step, click the Back button.

Selecting Something else and clicking Continue will bring you to the Advanced Partitioning Tool. “Advanced” does not mean that the tool is really advanced, it just means that it is for people who know how to partition disks in Linux. If you read and understood the material discussed in guide to disks and disk partitions in Linux, consider yourself an advanced user.
The main window of Advanced Partitioning Tool is shown below. By default, the partitions listed at this step – sda1 and sda2, are the two Windows 7 partition that we saw on the first image on this page. In Windows’ parlance, sda2 is the C drive, while sda1 is the System Reserved partition.

The task here is to resize sda2, freeing up enough space that will be used to create the partitions for installing Linux Mint 13. To begin, select sda2 and click Change.

This is the resize window, also known as the Edit Partition window. The sda2 on the computer used for this tutorial has about 320 GB of disk space. How much of that disk space we can free up depends, of course, on what is available. This is where you have to be very careful.

The system used for this tutorial was a recent installation, so Windows 7 has only used about 7 GB. With that, I decided to allocate 100 GB to Windows. That amount is what should be shown in the New partition size field. And that is all you need to do here. Click OK.


Every step on the article was covered and Asus 1225C is now running both Win7 and Linux Mint 14. Win7 seems to be booting just fine, but when Mint 14 is chosen from the boot menu it does not go right to the log in screen. It pops up a message as follows:
[title of page:]
gnu grub version 2.00-7ubuntu11
[…followed by 5 options to choose from]
linux mint 14 mate 32 bit 3.5.7-17-generic (/dev/sda3)
linux mint 14 mate 32 bit 3.5.7-17-generic (/dev/sda3) — recovery mode
memory test(memtest86+)
memory test(memtest86+, serial console 115200)
windows 7 (loader) (on /dev(sda1)
[… followed by directions given at the bottom of the screen]
use the “up arrow” and “down arrow” keys to select which entry is highlighted
press enter to boot the selected OS, “e” to edit the commands before booting or “c” for a command line
When I choose the first option, the screen goes very dark with the following message displayed:
Failed to start X server (your graphical interface). It is likely that it is not set up correctly. Would you like to view the x server output to diagnose the problem? Yes or No
Once I choose “yes” the following comes up:
x.org x server 1.13.0
release date 2012-09-05
x protocol version 11, revision 0
build operating system: linux 3.2.0-26-generic i686 ubuntu
current operating system: linux 1225c 3.5.0-17-generic #28-ubuntu SMP
tue oct 9 19:32:08 UTC 2012 i686
kernel command line: BOOT_IMAGE=/vmlinuz-3.5.0-17-generic
root=UUID=894b4915-4f89-48b5-bb14-69329e1aac15 ro quiet splash
vt.handoff=7
build date: 08 october 2012 03:34:08pm
xorg-server 2:1.13.0-0ubuntu6 (for technical support please see http://www.ubuntu.com/support)
current version of pixman: 0.26.0
before reporting problems, check http://wiki.x.org to make sure you have the latest version
Any idea what has gone wrong in the installation?
4x Intel Atom CPU N2800 @ 1.86Ghz
Memory 2gb
Linux Mint 14 MATE 32-bit
500gb HD
Most likely you need to install a video driver. Try logging into a terminal-environment ( + + ) and install it from there.
Example: if you have a nvidia graphics card you write:
“sudo apt-get install nvidia-current”
if you have a card from another vendor just google it
Oops, seems I used some bad formatting there. Its supposed to be: “terminal-environment (ctrl + alt + f2)
Lovely!!
Thanks a million!! This helped a lot.. Had installed Mint about thrice before i realized i was missing the MBR updation!! a quick googling brought me here..
THANKS A LOT!!!
I now have Win7 + Mint 13 (Cinnamon) dual boot!! 🙂
Hi I followed the directions for How to dual-boot Linux Mint 13 Cinnamon/MATE and Windows 7 and after following the directions and completing the step to free up space to install the Mint distribution the partitioning tool indicated that the free space I had was now not usable and would not allow me to continue in making the 4 partitions needed for the installation. Only the revert option was available. Did eventually try this as only option available but it did nothing. What happened? Did I do something wrong? Did I lose the space I allocated (125GB)? Can this be fixed? Thanx.
It likely means that the free space is outside of the maximum of 4 primary partitions that you are allowed on a disk. You might want to read guide to disks and disk partitions in Linux. It contains info that will give you a fundamental understanding of the subject.
Post the number and size of the partitions on that disk, after reading that article.
I read the “Guide to disks and disk partitions in Linux” article and understand that I need an extended partition because I already have 4 partitions on my present hard drive. They are the “C” drive (with 558GB after I tried to add the new 125GB partition for Mint, a recovery partition (19.9GB), an HP Tools partition (3.95GB) and System partition (199MB). In addition I know have the 125GB of free space that is “unusable”. The main question I have is can I recover this free space and use it for Mint or return it to my windows. If I can use it for Mint how would I make it an extended partition as I did not see how to do this in the “Guide to disks and disk partitions in Linux”. Really any information on recovering this unusable space would be greatly appreciated.
Thanx
Matthew
Under Linux, those Windows partitions will be seen like this:
sda
sda1 199 MB (system partition)
sda2 558 GB (C drive)
sda3 19.9 GB (recovery partition)
sda4 3.95 GB (HP tools partition)
Because they are all primary partitions, you are not going to be able to create any other partition, and any space you recover from any of the partitions, will be unusable.
Your only option is to delete one of the partitions that you can afford to delete. You may then use that free space to create an extended partition, and logical partitions under it.
The big decision is which partition can you delete without screwing up the system. The C drive and System partition are off limits. So you are left with the other two. And of those two, the HP tools partition is your best bet.
Assuming that you delete that partition, the 3.95 GB from it and the unusable space will now be combined. Hope all this makes sense?
Your suggestion worked fine. I am now able to enjoy Linux Mint 13.
Thanx for the assistance, it was great!
MFS
I followed these instructions as is. Worked exactly as described. I have a dual booting laptop (windows 7 / Mint 14.
Thanks,
Chris
Mint 14, not Mint 13?
I followed the instructions and also installed Mint 14 Cinammon – worked perfectly – thanks! No problems with easyBCD either.
I followed the instructions. The Mint installation went well, but easyBCD did not cut it. When selecting linux boot, I ended only in the grub4dos prompt.
What worked was https://help.ubuntu.com/community/Boot-Repair . Installed it while running from the Mint live image. It had no problems detecting both windows an and linux. I selected the option install grub to /dev/sda.
Now, when booting windows, it goes from Grub2 to grub4dos and then to windows. It would be better i I did not use EasyBCD and went for Boot-Repair directly. I did one attemt to remove grub4dos, which failed miserably, and i had to use Boot-Repair to recover. Anyway, I am starting to get confortable with Mint, so I dont expect to boot to Windows very often.
Acer Aspire X3995 with intel graphics, 1TB disk.
Followed this tutorial but Linux won’t load. When I try to boot up Linux Mint 13 I just get a Grub¤DOS bash-line.
PC: An asus zenbook prime ux32vd
EasyBCD displays these settings:
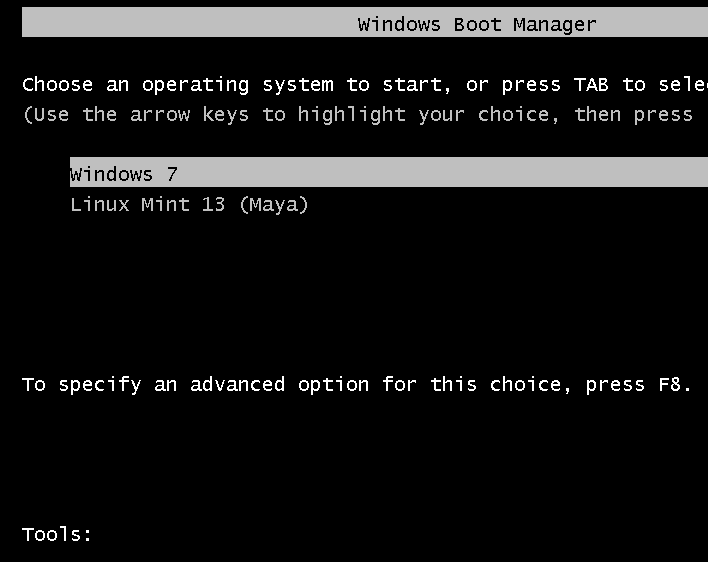
Entry #1
Name: Windows 7
BCD ID:{current}
Drive: C:\
Bootloader Path: \Windows\system32\winload.exe
Entry #2
Name: Linux Mint 13 (Maya)
BCD ID:{some very long hexadecimal value in 5 pieces}
Drive: C:\
Bootloader Path: \NST\AutoNeoGrub0.mbr
I’ve got 2 windows partitions, 2 partitions on another disk and the 4 linux partitions. Windows reads the following sizes for the 4 linux partitions:
476 MB, 23.28GB, 19.09GB, 3.72GB. (I reckon windows uses Gibibytes and Mebibytes while linux does not).
Any thoughts?
IS yours an installation on 2 HDD or one. If 2, where is Mint installed, on a separate HDD or alongside Windows on the same HDD? What’s the location of the Windows partitions relative to Mint partitions, if they on are on the same HDD?
Disk 1 contains nothing of interest. Both OSes are on disk 0.
From windows 7’s partitioning tool, it looks like this:
System Reserved
C:\
476 MB (Primary partition)
23.28GB (Primary partition)
19.09GB (Primary partition)
3.72 GB (Primary partition)
Additional info:
The current windows 7 installation I’ve installed myself. Originally it was delivered with a hybrid setup between a small SSD disk (disk 1) and a bigger HDD disk. I replaced the HDD with an SSD and installed windows 7 on that (disk 0), but it just occurred to me that there may be some files lingering on disk 1. Got any experience with that sort of hybrid setup? Think it’s safe to wipe everything on the smaller SSD disk?
Well, if you have 2 SSDs, or even just 2 HDDs, and you want to dual-boot, it is better to install each OS on a separate drive. Makes you life easier that way. So, install Windows on Disk 0, Mint on Disk 1, and you will not need EasyBCD. Just make Disk 1 the first boot device in the BIOS or UEFI utility.
I suppose, but disk1 is about 20GB big.
So Disk o is about 46 GB. You can put Mint on that, and put Windows on Disk 0. If you need more storage space, you’ll have to get large SSDs or a regular HDD.
Hi,
Thanks for the great tutorial. Worked first time for me (complete linux noob).
However, I managed to stuff up installing something for switchable graphics which made the display very unstable and decided to do a complete re-install (luckily hadn’t added any other new stuff) and now instead of booting to the Grub 2 menu, I get direct booting to a multiple choice menu (offers Mint, mint safemode, windows sda2(boot) windows sda3
(C:)… couple of other options) which I used to get after the Grub menu.
Tried removing the linux boot option in easyBCD and re-making but that didn’t seem to do anything.
Not really a problem, can still boot both windows and Mint fine. Just wondering if you have seen this before and know why it happens?
HP probook 4530s
Intel core i5
Radeon HD 6490M/Mobile Intel HD integrated graphics
Cheers
When you boot the computer, what do you see first? Windows boot menu or GRUB’s?
It isn’t windows boot manager, so I guess it must be grub. It doesn’t look like your second picture above.
Thanks.
The it means that you installed GRUB in the MBR (the first sector if the HDD), rather than in the boot partition of Mint. If you can still boot into both OSs, then it;s ok, until you decide to reinstall pr upgrade Windows.
Ahhh, that makes sense. Just figured out how that happened – forgot to change the device for boot loader installation menu.
Thanks again.
Great instructions, and I look forward to trying them. I currently have W7, but need to reinstall due to some BSOD issues, and will also install Mint Maya or Ubuntu.
I’d appreciate advice on the ideal number and location of partitions.
Laptop (Lenovo X201s), 320 GB single hard drive, i7, 4GB RAM.
My thought:
A. Windows system partition
B. Data partition
C. Lenovo Windows reinstall partition
1. Linux boot partition
2. Linux root partition
3. Linux home partition
4. Linux swap partition
Some questions:
– Can B and 3 (data and home) be the same?
– Can I mix up the order: A,1,2,B,3,4,C, and is there any benefit to doing so? (e.g., having all the system bits up front).
– Is there some other, better mix of partitions, given that I want a dual boot system, I prefer to have data in its own partition, and I want to keep the reinstall partition?
– Given that there will be a lot of partitions, and I’m reinstalling everything, can I just have the Windows system partition, and all the rest of the partitions be in one extended partition? Or is there a benefit to having some be primary and some in extended?
No, B and 3 (data and home) cannot be the same, though you can write to B from 3. See this article.
Your scheme will work. 1-4 will have to be logical partitions, which is just fine.
A and 1 can be right up front together, but with a 320 HDD, that will not be necessary.
Thanks!
Works great for me. I just booted Linux Mint Maya Cinnamon, then shut down. Then I started it up and booted Windows 7 with no problems so far. Thanks.
I did a full disk format (on a new PC) and re-installed Windows before I started this tut.
hi finid,
I’m getting a GRUB4DOS message saying Minimal BASH-like line editing is supported. It does not boot directly to Mint.
Please help.
More info. Disk size and partition sizes. firmware type, UEFI or BIOS? etc.
500GB HDD but I was using 300 for Backup (partitioned), I reformatted just now and have not retried.
UEFI
I just got through with the tutorial. Everything went smoothly, and I can boot into either successfully, but it says “Initialize variable space. Starting cmain()…” and sits there for 2-3 minutes before making it into Mint. Is this normal or is there a way to fix this?
update: I’m not sure what I did, but it no longer hangs on the “initialize variable space” message. I haven’t changed anything major. Just some software/system updates, installed gnome-shell and gnome-session which means i had to dpkg –configure -a, installed ubuntu’s software center (i accidentally hit ‘y’ to some…script modification, I think, during it’s installation). I’ve rebooted at pretty much each stage, but the problem persisted until the software center installation, which seems a bit odd to me. Any insight you can offer would be appreciated, so I can avoid this next time.
A few more details that might help.
-The message only appeared when booting into mint
-I made my first partition logical because 3 primaries already existed.
system details:
-intel core i7-3612QM
-8gb ddr3 ram
-1TB HDD (50/50 windows/linux partition scheme)
-bios a04
oh, and if it matters, it’s a laptop
I’ve not come across that error, so I don’t know why. Most important thing is it’s solved. You can try finding out if the Software Center is the issue( not likely) by uninstalling it, reboot and see it the message returns.
One question: Was your /boot partition created at about the 500 GB mark of the HDD?
Yes, it was created right at the 500gb mark. what’re you thinking?
Also, is “variable space” referring to the logical partitions?
Not sure what “variable space” is referring it.
Sometimes, the system will not boot if /boot is too far from the first sector of the HDD. so it’s good to know that it works at 500 GB.
I tried to dual boot Win7 and Mint13 and ran into a problem.
One note – I tried to install XFCE MINT13 and I stopped it before it had completed. The status of the install was nonexistent and I didn’t know it hadn’t completed. I then used EasyBCD to update the Win MBR. It didn’t work – and this was expected.
I then went back to install the gnome version of Mint13. It completed its install, but I now get the following error when trying to load Mint13 from the Windows MBR:
“Windows failed to start. A recent hardware or software change might be the cause.
File:\NST\AutoNeoGrub.mbr
The selected entry could not be loaded because the application is missing or corrupt.”
Do you have any ideas how I can fix this?
Also, I went to EasyBCD, deleted the Linux Mint line and uninstalled EasyBCD. I then went back and re-installed gnome Mint13. I then installed EasyBCD and followed the instructions again.
I ended up with the same error when I tried to load Mint13.
TIA…
Try reinstalling Mint, but instead of installing GRUB in the boot partition, install it in the MBR, so that you can at least boot into Windows, assuming you did not hose the Windows partitions.
If you can boot into Windows from GRUB’s menu, then you can restore Windows’ boot manager using EasyBCD. See this article.
Hi finid,
I wasn’t clear that my Win7 boots up fine, so there is no need to try and rig the boot loader so Win7 can run.
The error message I posted arises when I try and boot Mint13… even though the error itself references Window failed to start.
I have no idea why the boot loader mentions Windows failing to start when trying to boot Mint.
Mint13 went through the install process and said it was installed fine.
Should I do it again to see if something changes?
TIA…
finid, I found out I have an EUFI boot system and, apparently, this tutorial doesn’t apply – at least not without modification. I’m searching for ways to dual boot an EUFI solution.
I wrote one for dual-booting between Ubuntu 12.04 and Windows 7 on UEFI hardware. Read it here. There is another article on the Ubuntu page that deals with dual-booting on UEFI hardware on SSD and HDD.
Ubuntu and Mint installers the same, so there is should no problem using the tutorial for Mint.
Hello, You state “For this tutorial, the partitions that will be created for Linux Mint 13 are: a partition mounted at /boot; root partition mounted at /; a partition mounted at /home; and a Swap partition. You do not need to create all four..” I do not want to create all four, so which ones do I have to create? Is there a significant disadvantage by not creating all 4 partitions? Thank you.
the minimum required are: root and swap partitions. Those are the ones created by the installer.
a separate boot partition makes boot recovery operations a bit easier, and one for /home makes it possible to reinstall the system without touching your files, though it is advisable to backup before doing an upgrade.
some installers are smart enough to upgrade without messing with your data, even when /home is not on a separate partition.
Thank you.
Hello. I attempted to install Linux Mint 13 along side pre-installed Win 7 on my HP Pavillion laptop today following the instruction in your tutorial. My laptop partition before the start of the installation process was as follows:
sda1 (ntfs) 208.7mb
sda2 (ntfs) 474.4gb
sda3 (ntfs) 21.3gb
sda4 (fat32) 4.3 gb
I was able to go as far as recovering some free space from sda2 and got the following partitions:
sda1 (ntfs) 208.7mb
sda2 (ntfs) 374.4gb
free space 100 gb
sda3 (ntfs) 21.3gb
sda4 (fat32) 4.3gb
However, the free space had ‘unusable’ before it, and when I tried to create the partitions for Linus by selecting the free space and clicking ‘Add’, nothing happens (no ‘create partition’ box pops up). So I ended up quitting the installation. Any assistance please? Thank you
the free space is unusable because there are 4 primary partitions, which is the max that can be supported under that scheme. You will have to make one of them an extended partition before you can continue.
see the article titled guide to “disk and disk partitions in linux” for more info on this.
Thank you for your reply. I have read the article “guide to disk and disk partitions in linux” like you suggested, however, it does not explain how to make a primary partition into an extended one. Also, is it Ok to make the sda2 (the one with the most space and my C: drive) on my system as extended? Thank you
Hi, I have managed to resolve the issue using EaseUS Partition Master. Thanks for your help and this useful tutorial.
I like your style of presenting information. Many questions?
I have an HP with an i7 chip. 1Tb of memory. Want to use Linux Mint 13 Cinnamon 64b.
I cannot find on my download the “other alternative”. I tried to load linux mint 13 but it will not install. Nor did Ubuntu 12.4, nor did open suse.
It does not install but leaves something that brings up “will automatically install in 10 seconds. It does not install. I have cleaned the hard drive, regedit the registry for “linux”.
What am I doing wrong or forgetting?
I read for windows 7, that it will not allow another operating system. I forgot where I read it (in Microsoft information supplied by HP}. Any idea where or am I getting to old for computers?
If you can help, it would be greatly appreciated.
I am getting fed up with Windows.
Thanks
Can you provide more info about the PC? Board type, BIOS or UEFI firmware, etc. I’m sure you meant 1 TB HDD, not “1Tb of memory,” right? Windows 7 will allow, as you can see from this tutorial. It’s Windows 8 that we have to worry about.
Is that a 2nd or 3rd Gen i7? Are you sing the integrated graphics or not?
Everything was ok until I tried to run Linux Mint from Windows Boot Manager. I get \NST\AutoNeoGrub0.mbr not found. It’s on C: and EasyBCD is looking at C:.
I also have a EasyBCD entry for the CD drive but it’s not the default.
What are the specs for your machine?
asus-a55a,750Gb HD, 8G ram, Win7 in sd0.
When installing Mint I rx a weird message about the setting Reserved boot that was different than /boot. Didn’t makes sense at the time.
I think I messed up the bios-grub. I’ll try again.
So it’s a laptop with Intel 3rd Gen i3 processor. Did it come with UEFI firmware or the old BIOS.
And how did you partition the 750 GB? Hom much space did you allocate to Windows before creating the /boot partition?
I have a 200M ntfs partition (sda2)and a 475M ext4 (sda5) labeled “EFI System”. I have no idea what EFI does.
sda1,200M,system sda2,128M,”mstfres” sda3,28G,OS sda4,25G,recov sda5,476M,/boot sda6,14G,/ sda7,372G,/home sda8,2M,bios-grub sda9,5G,swap sda10,2G,unassigned
3&4 are nfts and were pre-allocated.
5-10 are ext4.
I formatted partitions 5-8, reloaded Mint. Reran EasyBCD. Same error as before.
Did you create the Mint partitions manually or where they created by the installer?
Those partitions tell me that you are using a GPT partitioning scheme, but the bios_grub partition is all the way at the end of the disk. That does not look right. As far as I know, the the bios_grub partition should be the first partition, and it should not have a file system. That is, it should an unformatted partition.
That may or may not be the source of your problem, but that does not look right. That as far as I know is not how you create a GPT-based system.
Looks like the old BIOS so far. It came with 350G C: and a 250G D:. I deleted D: and am trying to put Mint there, basically.
fyi, because of maintenance issues, commenting wil be disabled on this website in a few hours, so if you cannot post, don’t let it bother you. Commenting should be back on before very long.