This article is the next in a series of guides on how to dual-boot Windows 7 and Linux and BSD distributions. It covers dual-booting Pardus 2011 and Windows 7. If you want to dual-boot Windows and another operating system, like a Linux or BSD distribution, you will likely want to do so on a computer with one or two hard drives. And you will want to do it on a computer with an existing installation of Windows 7, or by installing Windows 7 anew.
This tutorial presents a step-by-step guide on how to proceed on a computer with one hard disk, with specific instructions on how to free up space for Pardus 2011 when installing Windows 7 anew, or when installing on a computer with an existing installation of Windows 7.
Let’s start with the case where you want to install Windows 7 anew. If you want to install on an existing installation of Windows 7, just scroll down to that section.
New Installation of Windows 7: Boot the computer from the Windows 7 installation CD and click to the disk partitioning step. If the hard drive is not partitioned, that is, if it is a new disk, the image below represents what you will see. If there are existing partitions on the disk and you want to overwrite their contents, select each one and click on Delete. The Delete button is visible only after you click on Drive options (advanced).

Now, you will have to determine how much space to use for Windows 7, and how much for Pardus 2011. This segment of the tutorial was carried out in a virtual environment with about 100 GB of disk space, and I chose to use half for Windows 7 and the other half for Pardus 2011.

Here is the same step after changing the disk size to my specification. Click on Apply.

By default, the Windows 7 installer will create two partitions as shown. Partition 2 is the main Windows 7 partition, and that is what has to be selected before clicking Next. The free space where Pardus will be installed is shown as Unallocated Space. Click Next.
After Windows 7 installation is completed, boot the computer from the Pardus 2011 installation DVD, and proceed to page 2.

Existing Installation of Windows 7: If your computer has an existing installation of Windows 7, and there is no unallocated space on the hard disk, then you need to free up space before you can install Pardus 2011. You can free up space from inside Windows 7 or let the Pardus 2011 installer free up space by itself. The images in this segment show how to free up space from inside Windows 7.
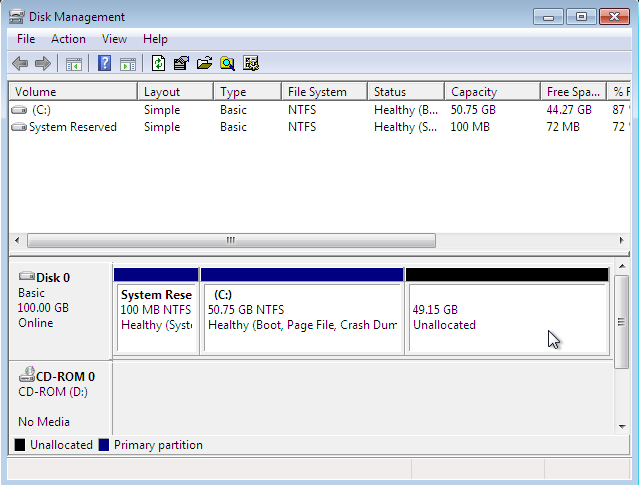
So, boot into Windows 7, and type diskmgmt.msc or partitions in the menu’s search field. The Disk Management tool, shown below, will open. In the example used in this tutorial, there are just two disk partitions. The data partition, drive C, is what we can shrink to make space for Pardus. To have Windows shrink it, right click on drive C and select “Shrink Volume…”

The system will then present the best option for you. Unless you know what you are doing, stick with this option. Windows has already determined by how much it can shrink the partition without blowing itself up. In this example, drive C is about 100 GB, and Windows has freed up about half, or about 50 GB. That half will be used to install Pardus 2011. Click on Shrink.

Here is the result of the surgery Windows 7 just performed. You can see that there are now three partitions, where there used to be just two. The freed up space is shown as the “unallocated” partition. Exit the Disk Management tool, insert a Pardus 2011 installation DVD in the optical drive, and reboot the computer.


Thank you so much!!!
Note:
I did have an error during installation right at the end so it didn’t boot.
Log into windows 7 partitions manager and deleted the Pardus installations (including the 500MB pardus boot)
So, I install pardus again, this time it works without any error!
Maybe it’s because of the unallocated status vs free status from the partition. The second time around it was free space not unallocated.
Now i’m happy!
i did these instructions , but
basicly when ive done the install it just boots into windows with no option for linux
i tryed forcing the boot with f12 but it only sees the 1 drive not the 2 partions
any ideas ?
Where did you install GRUB? If in the boot partition of Pardus, the computer will reboot into Windows, then you will have to use EasyBCD to add an entry for Pardus in the Windows 7 boot menu.
Since an example of how it is done here
hi kris..i have dual booted windows 7 and pardus 2011..now i have fedora and win 7..so i dont remember dual booting pardus exactly..but i would sujjest u to create some unpartitioned space before booting with ur pardus dvd..so when the installer option comes u can just select this unpartitioned space( free space so select to install into the free space)..when u boot again u will have option for selecting into win 7 or pardus 2011
…it works trust me ..i had some trouble but it did work eventually..if u are having any more trouble pls feel free to write here..
THAT WAS SWEEEEEEt….thanx thanx thanx a lot….
i jst dont know how to thank you..everything workd like a piece of cake..
thanks for this great guide..i was having real trouble dual booting pardus 2011 and win7..asked for help here..and in 2 days i got the best TUTORIALS i could dream of..thanx a lot…’
mwwwwwwwwwwwwwwwwwwwwwwwwwwwaaahhhhhhhhhhhhhhhhhhh
regards
unni