Linux Mint Debian Edition, or LMDE, is the edition of Linux Mint based on Debian Testing. The latest release was made available for download on December 24, 2010. The installation program on this edition is similar to the Ubiquity installation program, which is used on the main edition, the one based on Ubuntu. But while the Ubiquity installation program incorporates an automatic disk partitioning phase, the LMDE lacks it. As a result, installation of LMDE requires that the disk be partitioned manually . This tutorial offers a step by step on how to partition a disk for installing LMDE.
Images used in this tutorial were obtained from an installation in a virtual environment with a disk space of about 100 GB. The steps would be the same if you are installing on real hardware with, say, 500 GB of disk space.
Note: This tutorial assumes installation on a pristine hard drive.
You might also be interested in how to install Linux Mint Debian Edition on an encrypted LVM file system.
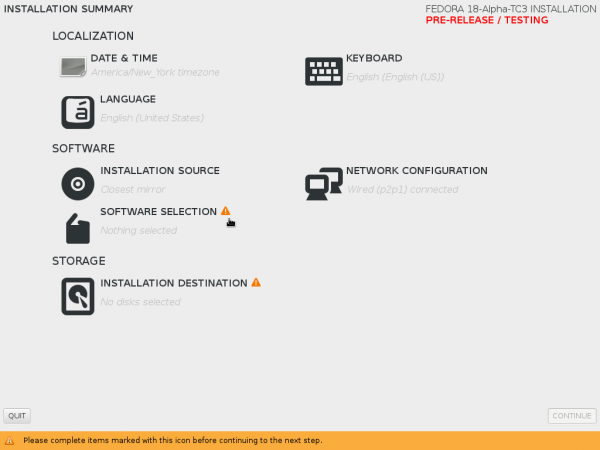
This is what you will see when you get to the disk partitioning step of the installation process, that is, if there are no existing partitions on the disk. To start creating partitions, click on the Edit partitions button.

That brings to the GParted window. GParted (GNOME Partition Editor) is the disk partitioning tool you will be using to create partitions on LMDE. If the disk has not been initialized, you will need to do that first before you can create partitions. To initialize the disk, select it, then click on Device > Create Partition Table.

With the disk initialized, select it, then click as shown to start creating partitions. For this installation, we are going to create four partitions:
- A /boot partition. This will be the first partition and it will be a primary partition.
- Swap space. This partition could be primary or logical. For this tutorial, it will be created as a primary partition.
- The third partition will be for the root file system, and it will be a logical partition
- And the last partition will be for /home, also a logical partition.
Creating logical partitions will keep you from hitting the limit of four primary partitions allowed by the system.

This is the partition creation window. You must specify the disk space to allocate to the partition, whether you want it to be primary, extended or logical, and the file system type. The Label field is optional.

This is window with the values for /boot in place. On a new installation of LMDE, /boot takes up about 30 MB of disk space so anything higher than that should do. But most distributions assign about 500 MB to it, so we use that value here. Click Add to exit.

With the /boot partition created, select the free space to create the next partition. This step will have to be repeated for the other partitions, too.


partitioning a hard drive was always a head banger so to speak (for me) and i never did try to do it, but i saw i had to do it for LMDE and with your article it was a no brainier, thanks
Wow, I tried to install the newest linuxmint debian version and hit a dead end. I’m used to linux doing everything for me! I’m still in the dark but not as much as I was before. Actually going through the steps gave me a better understanding! Very much appreciated =)
The tutorial has been updated. You may read it here.
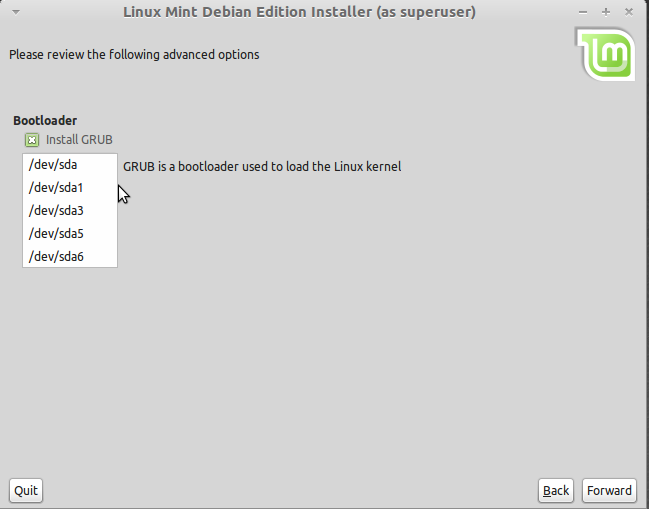
Please consider testing on multi-disk systems. If I install on sdb, can I get grub to write to sdb, and not overwrite sda’s grub? My BIOS has a disk boot selector built-in. Thanks.
Yes, you can write GRUB to the MBR (Master Boot Record) of sdb, or even to the boot partition of the OS installed on sdb.
When you do that, you would then have to edit the boot menu of the OS installed on sda to add an entry for the OS installed on sdb.
Question of accuracy here…
On September 18th, you advocated a ext4 for the /boot partition, and yet, in this article you now say to use ext 2 for it.
Which is the correct procedure for /boot? ext4 or ext2 ?
I did say you can use ext4 for /boot (most distros use it by default) and I also made the point in that article (maybe in a subsequent one) that there is an ongoing debate regarding using ext4, a journaling file system, for a file system directory that does not need it.
The bottom line is this: The overhead associated with using a journaling file system for /boot is negligible. So it really makes no difference whether you use ext4 or ext2. It will not break anything.
I used ext2 in this article because that is what Debian uses by default. Of the distros that I have reviewed, Debian is the only one that still uses ext2 for /boot. Debian is also the only one that still uses ext3 as the default journaling file system.
What about using ext3 for your boot-partition? I would argue that as long as the system boots, it does not matter very much, which file system you use. And you’re right that journaling is not necessary for the boot-partition. Speed of the file system and overhead are not much of an issue as the /boot is quite small. A backup of the MBR via dd is useful, especially when there is an update of the init.ramdisk or an upgrade to GRUBW which can break things badly.
Most Linux distributions use ext4 for /boot so you can use ext3, too. The point I always try to make with regards to this subject is it does not matter. If in doubt, when in doubt, use the distribution’s default. If you do not trust the developers, use ext2.