 Sabayon Linux 4 is one of a handful of Linux distro that uses LVM as the default disk partitioning scheme. Linux Logical Volume Manager (LVM) is a feature built into the Linux kernel that brings some benefits to hard disk configuration and management under Linux that is not possible with the traditional method of disk management. It makes it possible to, for example, dynamically resize a logical volume (partition) on a running system.
If you are new to Linux, and to the concept of logical volume management, we recommend that you read the basic benefits of using LVM, and how Linux distros configure and manage LVM.
By default, the Sabayon installer creates two logical volumes – one for swap and the other for the root (/) partition. This approach is not necessarily the best way of setting up LVM. In this tutorial, we give step-by-step instructions on how to create a custom LVM setup on Sabayon Linux 4.
Before delving into the tutorial, we should point out that on Sabayon, it is not yet possible to create encrypted LVM volumes. If that is important to you, you should consider Debian, Fedora, or Mandriva.
Setting up LVM involves the following steps:
- Create a non-LVM partition for /boot
- Create a Physical Volume
- Create a Volume Group and assign the Physical Volume to the Volume Group
- Finally, create Logical Volumes
For this tutorial, we intend to create separate logical volumes for / (the root directory), /usr, /var, /tmp, /home, /opt, /usr/local, and swap. To reduce the number of screenshots, we begin this tutorial at the point in the installation process where the installer presents the hard disk(s) detected on the PC, and end it after all the logical volumes have created. For a complete step-by-step installation guide – with screenshots, read the Sabayon Linux 4 installation guide
Now, on to the tutorial.
The default method of disk partitioning is Automatic, but since we want to create a custom set up, select Manual, then click on the Forward button.
This screenshot just shows the disk(s) and free space available for use. To create the first partition, select the free space as shown, and then click on the New button.
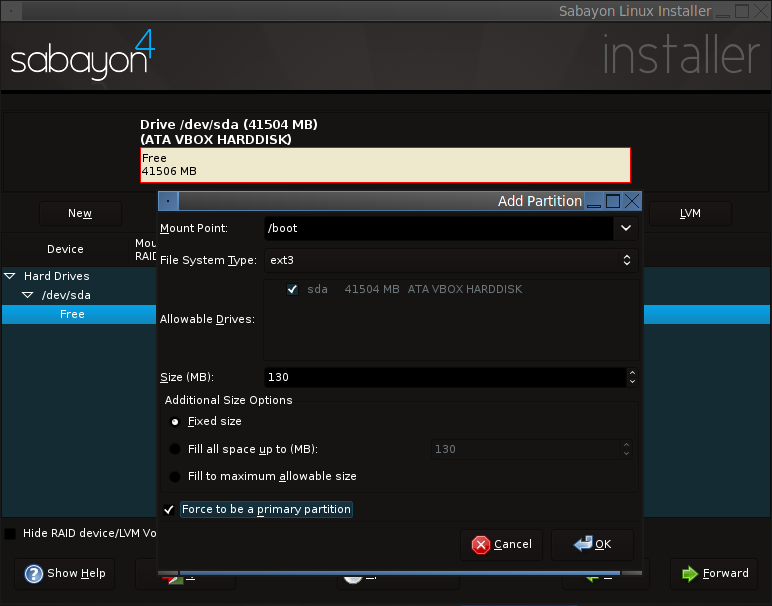
When configuring LVM, the first partition you create must be a non-LVM partition for /boot. The boot directory, /boot, is where all the static files required to boot the system are stored. Most distros typically assign about 100 MB to /boot, and this should be more than enough. The installer should set it up as a primary partition, but just to be sure, make sure that Force to be a primary partition is checked.
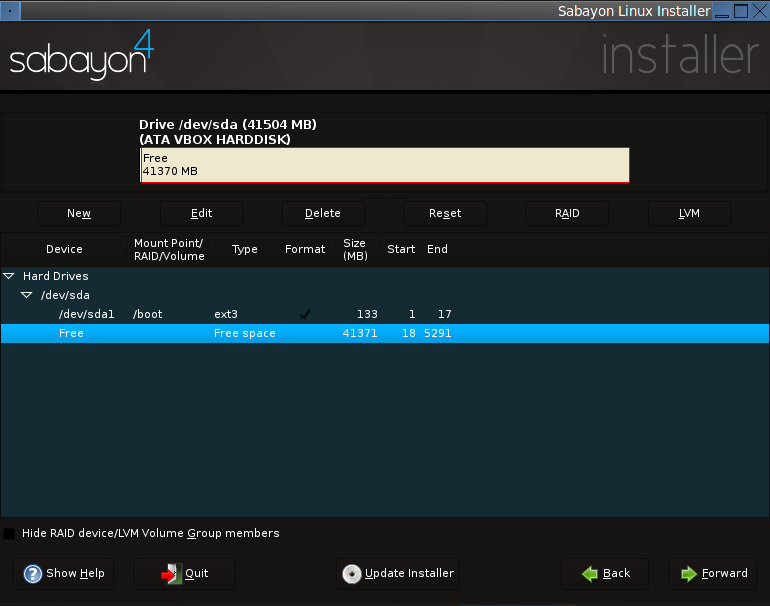
With /boot out of the way, now is the time to create a Physical Volume (PV). Creating a PV initializes the rest of the space for use by LVM. To do this, select the free space, then click on the New button.
The only options you need to change to create a PV is to set the File System Type to physical volume (LVM), and make sure, if you intend to use all the available free space for LVM, that the radio button next to Fill to maximum allowable size is on. Click OK. If you were doing this from the command line, this is where the pvcreate command would have been used.
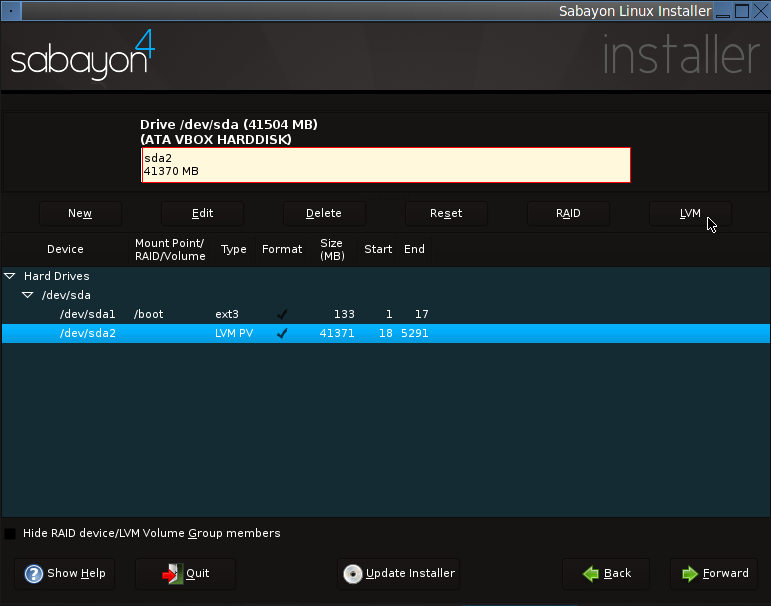
Now that a PV has been created, the next step is to create a Volume Group (VG), assign the PV to the VG, and then create logical volumes from the available space on the VG. In LVM parlance, a logical volume (LV) is the equivalent of a partition, and a VG is just a virtual container of LVs and PVs. To perform the aforementioned tasks, select the PV (/dev/sda2 on the screenshot) you just created and click on the LVM button.
The first thing we need to do is name the VG. By default, the name of the VG is VolGroup00, but you can give it any name you feel comfortable with. Because only one PV has been created, notice that is automatically selected under Physical Volumes to use. With the VG named, and the PV assigned to the VG, click on the Add button to the lower right side of the window to start creating LVs.


“However short of a server farm, you do not ever need to use LVM, it is a much over used feature”. Unless you want to add a new hard drive, replace an existing one, or make a backup. if you do any of these or may someday need to do this you will greatly appreciate LVM.
So what about encrypted LVM volumes? You mention they are NOT supported? Do you know if there is any chance this will change in the near future?
Only the Sabayon devs can answer that question. If you are looking for a distro with support for encrypted LVM, try Debian, Mandriva, or Fedora. In general, Fedora makes it a lot easier to configure disk encryption than any other distro.
@Azerthoth
And the reason why the “default size right off the DVD is 12 Gig” is because all three desktop environemnts – KDE, Gnome, and Xfce – are installed by default. Question is, “why do you need to install all three desktop environments?”
If you follow the directions in this installation guide, the default will do just fine.
And if you think that LVM is useful only in a server farm then you do not really know much about LVM.
One thing is clear, you havent spent much time with sabayon. Your defaults are not just wrong, they are so small that it wont install. Sabayons default size right off the DVD is 12 Gig.
Sabayon has an automatic set up for LVM, point it at a 30 Gig partition and let it go. If you need to adjust mount points you can do so later. However short of a server farm, you do not ever need to use LVM, it is a much over used feature. Any one halfway competent individual can set the fstab up properly.