This tutorial shows how to dual-boot Linux Mint 17 and Windows 8 on a computer with two hard drives and UEFI firmware. For a guide on how to perform the same operation on a computer with one hard drive, see How to dual-boot Linux Mint 17 and Windows 8 on a PC with UEFI firmware.
The computer used for the test installation is not an OEM, or store-bought one. Rather, it is a custom-built computer, with an ASRock motherboard and Intel Core i3 processor. Windows 8 is installed on the first hard drive, a Maxtor hard drive with 200 GB of disk space, while the second hard drive is a Western Digital (WD) piece with 320 GB of storage. Linux Mint 17 will be installed on it.
For this exercise, I used the Cinnamon edition of Linux Mint 17. But the steps will also work for the MATE and Xfce editions, because they use the same installer as the Cinnamon edition.
An assumption made here is that Windows 8 is already installed on the first hard drive. However, if necessary, you can always install it afresh. Also, the automatic disk partition method of the Linux Mint 17 installer is used, that is, no manual disk partitioning is involved. However, if you wish to create a custom set of partitions for Linux Mint 17, you can do that just was easily.
So based on those assumption, here are the steps involved:
- Download an installation image of Linux Mint 17 (Cinnamon, MATE or Xfce) from here. Burn or transfer it to a suitable installation media (DVD or USB stick).
- Install Linux Mint 17 on the second hard drive. For this tutorial, the installer’s automated disk partitioning tool is used, so no manual disk setup is involved.
- Set the default boot manager for the computer
With all that intro out of the way, here’s how to get this done.
Step 2. Install Linux Mint 17:
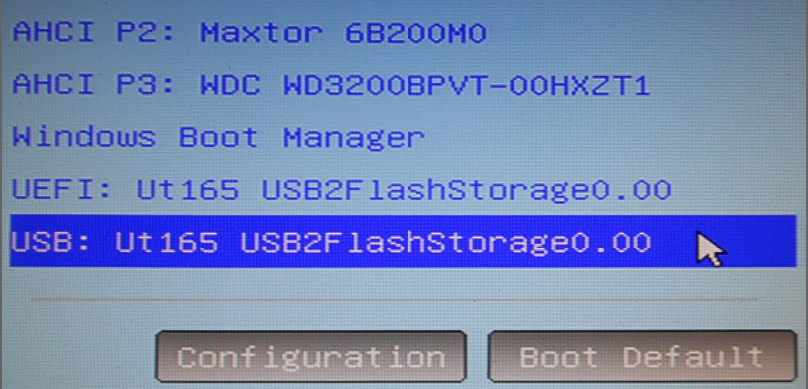
(Re)Boot the computer with the installation media in the optical drive or in a USB port. Before it boots the default boot device, press the F key that redirects you to the computer’s boot menu. On my test computer, that key is the F11 key, and this is what the boot menu looks like.
The AHCI P* … entries are for the hard drives, while the * Ut165 * … entries are for the installation media, which in this case, is a USB stick. Selecting the UEFI: Ut165 … entry will result in a system installed on GPT partitions, while the USB: Ut165 … entry will result in a system installed on MBR partitions, even when the computer has UEFI firmware.
If you want a result that’s exactly like the one produced with this guide, select the UEFI: Ut165 … entry and hit the Enter key.

The computer should boot into a live Linux Mint 17 Cinnamon (or MATE or Xfce) desktop. Launch the installer by clicking on its icon on the desktop. When it starts, click until you get to the step shown in the image below. For the computer used for this guide, the second hard drive connected to it has an installation of Ubuntu 14.04. That installation was also a test system, so I didn’t mind erasing it. In any case, the installer accurately detected that the target drive has an operating system on it and offered the options that you see in this image. Since there’s no sign that the Windows 8 drive was detected, it is always a save bet to make sure that the installer detected it. To verify, select the Something else option and click Continue.

That should open the installer’s Advanced Partitioning Tool. You should see all the disks (and their partitions) detected by the installer. In the screenshot shown here, you should see the partitions under the first detected hard drive (/dev/sda). That is the Windows 8 drive. So we know that the installer detected it.

This screenshot shows the lower part of what could not be shown in the screenshot above. It shows the partitions under the second hard drive (/dev/sdb). You can see that everything is in order. Since I had no intention of creating partitions manually, I had to take a step back to the Installation type window.

From the Installation type window, select the second automated disk partitioning option as shown in this screenshot. In addition, you may also select the option to encrypt the disk (highly recommended, if you want a better physical security profile) and the LVM option. Click the Continue button.

This is where you have to be careful. By default, the installer will want to install Linux Mint 17 on the first hard drive, that is, the Windows 8 hard drive. But that’s not what you want to do. To select the correct hard drive, click on the Select drive menu.

This is what the menu looks like on my system. You can see both hard drives listed. The target hard drive is /dev/sdb

This is what the step should look like after the correct hard drive has been selected. If you click Install Now, all existing partitions on /dev/sdb will be deleted and Linux Mint 17 installed on a new set of partitions created by the installer.

Step 3. Set the Default Boot Manager: After Step 2 has completed successfully, reboot the computer. Before it reboots into the default OS, which should be Linux Mint 17, press the F key that will take you to the boot menu. For my computer, it is the F11 key. This screenshot shows the entries in its boot menu. The OS entry for Windows 8 is Windows Boot Manager. Somehow that of Linux Mint 17 is Ubuntu. If you select any AHCI P* … entry, the computer will not boot.
To boot into Linux Mint or Windows 8, select the matching OS entry. If you select the Ubuntu entry, you will be taken to Linux Mint 17’s GRUB menu, which should also have an entry for both operating systems. Since that entry has been automatically set up as the default boot device, anytime the computer is booted, you will have the option to boot into Linux Mint 17 or Windows 8. If Linux Mint 17’s boot manager is not set up as the default boot device, go into your computer’s UEFI setup tool and make it so. One of the F keys should get you into the UEFI setup utility. For my computer, that key is the F2 key. The Delete key will also do the trick.


Hi, I installed Linux mint 18.2 on my second hard drive and the installation went well, but since it was my first time installing Linux mint myself I didn’t know I had to make the hard drive bootable first. So now I have two hard drives in my laptop, but I can only use the one with Windows 10 installed. I already checked if the hard drive is still recognised by my laptop, which it is, so it’s just not a hard drive I can boot from.
How do I solve this?
From the BIOS/UEFI utility, make the 2nd drive the default boot device. Or from the same BIOS, make the Mint boot manager (it will be listed as ubuntu) the default boot manager.
Either one will work.
Nice tutorial, but I have some doubts.
I’m currently running winodows 10 as default os with UEFI bios mode and the SSD is in GPT table.
If I want to install ubuntu or mint as secondary os which one should I do
1. Do I need to create a UEFI usb stick instead of normal mobe USB stick?
2. Which one should I select during installation
1. UEFI USB STICK
2. normal USB
as in snapshot 1.
ISO images for Ubuntu/Mint are dual-mode, that is, they can be used for installation on UEFI and non-UEFI computers. Since yours is UEFI, the installation media will auto-detect it and boot into the appropriate mode.
Nice!! installed mint in a second HDD, everything is fine. Although every time I need to enter boot menu for Mint, is there any way so I can enter directly to grub menu and select mint or windows?
In the BIOS/UEFI settings, make the Mint HDD the default boot device.
That should work, though on many UEFI implementations, the OS that the PC boots into is the one that was last booted, regardless of what the default boot device setting is in the BIOS/UEFI utility.
I ran into the problem of UEFI on my latest PC (built for me by my son), which is my first machine with UEFI. My pragmatic solution was temporarily to disconnect the other hard drives except the one I was installing on. The sequence was:
Run my default OS (Windows 7)
Put the Linux Mint 17.3 Rosa installation disk in the DVD drive
Close Windows/shut down the computer
Open the case and disconnect data and power leads from all internal hard drives except the one I had selected for installing Linux
On restart go into the BIOS to check that the UEFI Linux option in the DVD drive was first in the boot sequence (it was)
Run Linux from disk.
Install Linux on hard disk
Close Linux and shut down computer
Reconnect all leads to other hard disks – this included the SSD drive (the C: drive which contains my Windows 7 installation)
Restart and go straight into BIOS to check that Linux boot manager is at top of list (it was)
Exit BIOS and continue to boot into Linux
Go to Terminal and run: sudo update-grub This found my Windows boot option as well. I got this tip from Finid at http://linuxbsdos.com/2015/02/27/dual-boot-linux-mint-17-1-windows-7-on-a-pc-with-uefi-firmware/ Thank you, Finid!
Type: exit to exit Terminal
Close Linux/shut down PC
Restart computer – to be double sure, recheck the boot sequence in the BIOS to make sure that Linux is at the top.
Continue boot – Grub now shows the various options which you can select, primarily Linux Mint and Windows in my case. Make your selection and proceed.
I hope my experience will help some folks out there.
Very nice!
What would be different if this were a computer bought from a computer shop or discount mart? What if the diatribution is Ubuntu, Debian, or Fedoria?
If this will work well across the board, then I won’t have to find a computer with Win 7 becasue I fear problems with UEFI.
Thanks,
By itself, UEFI is not the problem. It’s Restricted Boot, which comes enabled with Windows 8-certified computers. That’s what causes headache with dual-boot attempts, though it’s doable.