After Linux Mint 17 was released back in mid-2014, I published How to dual-boot Linux Mint 17 and Windows 8 on a PC with UEFI firmware. Now that Linux Mint 17.1 has been released, it seems that many users are stumbling in their attempt to use the tutorial to dual-boot it and Windows 8 on a computer with UEFI firmware.
That shouldn’t be because the installers of Linux Mint 17 and Linux Mint 17.1 are the same. No difference in UI and functionality. So what’s the problem, or where’s the problem?
To find out, I decided to repeat the setup using an installation image of Linux Mint 17.1 and either Windows 7 or Windows 8. The choice of Windows 7 or Windows 8 does not make any difference in this matter, so I chose Windows 7.
In this tutorial, therefore, you’ll read how to dual-boot Linux Mint 17.1 and Windows 7 on a computer with UEFI firmware. My test computer is a self-built desktop, but the steps should also work on an OEM (store-bought) laptop or desktop.
Getting From Here To There: To accomplish the task, you’ll, of course, need to have access to a Windows 7 computer that you have permission to use. After that, enough space has to be recovered from the C drive to use for installing Linux Mint 17.1. Then you’ll download an installation image of Linux Mint 17.1 and use it to install that edition of Linux Mint alongside Windows 7 on the target hard disk.
To install Linux Mint 17.1, the following partitions have to be created:
- Root (mounted at /) partition
- Home partition, mounted at /home
- Swap partition
If you’re new to disk partitioning in Linux, it is recommended that you read Beginners to disks and disk partitions in Linux.
Step 1 – Shrink Windows 7 C Drive: An OEM Windows 7/8 hard drive will come with a huge C drive, most of which will be unused. To install Linux Mint 17.1 alongside, some of that unused space on the C drive will have to be recovered. Free space can be recovered from inside Windows 7/8 or by using the Linux Mint 17.1 installer.
The recommended route is from inside Windows 7, using its partition manager. If you need help shrinking the C drive, use this forum post as a guide. After that task is completed, you should have recovered enough free space to install Linux Mint 17.1, a shown in Figure 1. That Unallocated space was recovered from the C drive of the test computer.
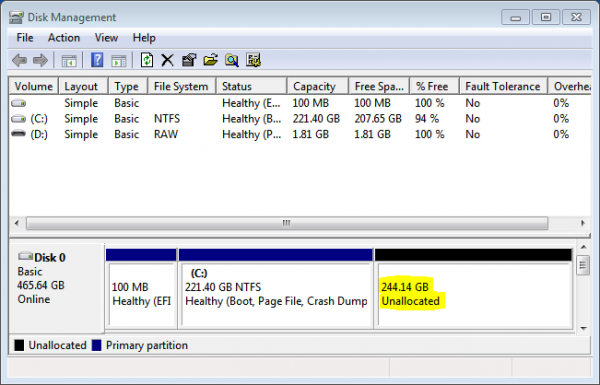
Figure 1: Windows 7 partitions as seen from the Windows 7 partition manager after shrinking the C drive.
Step 2 – Download Linux Mint and Transfer it to a USB Stick: Installation images for Linux Mint 17.1 are available for the Cinnamon, MATE, KDE and Xfce desktop environments. If you haven’t done so already, download an installation image of from the project’s download page. Note that the installer on the KDE edition has a slightly different UI, but you should not have any difficulty in using this guide if Linux Mint 17.1 KDE is your choice.
After downloading it, transfer it to a USB stick or a blank DVD. The former is recommended, because it can be reused. If on Windows, use whatever application you have available to transfer the image to the USB stick or DVD. If, on the other hand, you have access to a Linux machine, use forum post as a guide.
Step 3 – Boot the Computer From the USB Stick: After Step 2 has completed, boot the computer from the installation media. However, before it boots into the default disk, press the F-key that will take you to the computer’s boot menu. Once there, you should see several entries, two of which should be for the Linux Mint 17.1 installation media. One of those entries for the installation disk should start with UEFI. That’s the one you want to boot from, because it will boot into the UEFI-aware version of the installer.
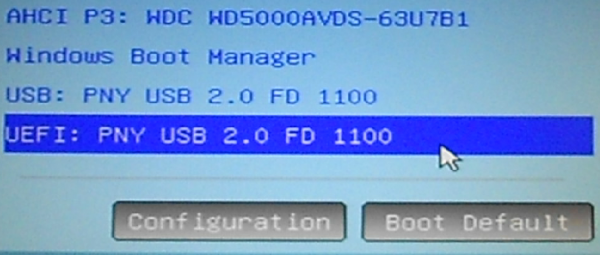
Figure 2: UEFI computer boot menu showing entries for Linux Mint 17.1 installation USB stick.
If you get a boot menu that has just one entry for the Linux Mint installation disk, like the one in Figure 3, then the installation is likely to fail, because it might not hold the UEFI-aware version of the installer. And this is the problem I think some users are encountering. And that could be due to an error in the transfer/burning process.
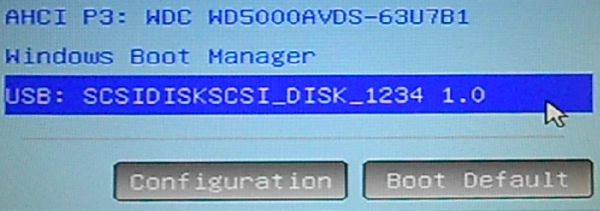
Figure 3: Computer boot menu without an entry for UEFI-aware version of Linux Mint installation media.
After booting into what you think is the UEFI-aware version of the installer, you should first see a screen with the entries shown in Figure 4 before the computer boots into the Linux Mint 17.1 Live desktop. Seeing it is prove-positive that the computer will boot into the UEFI-aware version of the installer.
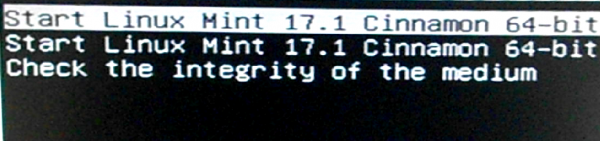
Figure 4: GRUB boot menu of the UEFI-aware version of Linux Mint 17.1
Step 4 – Install Linux Mint 17.1: Once in the Linux Mint 17.1 Live desktop, you should see an icon for the installer on the desktop. Double-click it, then click through the first few steps until you get to the one shown in Figure 5. At the top, it should say “The computer currently has no detected operating system. What would you like to do?”
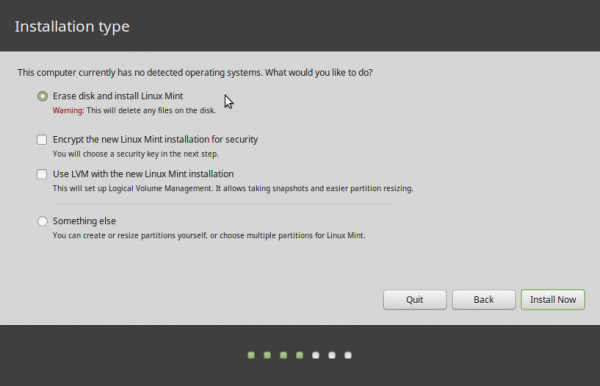
Figure 5: Disk partition methods on Linux Mint 17.1.
You know that can’t be right because you know for a fact that Windows 7 or 8 is installed on the computer. But this is not a big issue. You’ll just have to use the installer’s manual disk partitioning tool, which you access by selecting the Something else option and clicking Continue.
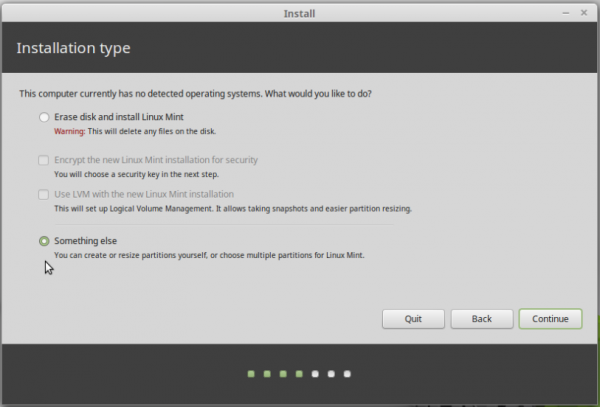
Figure 6: Something else option on Linux Mint 17.1 installer.
Figure 6 shows the installer’s manual disk partitioning tool’s window. It should show a listing of disks detected on the computer, with their partitions listed right below each. The first detected disk should be listed as /dev/sda, and if the installation media is a USB stick, it should be listed as /dev/sdb. You should ignore that, just focus on /dev/sda. The free space recovered from Windows 7 in Step 1 should be listed at the end of the partitions under the target disk. It should be the free space listing.
To start creating partitions for Linux Mint 17.1, select that free space and click on the + button as shown in Figure 6. This will have to be repeated to create all the necessary partitions.
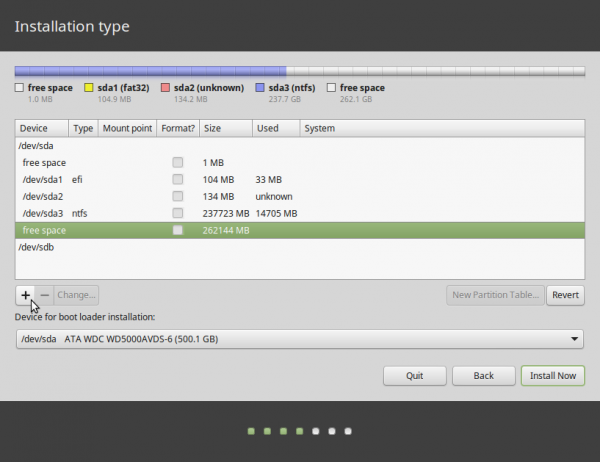
Figure 6: Windows 7 partitions as seen from Linux Mint 17.1 installer.
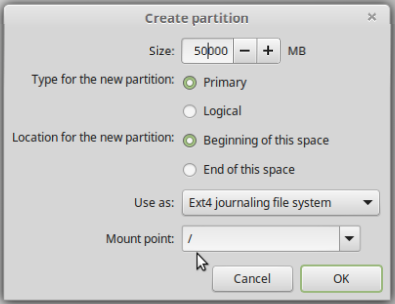
That should open the installer’s partition editor, shown in Figure 7. Only the Size, Use as, and Mount point settings need to be modified for the partitions you’ll be creating.
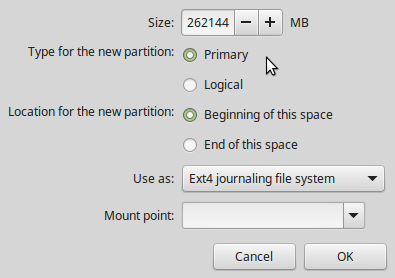
Figure 7: Linux Mint 17.1 disk partition editor.
The first partition will be for root. The recommended disk space for installing Linux Mint 17.1 is less than 10 GB, but if you have disk space to spare, any value higher than that is fine too. The default file system (Use as) is Ext4 journaling file system and that should be good for this setup. From the Mount point menu, select /. Click OK.

Figure 8: Create root partition on Linux Mint 17.1.
The home partition will be using most of the disk space available, so allocate as much as you have. The mount point should be /home. Use the default file system. OK.
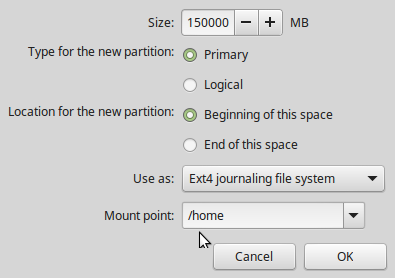
Figure 9: Creating home partition on Linux Mint 17.1.
The last partition will be Swap, unformatted disk space that the system may use as virtual memory. The recommended disk allocation for Swap is 4 GB. From the Use as menu, select swap area. OK.
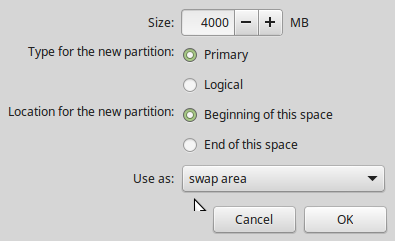
Figure 10: Creating swap partition on Linux Mint 17.1.
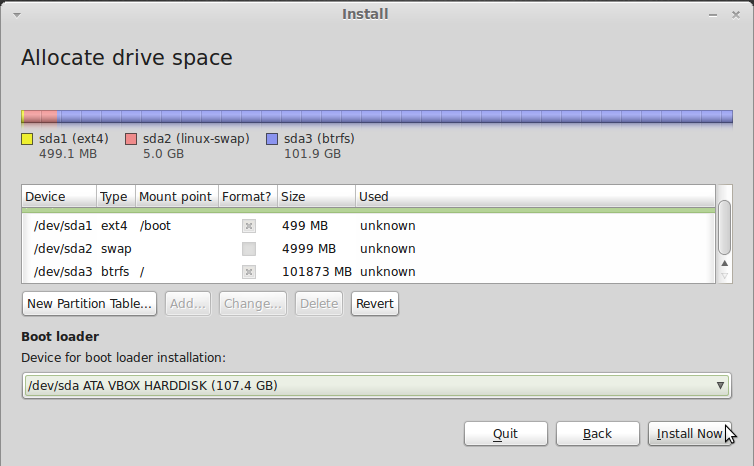
Figure 11 shows the listing of partitions after the Linux Mint 17.1 partitions have been created. Sda1, sda2, and sda3 are the Windows 7 partitions, while sda4, sda5, and sda6 are the Linux Mint 17.1 partitions. Because we are dealing with a computer with UEFI firmware, sda1 is also the boot EFI partition, which is where GRUB will be installed. Double-check what you’ve done and if you’re satisfied, click Install Now to continue with the rest of the installation.
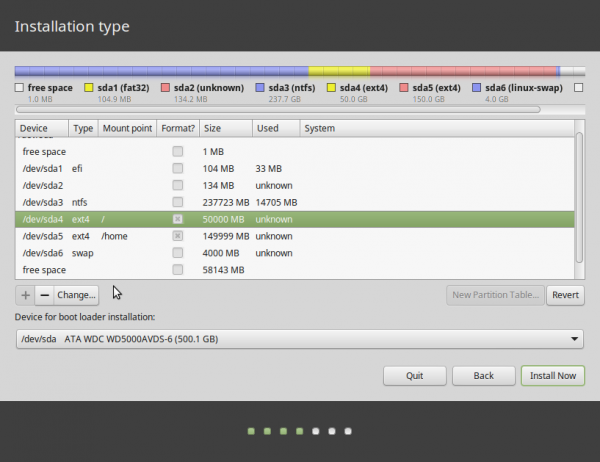
Figure 11: List of Windows 7 and Linux Mint 17.1 GPT partitions for a dual-boot setup.
Step 5 – Reboot: After installed has completed successfully, rebooting the computer should boot into Linux Mint 17.1, but not before making a pit stop at GRUB’s boot menu, which should have entries for both Windows 7 and Linux Mint 17.1. From my experience with UEFI systems, there really is no default OS on a dual-boot system. The last OS booted becomes the default, regardless of the setting in the UEFI setup utility.
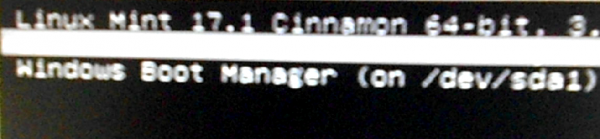
Figure 14: GRUB menu of Linux Mint 17.1 showing entries for the dual-booted operating systems.
More Information: That should be it. Post a comment if you run into any problem. If you want to set up a similar system on a computer with two hard drives, that is, with Windows 7 and Linux Mint 17.1 installed on separate hard drives, see Dual-boot Windows 8 and Linux Mint 17 on a PC with 2 disks and UEFI firmware.


my pc had windows 7 installed but it crashed for unknwon reason . as i was in a hurry , i had to install linux mint as a single os .. later i realized that i can’t log tom my partitions which were previously created by windows 7. when i try to reinstall windows 7 or any other version of windows i have a message saying i have to format my hard which became one raw partition site:answers.google.com
So you managed to delete Windows 7 when you installed Mint on the same HDD. That install of Windows 7 is gone. Now you’re trying to reinstall Windows 7. That means deleting Mint, which is OK, provided that’s what you want to do.
So use the Windows 7 install CD to reformat the HDD and reinstall. Afterwards, you can install Mint alongside it in a dual-boot fashion. Easy as pie.
Installing 17.1 to dual boot on a Win7 EFI pc on getting to the no ‘This computer currently has no detected operating system’ when selecting the ‘Something else’ screen I am then met with a table showing dev/sda as having 160041MB of free space. The drive is formatted with a 75 GB partition containing W7 and a 70 GB partition empty which I intend to use, there is approximately 5 GB of unallocated space. My other drives sdb and sdc show the partitions correctly.
When booting using the f12 boot manager I select the EFI dvd drive as the option to boot from, this is actually the first, so default, option with an ATAPI option for the same drive at the bottom. I have previously got to this stage with the intended 70GB partition as unallocated with the exact same outcome.
I have made repeated attempts with the intended partition left as both unallocated space and a FAT32 partition, all with the same result. Going past this and creating partition will, to my mind, corrupt my Windows installation.
Having only 4 SATA headers on the board, and using all for 3 drives and a disk drive I don’t really want to use the option of installing an operating system of either of my two data drive (sdb & sdc) as they are used for specific storage.
My problem is where do I go next?
I looked at a number of websites purporting to explain how to do dual boot.
Although this was the least detailed, it was also the simplest and clearest to apply.
And it worked without a hitch.
Hi , I have an Gigabyte board GA-990FXA-UD3,which i installed win.8.1 , I decided i didn’t like 8.1 so i wiped my hard drive clean and tried to install Linux Mint 17.3.( this board does not have the secure or fast boot in Bios.) every time i try and install Linux from a disk i get this message AHCI usb detection failed. i lose the keyboard,mouse and my WIFI, also, i have no working usb ports and have no way of installing mint! Any solution to my dilemma? (Oh BTW i have changed my bios to Legacy w/no results.)
I have a box that I built using a Gigabyte GA-Z68MA (Intel processors) that works just fine, though I have occasional issues with the USB ports.
Have you checked there’s an AHCI in the BIOS/UEFI settings that needs to be enabled? That might be a cause.