Anaconda, the Fedora system installation program, is one of the easiest and most feature-rich graphical installation programs available on any distribution. The default partitioning scheme, which uses LVM, the Linux Logical Volume Manager, should be good enough for most systems, especially for standalone Fedora installations.
But sometimes, you might find yourself in a situation where you want to dual-boot an existing installation of Fedora with another operating system or distribution, long after the first installation. If you used the default partitions created by Anaconda, that process becomes very difficult.
That is because with Anaconda’s LVM-based disk partitioning scheme, all available disk space are allocated to the LVM Physical Volume, which makes it impossible to recover space from the system for installing another distribution.
That is why it is very important to plan for the future, when installing Fedora. In this article, a step-by-step guide on how to create an LVM-based disk partitioning scheme for Fedora 17, the latest edition, while making an allowance for another distribution on the same hard drive, is presented.
If you are not familiar with LVM and with disk partitioning in Linux, it is highly recommended that you read guide to disks and disks partitions in Linux and introductory articles to LVM here.
Since the installation process is the same across all the Fedora 17 editions, this tutorial can be used to create manual LVM partitions for the main Fedora 17 edition, which uses the GNOME 3 desktop environment, and any of the Fedora 17 Spins.
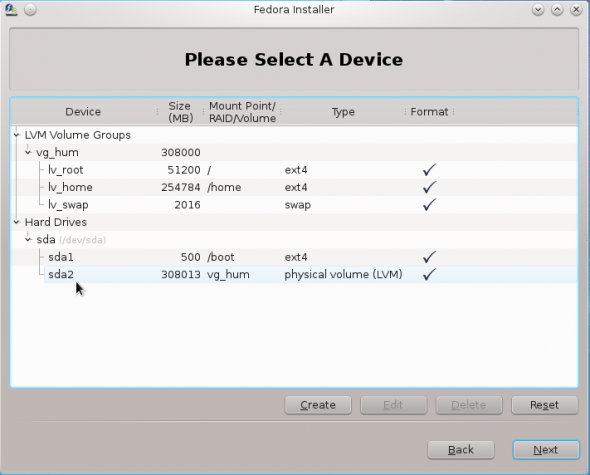
The partitions created by default for installing a Fedora 17 system are shown in the image below. You can see that there are two primary partitions, one of which is a boot partition (/dev/sda1) and the other (/dev/sda2), the LVM Physical Volume. In addition, there are three logical volumes (see the top of section of the image). They are: lv_root, lv_home and lv_swap. Notice that there are no free space available. That is because as stated earlier, Anaconda allocates all available disk space to the partitions and logical volumes.

The partitions and logical volumes shown above are the minimum required for installing Fedora or any other distribution that has support for LVM. So what we are going to do here, is create the same partitions and logical volumes as shown in the image above, but leave some free space in case you need to install another distribution on the same hard drive. A process known as dual-booting.
If you have not done so already, download an installation image of Fedora 17 from here. Transfer it to a suitable media and boot the computer from it. Start the installer and click through the first steps until you get to the one shown in the image below. Select Create Custom Layout, then click Next.

That should get you to this window, where the detected hard drive(s) are listed. This system has been selected to show the free space. To start creating partitions, select the free space and click Create.

As on a default installation, two primary partitions and three logical volumes will be created. The first primary partition, which is a Standard partition, will be mounted at /boot, that is, it is the boot partition, where all boot-related programs will be located. The second primary partition will be the LVM Physical Volume, under which the three logical volumes will be created.
The default option on this window is Standard, which is what we want. Click Create.

On the next window, shown here, there are three options that we have to modify. They are: Mount Point, File System Type, and Size (in megabytes). For the boot partition, the mount point will, of course, be /boot. While the default file system type on Fedora and virtually all Linux distributions is Ext4, there are other options. However, you do not have to bother about those other options. Aside from physical volume (lvm) and swap, which we will be using further later, you do not need to bother about the rest, at least for this tutorial.

When the right options for the boot partition have been selected, the window should look just like the one shown here. Notice that for the size, 500 MB was allocated. That is the default size allocation for a boot partition on most Linux distributions. If you do not have a lot of disk space to spare, you can go lower than that. As low as, say, 100 MB. OK.

With the boot partition out of the way, select the free space on the main window, and click Create. That should bring up the same window you saw earlier. Since the next partition is a primary partition for LVM, select LVM Physical Volume. Create.


