One tool that has seen very little or no change over the past several releases in Ubuntu Desktop is the installation program. So it is somewhat surprising that some users are having a hard time dual-booting Windows 7 and Ubuntu 12.04 using a tutorial written for Ubuntu 11.04.
Stemming from comments in that article, and email from readers, I decided to revisit that tutorial using Ubuntu 12.04. So the purpose of this article is to show how to dual-boot Windows 7 and Ubuntu 12.04 on a computer with one hard drive. And it will be on a computer with an existing installation of Windows 7. If there is a need to, you may reinstall your copy of Windows 7.
If you want to attempt this on a computer with two hard drives, see how to Dual-boot Ubuntu 12.04 and Windows 7 on a computer with 2 hard drives.
To get started, download an installation image of Ubuntu 12.04 from here. Depending on your platform, you may download the 32- or 64-bit image. Screenshosts used in this tutorial were taken from test installations using a 32-bit installation image in both a virtual environment using VirtualBox, and on real hardware. In either case, I did not encounter any errors that others have reported, so I am certain that if you follow this guide, you should have a computer with both Windows 7 and Ubuntu 12.04 installed in a dual-boot configuration.
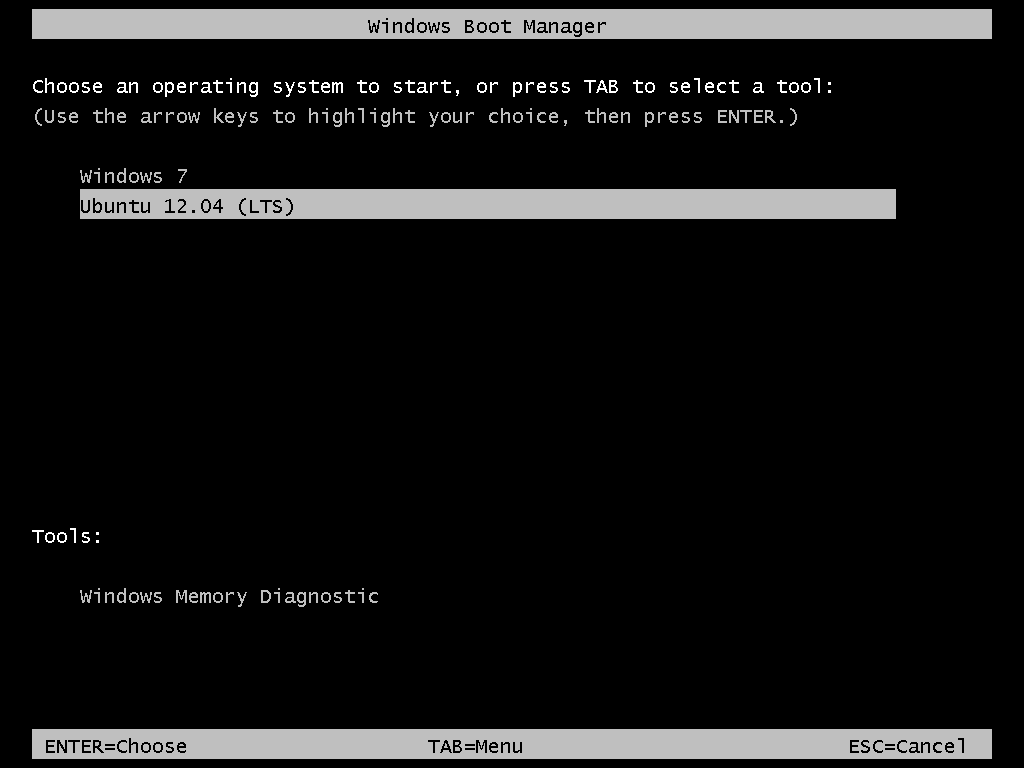
So that anytime you reboot the computer, you should see Windows 7’s boot menu with two entries listed – Windows 7 and Ubuntu 12.04 (LTS). Then you may choose to boot into Windows 7 or Ubuntu 12.04.

Now that you know what the overall goal is, how do you get from here to there? First, understand that if you have a computer running Windows 7, that Windows 7’s boot manager is responsible for making sure that the system boots. Installing Ubuntu on the same hard drive throws another boot manager into the mix. So the most important decision you are going to make about this, is which boot manager (Windows 7’s boot manager or Ubuntu’s) do you want to be responsible for primary boot operations?
When dual-booting Windows 7 and a Linux distribution on a computer with one hard drive, the best option is to have Windows 7’s boot manager be the primary boot manager. Why? Because whenever you reinstall or update Windows 7, its installer will overwrite anything it finds in the portion of the hard drive where critical boot-related programs are installed. That portion of the hard drive is known as the Master Boot Record (MBR). Also, certain anti-virus programs have been known to mess with the contents of the MBR, so installing GRUB in another location will ease the maintenance headache associated with your system. This point determines where GRUB will be installed.
If you are not familiar with disk partitioning (in Linux) and dual-booting, it is highly recommended that you read guide to disks and disk partitions in Linux and tips for dual-booting Windows and Linux.
By default, a new installation of Ubuntu 12.04 is installed on two partitions – a main partition, and Swap. The main partition is usually a primary partition and the Swap, a logical partition. And if Ubuntu is the only operating system on the hard drive, you will see both partitions labeled /dev/sda1 and /dev/sda5. Because you are going to install it on a computer with another operating system on it, the partitioning scheme will have to change.
The recommended partition scheme that will work better with the system you are about to install will have at least three partitions. They are the:
- Boot partition – This is where GRUB will be installed, instead of in the MBR. Installing GRUB in the boot partition is where users have encountered errors, so pay particular attention to what you do with this partition
- Root partition – This is where all the programs will be installed
- Home partition – This is optional, but it helps to have your files and folders on a separate partition
- Swap space
I think what you need to do should be pretty clear now. Time to begin the process! If you have not done so already, burn the installation image (of Ubuntu 12.04) you downloaded to a CD or transfer it to a USB stick, and boot the computer from it. When booted from the CD, you will be given the option to boot into a Live Desktop or start the installation without visiting the Live Desktop. It does not matter which option you choose, but booting into the Live Desktop and starting the installation from there seems to be a very good choice.
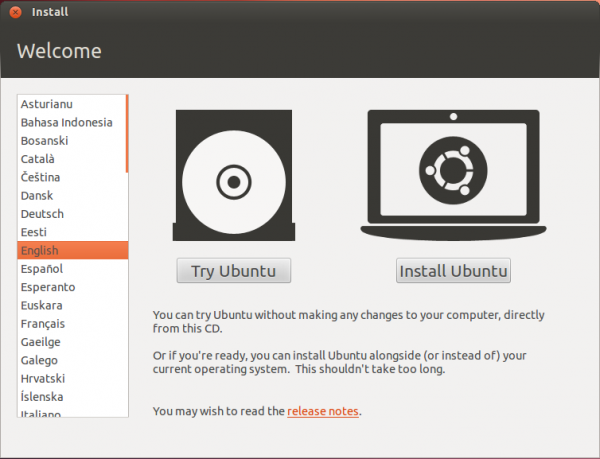
Whether the installation process is started from the Live Desktop or not, clicking through the installer gets you to the step shown in the image below. The most important information here is the minimum disk space (4.4 GB) recommended for a successful installation of Ubuntu 12.04. That piece of information will help you determine how much disk space to allocate to the root partition.
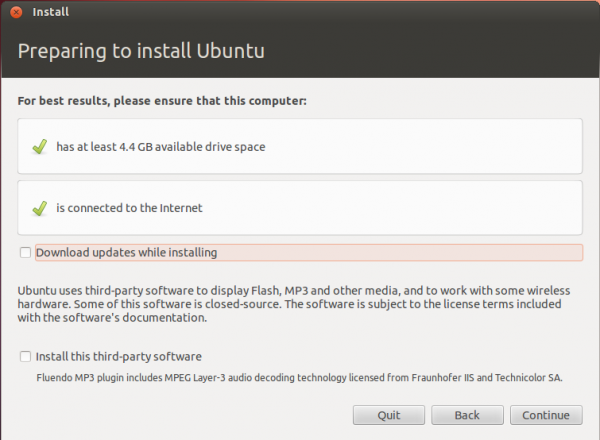
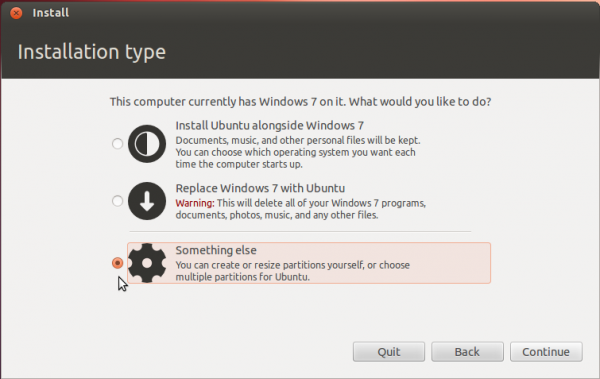
Clicking Continue from the previous step will land you here. If, as in this example, you have Windows 7 installed on the target hard drive, you should see the same three options shown here. Because you will be creating partitions manually, the option you want to select is Something else.
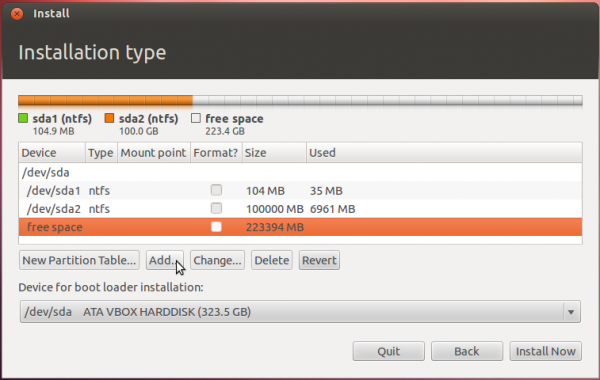
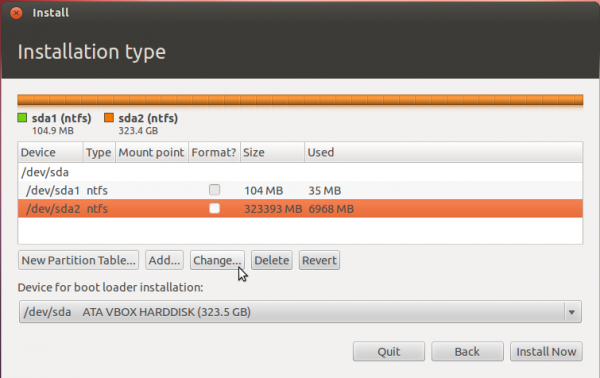
That should bring you to the Advanced disk partitioning tool. Again, if we are operating from the same point, that is, if you have a default installation of Windows 7 on the target hard drive, you should see two ntfs partitions (/dev/sda1 and /dev/sda2) listed. The main Windows 7 partitions, also popularly known as the C drive, is your sda2. To install Ubuntu, you will have to resize that partition. Note: If have free unallocated space on the hard drive, you do not have to go through this partition resizing process. To resize the partition, select it and click the Change button.
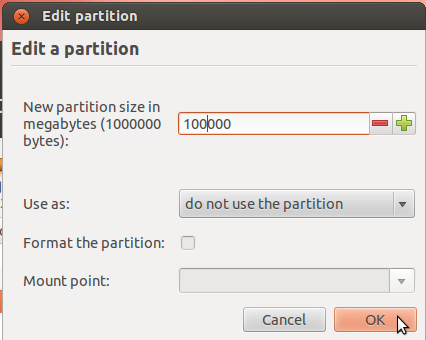
That should open this window. The only thing to do here is tell the installer how much disk space you want to keep for Windows 7. The rest will be used for Ubuntu. The system used for this tutorial has about 324 GB of disk space. I chose to keep 100 GB for Windows.
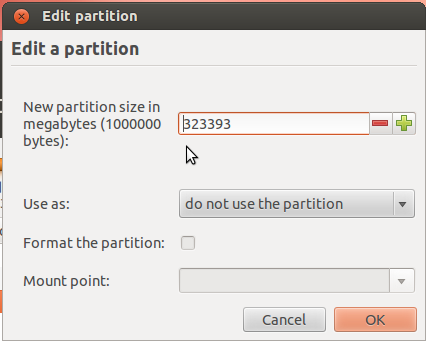
So the window now looks like this. Click OK.
After the partition has been resized successfully, you should see the freed space marked as free space. Select it and click Add to start creating partitions for Ubuntu 12.04.