![]() A Paranoid, or 5-star, security rating is the highest physical security rating that you can achieve on your computer. It entails enabling a set of OS-dependent and OS-independent features.
A Paranoid, or 5-star, security rating is the highest physical security rating that you can achieve on your computer. It entails enabling a set of OS-dependent and OS-independent features.
But why would anyone want to achieve such a high physical security rating on Fedora or any other distribution? Strict control of who can access your data if your computer falls into the wrong hands, that’s why. The point is, if your computer is stolen, or seized by agents of the state, you do not want to make it easy for them to access your data. In fact, you want to make it impossible for them to access your data.
Even when you think that you have nothing to hide, you never know when some guys will show up at your residence or business with a warrant to seize all computer and computer-related devices they can find. Just ask Jason Chen.
Now to the physical security features and how to enable them on Fedora 13. There are five of them:
-
Set the BIOS password – This is the only OS-independent feature. It can be enabled on any computer, and requires getting into the BIOS Setup Utility and enabling the password. On most computers, you set the password in the “Security” tab of the BIOS Setup Utility. The following are the reasons why you would want to set a BIOS password:
- Prevent Changes To BIOS Settings — If an intruder has access to the BIOS, they can set it to boot off of a diskette or CD-ROM. This makes it possible for them to enter rescue mode or single user mode, which in turn allows them to seed nefarious programs on the system or copy sensitive data.
- Prevent Booting the System — Some BIOSes allow you to password protect the boot process itself. When activated, an attacker would be forced to enter a password for the BIOS to launch the boot loader.
-
Encrypt the disk – This is perhaps the most important OS-dependent feature that you can use to achieve a Paranoid security rating on Fedora 13 (or any other Linux or BSD distribution). Typically, it is turned on during the installation process. The image below is from the installation step where you’ll have to turn on disk encryption. Just make sure that “Encrypt system” is checked before moving on to the next step. Read disk encryption on Fedora 13 for a description of how it works.
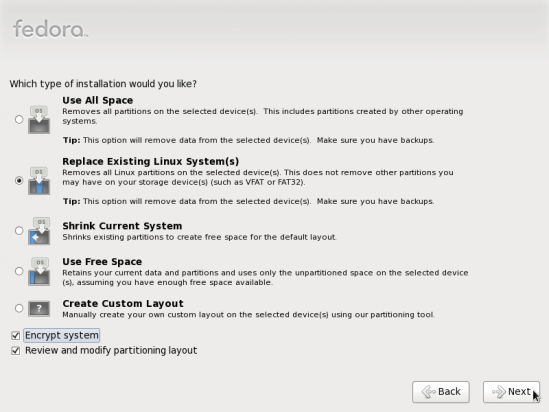
Disk partitioning options
-
Password-protect GRUB – The GRand Unified Boot Loader (GRUB) is now the default boot loader on virtually all Linux distributions (LILO, the LInux LOader, used to occupy that position). On some distributions like Fedora 13, it is the only boot loader supported. You would want to password-protect GRUB for the following reasons
- Prevent Access To Single User Mode — If an attacker can boot into single user mode, he becomes the root user.
- Prevent Access To the GRUB Console — If the machine uses GRUB as its boot loader, an attacker can use the edit the command’s interface to change its configuration or to gather information using the cat command.
You can password-protect GRUB during or after installation. During the installation phase, password-protecting GRUB may be enabled at the step shown in the image below. Just check “Use a boot loader password” and the installer will prompt for a password.
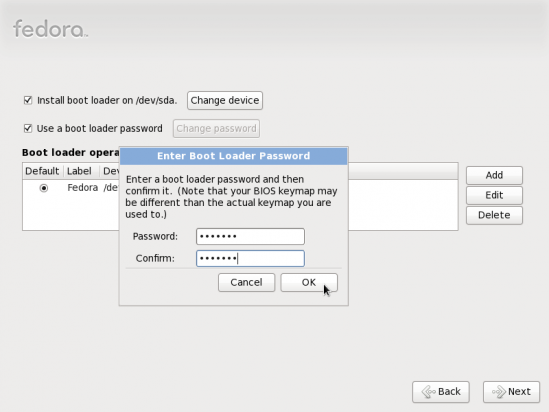
Specifying boot loader password
If you have Fedora 13 already installed and running, you can still set a boot loader password. Just follow these steps:
- Launch a shell terminal and type in grub-md5-crypt as shown in the image. You do not have to be root. The password that’s requested will be the one that’ll be used to protect GRUB. It should not be the same as that of any user account on the system, certainly not the same as the root password. Note the md5 hash generated. You will need it in the next step.
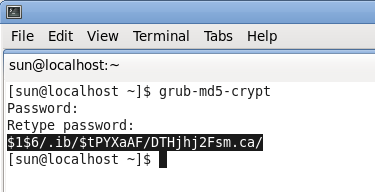
Generate the md5 hash for password-protecting GRUB
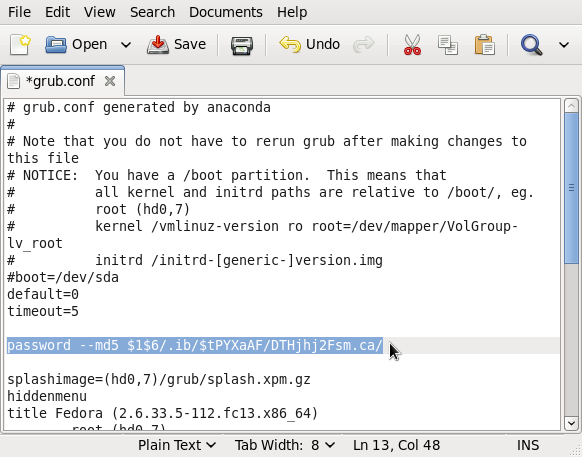
- Edit /etc/grub.conf (symlink to /boot/grub/grub.conf) as shown in the image. Just add another line below the “timeout” line and type in password –md5 < md5 hash from step i > as shown in the image. Save the file. Reboot and try to access other features of GRUB by pressing the “p” key. Did it work?
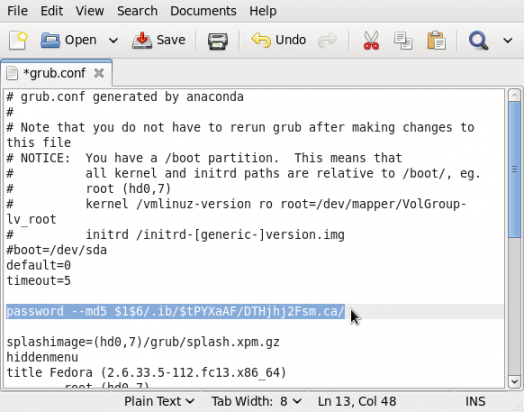
Edit grub.conf
- Check the file permissions of grub.conf and if it is readable by any other than root, change its permissions to 600 by typing, as root, chmod 600 /etc/grub.conf at a shell prompt.
- Choose a strong user account password – It’s always a good practice to choose strong passwords. But how strong is srong enough? Well, the installer and the user management utility will issue an alert when you specify a weak password. You have the option to choose another, stronger password, or use the weak one. Choose wisely.
- Never allow automatic login – On Fedora 13, this is one “feature” you do not have to worry about. Why? Fedora’s user management tool does not have this option. Ubuntu and other distro developers should take note.
-
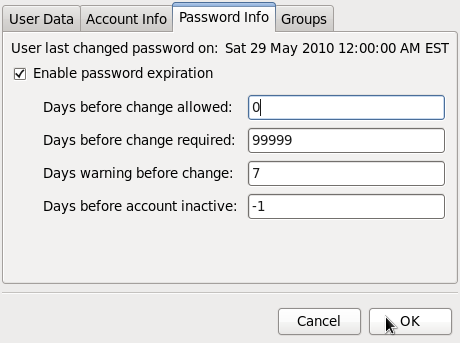
Implement password aging – Password aging just means that your current password will be set to expire after a defined date. Before that date, the system will prompt you to change it (usually starting 7 days before the password is set to expire). You enable password aging only after installation. Access the Users and Groups tool from System > Administration > Users and Group, and click on the “Password Info” tab. Check to “Enable password expiration” and click OK.
That should be all. Think this is going too far? Probably, but in today’s computing environment, you can never be too careful, or too paranoid. Afterall, it’s your data we are talking about.




Password protecting the BIOS is hardly bullet proof. All an adversary would have to do is pull the CMOS battery or set the reset jumper on the motherboard.
True, but no single security measure is tamper-proof. Remember that just because a professional thief can pick your lock does not mean that you should not bother about locking your door.