BackTrack Linux is now known as Kali Linux. You may read all Kali Linux articles and tutorial at http://linuxbsdos.com/category/kali-linux.
BackTrack is a Linux distribution that is based on Ubuntu, designed for hackers and/or security professionals, and loaded with the best Free Software and Open Source penetration testing applications available.
If you are looking for the best information gathering, vulnerability assessment, exploitation, privilege escalation, reverse engineering, RFID, stress testing, forensic and anti-forensic applications, you will find it on BackTrack. It is a hackers delight. If you are new to this distribution, you might want to read BackTrack 5 Revolution 2 screen shots. The screen shots there shows some of the category of applications available on BackTrack.
The latest edition is BackTrack 5, code-named Revolution, and we are at the second iteration release – BackTrack 5 R2. It is available as an installable Live DVD ISO image for both 32- and 64-bit architectures, each weighing in at about 2.8 GB. There is a separate installation image for the KDE and GNOME desktop environments. While you can install it on any computer, I think the best practice is to install it on an external, USB hard drive. Doing that, gives you a pentest distribution on the go plus all the extra storage you might need.
You may also opt to install it on a USB stick (a flash drive), but if you choose to go that route, be sure to have one with a capacity of more than 18 GB. Why? A default installation of BackTrack 5 R2 takes up just a little bit more than 18 GB of disk space. It is huge.
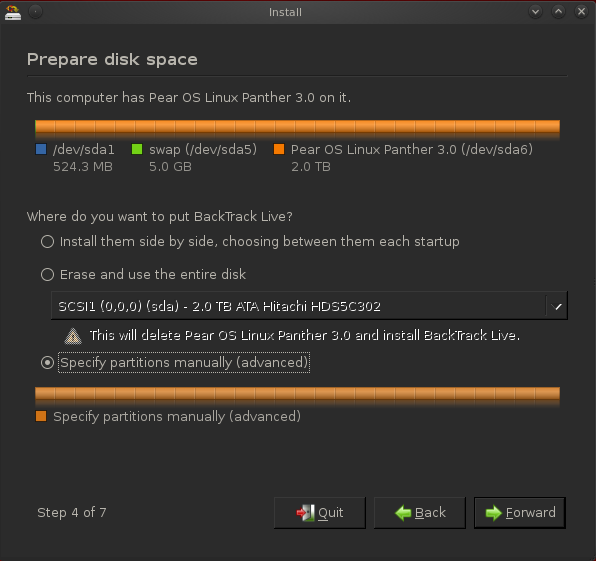
This tutorial shows how to install it on an external hard drive, using a 32-bit installation image. You may download it from here. Burn it to a DVD, place the DVD in your computer’s optical drive and reboot. Boot into the Live desktop and click on the Install BackTrack icon on the desktop. When the installer launches, click through the first few steps until you get to the one shown below, It is the fourth of eight steps of the installation process.
Since you are attempting to install it on an external hard drive, it means the computer will have at least one internal hard drive. To have the installer auto-partition the external drive, select the second option at this step of the installation process, then select the external drive from the dropdown menu below it. Just be sure that the drive you select is the external drive. Hint: It will not be sda because that is the first internal hard drive. And if the computer has two internal hard drives, it will not be sdb. That, is the second internal drive. If you are new to this, you might want to read guide to disks and disk partitions in Linux.
To create partitions manually, as I am going to demonstrate in this tutorial, select the third option – Specify partitions manually (advanced). Click the Forward button.

You should land at the Advanced partitioning tool. The computer I used for this tutorial has two internal hard disks. The external hard disk is sdc. You can see that it has existing partitions in it. Since I want to use the whole disk for BackTrack, all 320 GB of it, the first task is to delete those existing partitions. If this is the case with yours, select each partition and click the Delete button.

After the delete operation, the window will now look like this. To start creating partitions, select the free space and click the Add button.

If you selected the automated partitioning option at the fourth step of the installation process, the installer will create just two partitions – a main partition, and a Swap partition. For this tutorial, we are going to do the same. You can always create more if you feel there is a need to do so.
So, the first partition will be for the root partition. Mounted at /, of course. The disk space you allocate to it will depend on the size of the hard drive. Keep in mind that a new installation of BackTrack 5 R2 takes up over 18 GB of disk space. Click OK when all options have been specified.

For Swap space, select “swap area” from the “Use as” dropdown menu. The installer will attempt to create it as a Logical partition. You may accept that or choose Primary to create it as a primary partition. OK

After the partitions have been created, the main partitioning window will now look like this. The remaining free space can be used for persistent storage. Forward.

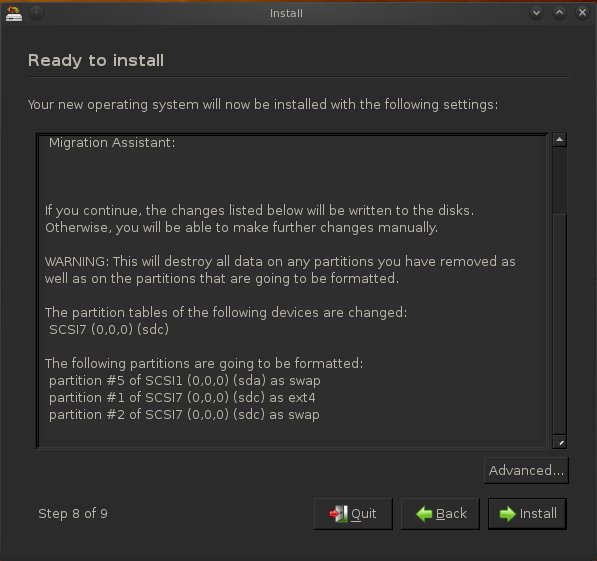
This step gives you a summary of what the installer is going to do, based, of course, on the choices you made in the previous steps. To make sure that the installer will install GRUB, the boot loader, in the Master Boot Record (MBR) of the target hard drive, the external disk, click on the Advanced button.

Luckily, the installer will, by default, want to install GRUB in the MBR of the external disk, so you do not have to do anything. OK.

After installation, reboot the system. Login. Note: The default username for BackTrack 5 R2 is root, and the password, is toor. Once in, type startx to start the graphical desktop environment. Be sure to change the password with password root command.


how can i break the password of wifi with backtrack 5 r2? Please fully guide me and also tell me about wpa wed and wpa2? I shall b very thankful to you…and if you can guide me on my email adress than it will be more good for me….
http://null-byte.wonderhowto.com/how-to/hack-wi-fi-cracking-wpa2-psk-passwords-using-aircrack-ng-0148366/
Go to the link above, a detailed guide to crack WPA protected WiFi passwords.if the WiFi is protected with a different type, read the posts of the same author.
u could use reaver.
I love reaver.
Takes awhile but hey i normaly run 3-4 sessions on one work space 16 total(default amount of work spaces)
*hint: Not all sessions are for wifi’s most metasploit and websploit, set, Androint_cu(downloaded) ect.
i m new to use backtrack 5 r3… First i burn it on dvd then reboot my system (dell precision 470 server machine 64 bit) but i was unable to boot it from dvd… Please guide me my email address is … Please help me…
What error message do you get?
Hi,

thanks for the tutorial but I have a question.
On the picture you posted
it says that partition #5 sda will be formatted as swap. what does it mean exactly and why would there be changes to the internal partition if I am planning to install BT on my external drive. Please advice
That is the installer automatically formatting it. It should not be so, but ultimately, it does (did) not affect the functionality of the internal system.
OK so you are saying there shouldnt be anything done on the sda drive, the main internal drive?
I just want to be 100% sure that I will not compromise my windows 7?!
For peace of mind, you might just as well disconnect the SATA cable from the internal HDD before starting the installation.
I am using a laptop so i cant really do that.
Have you tested this personally?
after doing all the above the computer wouldn’t boot from the external hard drive …………some help plz…
Well, what happens when you attempt to?
i was able to boot from mt laptop but i couldn’t boot from my Desktop PC the only differance between the 2 devices is that the laptop has 32bit hardware and the pc hase 64bit hardware and the backtrack that i’ve downloaded was 64bit……..Thx for the reply
Sri i was going over the laptop hardwere and even the i5 processor on my laptop is 64bit
Thanks alot. Big help
Does anyone know if its possible to run Trackback 5 Rev 2 and Windows 7 in a dual boot configuration?
See this article.
And a more here.
I’m new to this and i was wondering if deleting a partition can it cause or change anything on my windows operating system?
If the partition you delete is not owned by Windows, then you are good.
Just be sure to verify that you are not deleting your C drive or a system partition.
Hi, can i use backtrack 5r2 live dvd even if i wouldnt install it on my laptop?
Yes.
So after we install it on the external hard drive and reboot our computer, how do we get the computer to boot from the USB drive (whether flash or full-fledged external drive) rather than going straight to Windows or Linux, as would be normal? Do we just go into the BIOS and select ‘boot from USB’ or something? But if that is the case, won’t that be inconvenient in cases when we want to boot normally from our computer’s internal hard drive, since we’ll have to keep going into the BIOS and changing where to boot from? And if the solution to this is to somehow modify the Windows MBR to give us an option (as in an option for where to boot from), then won’t there be a problem with this in the future if Windows updates and thus overrides the modifications we’ve made in the MBR, removing the option we gave ourselves? I’m so confused lol.
You do not have to change the boot disk in the BIOS. You can access the boot menu as the computing is booting and select the entry for the USB drive.
Even if you change the default boot disk in the BIOS, it will boot from the internal hard drive if the USB drive is not connected to the computer.
I installed as directed…. but when i select it from the windows boot manager it goes to the loading screen (black with single flashing underscore) and it does nothing….
If you installed it on an external hard drive, what are you doing with windows boot manager? Most likely, GRUB was not installed in the MBR of the external hard drive. That is why, I think, you are seeing that flashing cursor.
I ran Backtrack 5 BootCD and installed to the external… It said it installed Ubuntu and when i load the disc i can see the external drive root and all its files…..(what were installed)
You can see all installed applications if you boot from the external drive that you installed BT 5 on. You may view them here.
yeah…. i know that but the problem is getting it to boot from the external…. after I install BT5 there is no drive letter (for that partition) and it does not load when i say boot from usb, since it is listed as a hard drive. dba and dbb my internal RAID hard drives, dbc is the external and what i installed on but i can’t figure out how to set it up to list on my boot windows screen or the boot device screen
I thought this article was very helpful, I was able to successfully install backtrack onto my external hard drive. However, I am unable to open and store information on that drive from windows. It has 1TB of storage and I only partitioned about 40GB for backtrack. Any tips on how I can still fix this problem?
Easy. Just create an NTFS partition from Windows on the external drive, then you can save information from Windows or Linux to that NTFS partition.
The NTFS partition has to be created from Windows, not from BackTrack.
See an example here.
That was easy! Thanks for the help!!