While we are still waiting for Btrfs, the B-tree File System, to be mature enough and be used as the default file system in Linux, it is already possible to install your favorite (Linux) distribution on a Btrfs file system. Linux Mint 12 KDE, a distribution based on Ubuntu Desktop, is one of those.
In this article, the steps required to install it (Linux Mint 12 KDE) on a Btrfs file system, are presented in an easy to follow manner. While the available installation image of this distribution is still a Release Candidate, the installation process will not change when the stable version is released. So this article can be used even with the stable version. (A release candidate was made available for download on Wednesday January 11.)
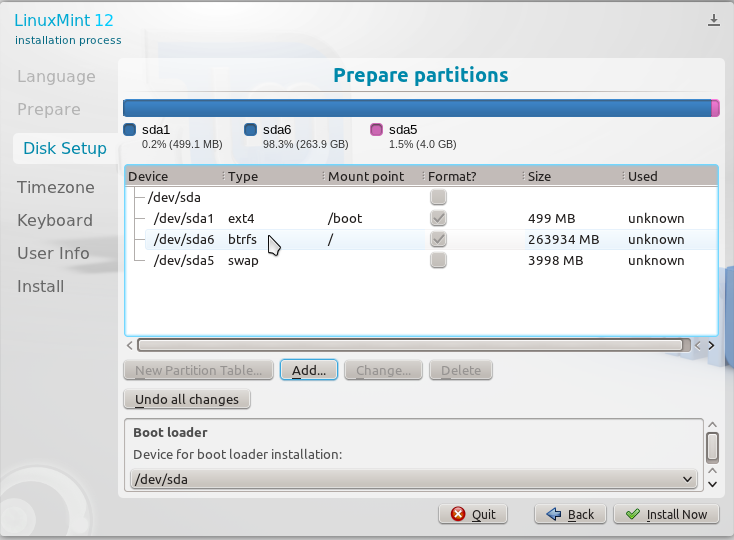
Installing a distribution on a Btrfs file system requires just three partitions – a boot partition, mounted at /boot; a second partition for /, the root file system; and the last for Swap, disk space that the system may use as virtual memory.
To start, download an installation image of the distribution from here and transfer the downloaded image to a DVD or USB stick. Boot the computer from it.
After booting has completed, you will be looking at a Live desktop of Linux Mint 12 KDE. Click on the “Install Linux Mint” icon on the desktop. The screen shot below is the second step of the installation process. The information here is just to let you know what is required to install this distribution. Click Continue to move to the next step.

There are two disk partitioning options here. Using the first one, the default, will cause the installer to install the system on an ext4 file system. Attempting to installing the system on a Btrfs file system is a manual operation, so select “Manual.”

The window should look like this when “Manual” is selected. Continue.

That brings you to the advanced disk partitioning tool. If the target disk has not been initialized, you will have to do so before you can start creating partitions. Select the disk and click New Partition Table.

When that operation is completed, the window should look like the one shown in the screen shot below. Select the free space, and click Add to create the first partition.

The first partition will be mounted at /boot. This is where programs required for booting the system will be located. If, like the target disk used for this tutorial, there is no other partition on the disk, the installer will create it as a primary partition. A disk space of 500 MB should be more than enough for the boot partition. Though the objective is to install the system on a Btrfs file system, the boot partition can be on ext4. OK.

With the boot partition created, select the remaining free space and click Add to create the next partition. This step will have to be repeated for the last partition too.

The second partition will be for /. This is the main file system, and you may assign the bulk of the remaining disk space to it, leaving just enough for the Swap partition, which will be created next. Select “btrfs journaling file system” from the “Use as” dropdown menu. OK.

Last partition will be for Swap, which, depending on installed RAM or memory, will allocate between 2 GB to 4 GB to Swap. For guidance on how much disk space to allocate, see recommended disk space for Swap. For this tutorial, I am going with 4 GB. Be sure to select “swap area” from the “Use as” dropdown menu. OK.

With all the partitions created, click Install Now to continue with the rest of the installation process.


