
This tutorial shows how to dual-boot Windows 11 and Linux Mint 22 on a PC with 2 drives, with both drives internal to the PC (desktop or laptop). If your computer has only one internal drive, you can still set up a dual-boot system between Windows 11 and Linux Mint 22, but I recommend that Linux Mint 22 be installed on an external drive.
The reason I recommend installing Linux Mint 22 on an external drive in such a dual-boot setup is to avoid issues that can arise during or after installation, which can result in the distro or Windows being unable to boot. By following any of the recent dual-boot tutorials I’ve written, including this one, you can avoid those issues.
This tutorial assumes that:
- The PC has 2 SATA or 2 M.2 hard drives. A PC with one SATA and one M.2 drive should work do. The drives used for this tutorial are both of the M.2 variety.
- The first hard drive recognized by the BIOS or UEFI utility has Windows 11 already installed on it. If you’re going to install Windows 11 from scratch, the order of installation doesn’t matter, though installing Windows 11 first is the usual approach.
- Linux Mint 22 will be installed on the second hard drive.
- That second drive will be automatically partitioned by the Linux Mint installer. You may partition the drive manually, but for this tutorial, I let the installer handle that.
- You’re able to disconnect the Windows 11 drive before installing Linux Mint 22. The reason for this is to keep the Linux Mint installer from writing to the /boot/efi partition of Windows 11 drive.
Now that you know how you need to get this done, here are the steps involved.
Step 1: Download Mint
The first task to complete, if you’ve not done so already, is to download Linux Mint 22. Regardless of the flavor you opt to download – Cinnamon, Xfce, or MATE, the installation process will be the same, since they all use the same installer. After the download has completed, flash the downloaded image to a USB stick.
There are several applications available for flashing an image to a USB stick. On Windows, use one of 2 apps I recommend to flash the ISO image to a USB stick. If you using another Linux distro, use the dd command or any of the other applications I recommended for flashing ISO images to USB sticks in Linux.
That should get you ready for step 2.
Step 2: Disconnect the Windows 11 drive
The reasons for completing this task have been given above, so get a screw driver and open up the PC. If the Windows drive is a SATA drive, disconnecting the power and SATA cables will do – no need to physically remove the drive from its bay. If it is an M.2 drive, you’ll have to physically remove it from its slot and set it aside.
You’ll put it back after installing Linux Mint 22.
Now to step 3.
Step 3: Install Linux Mint 22
To begin the process of installing Linux Mint 22, insert the USB stick from step 1 into any available USB port and reboot the PC. If the PC has been configured to boot from removable media, it should reboot into Linux Mint installer’s GRUB menu. Otherwise, keep pressing the appropriate function key (F11, F2, or whichever function key brings up the boot menu) until the PC’s boot menu appears. Then select the entry for the installation media and press the Enter or Return key.
Wait a few minutes for the system to boot into the live desktop. From there, double-click on the Install Mint 22 icon on the upper left corner of the desktop to launch the installer.
Then click through the first few steps of the installer until you get to the Installation type step shown in Figure 1. This is the step of the installation process where you get to decide how you want to partition the hard drive – whether you want to manually partition it or you want the installer to automatically partition the drive for you.
For the purpose of this tutorial, I chose to have the installer partition the drive, so I selected the Erase disk and install Linux Mint option. By this, the installer will create just 2 partitions – one mounted at /boot/efi, and the other mounted at / (root). If you’re coming from Windows and are not familiar with disk partitioning in Linux, / (root) is the Linux equivalent of the C drive in Windows.
If you want to create a custom set of partitions, the option to select is Something else. This assumes that you know how to create partitions in Linux. If you don’t, I recommend that you read my guide to disks and disk partitioning in Linux.
OK, back to Figure 1, select the option shown and click the Install Now button.
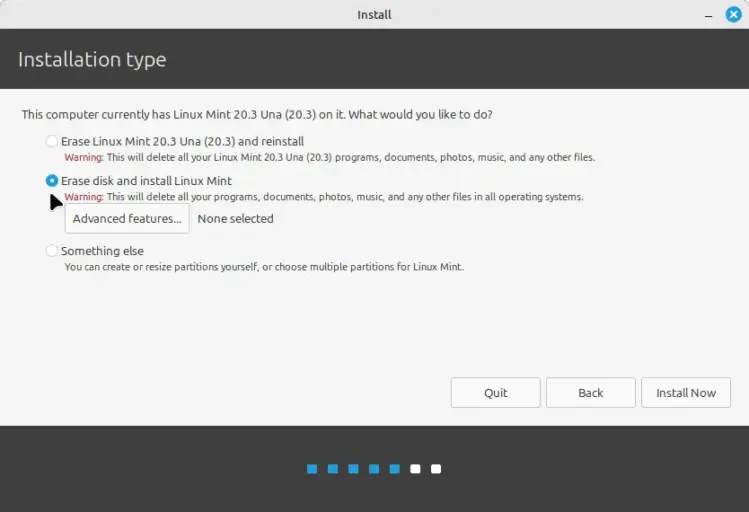
Figure 1: Selecting how to partition the target drive to install Linux Mint 22.
That will then show you the prompt just like the one in Figure 2. This is just informational, so click Continue.
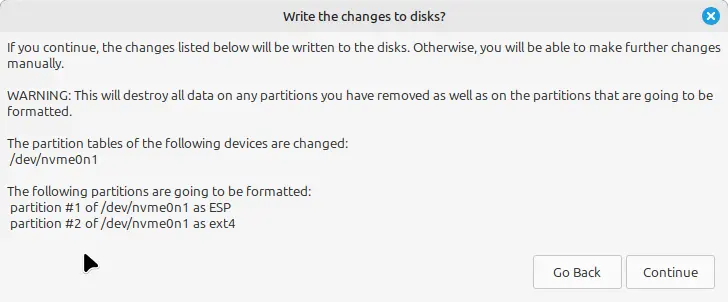
Figure 2: Informational prompt from the Linux Mint installer.
After the installation has completed successfully, you’ll be prompted to remove the installation media, then press Enter to reboot. If you do as directed, the PC will reboot into your new installation of Linux Mint 22. Afterwards, shutdown the PC, so that you can reconnect the Windows 11 drive.
Step 5: Reconnect the Windows 11 drive
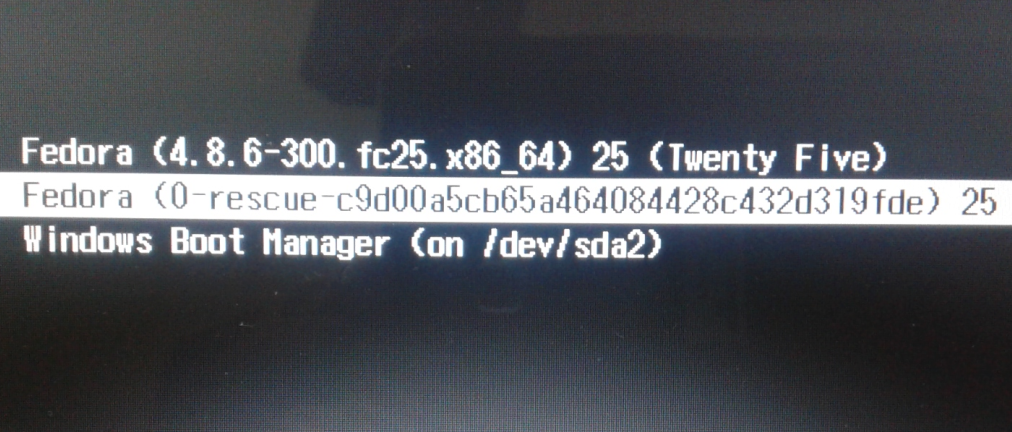
With the PC powered off, reconnect the Windows 11 drive, put the PC cover back on and restart it. As it restarts, press the function key that will bring up the boot menu. In the boot menu, you should see 2 entries, like the ones shown in Figure 3. From here, you can select which OS to boot into. Selecting the Windows Boot Manager entry will reboot into Windows 11. Selecting the Ubuntu entry will reboot into Linux Mint 22. You can change the order in the BIOS/UEFI utility.
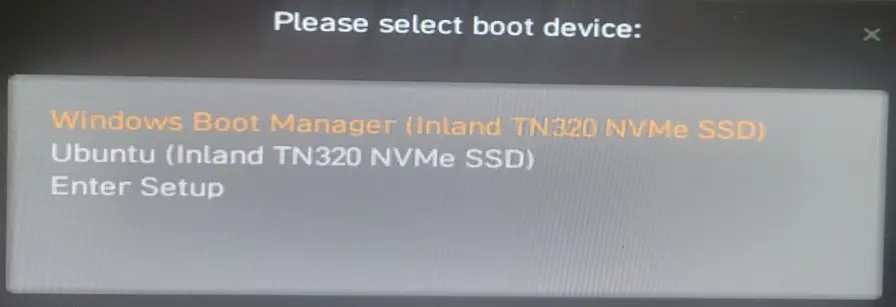
Figure 3: The PC boot menu showing entries for the Windows and Linux Mint boot managers.
When you boot into Linux Mint 22, you will be able to read and write to the Windows 11 drive from the file manager (see Figure 4) or even from the command line. And when you boot into Windows 11, you will be able to see the Linux Mint partitions from the partition manager, but won’t be able to read and write to it, because Windows cannot read and write to Linux filesystems.
But neither OS will be able to read or write to the EFI System Partition of the other. This complete separation of the the systems means the odds of one corrupting the boot files of the other are reduced to zero. And that is how it should be. This is how I recommend you dual-boot Linux Mint 22 and Windows 11 on a PC with 2 hard drives. The same applies to any other distro and Window 11.
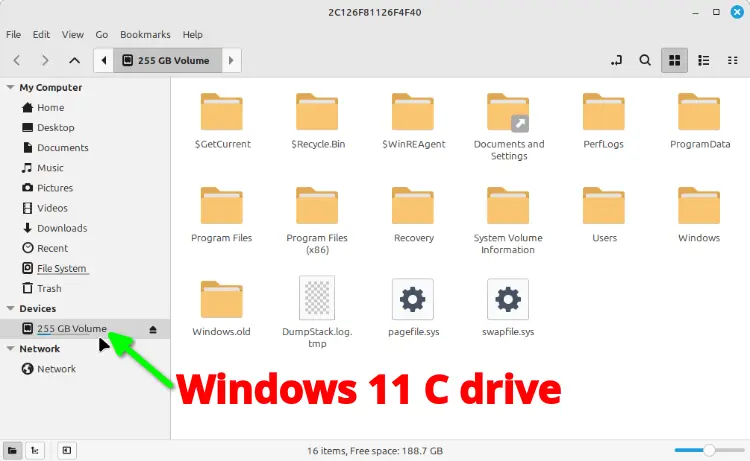
Figure 4: Shows that you can read the Windows 11 C drive from inside Linux Mint. You can also write to it..
Now that you’ve successfully completed this tutorial, you might want to read my step by step guide on how to add an extra drive for storage in a Windows 11 and Linux dual-boot setup like this. And to avoid file or data corruption when sharing content across both systems, be sure to disable Fast Startup in Windows 11.


