
Following from Tips for installing a Linux distribution on an external hard drive, here’s a short and quick one on how to install Ubuntu 15.04 or Linux Mint 17.2 on an external hard drive.
And also following from my recommendation in that article, installation will be on an MBR partitioning scheme, using the distribution’s non-UEFI-aware version of the installer.
So, if you wish to follow along, download an installation image of either distribution from here (Ubuntu 15.04) or here (Linux Mint 17.2). I used a USB stick as the installation media, but you can burn either image to a blank DVD.
Boot the computer with the installation media in place, but access the boot menu before it boots into the installer and select the entry that will boot into the non-UEFI version of the installer. As shown in in Figure 1, that entry should start with USB:
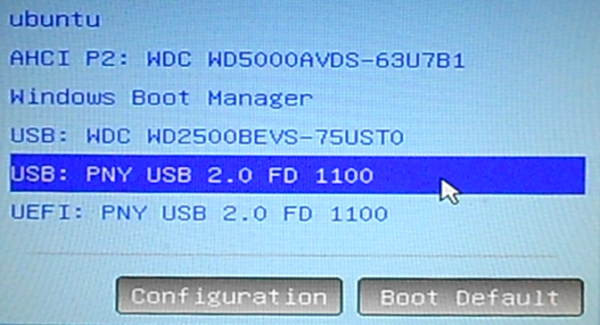
Figure 1: Entries in the boot menu of target computer
Boot into the Live desktop, and while there, launch the installer. Click through the first few steps until you get to the one shown in Figure 2. Because the computer used for this tutorial has an internal hard drive with Windows 10 and Ubuntu 15.04 installed in dual-boot fashion, the installer offered, by default, to reinstall Ubuntu. But that was not the goal, which was to install the distribution on the 320 GB external hard drive.
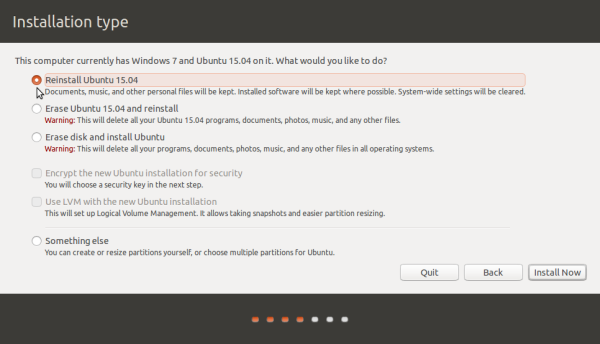
Figure 2: Partition methods of Ubuntu 15.04’s installer
For that to happen, select the Something else option and click Continue.
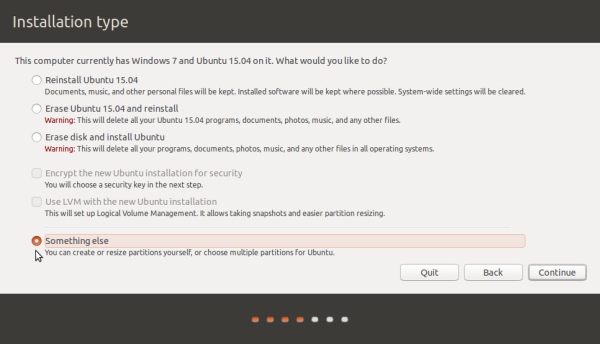
Figure 3: Selecting the “Something else” option of the Ubuntu 15.04 installer
Doing that will open the installer’s manual partitioning tool, where you’ll see all the hard drives detected by the installer and their partitions. As shown in Figure 4, the external hard drive is /dev/sdc, and it has a Windows operating system installed. Since I don’t need it, I’ll have to delete the Windows partitions so I can create partitions for the Linux distribution. If you don’t have partitions to delete, you can skip this section.
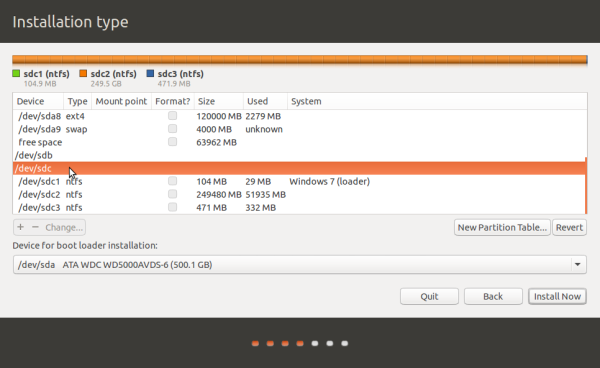
Figure 4: Advanced partition tool of Ubuntu showing all detected hard drives attached to the target computer
After deleting the partitions, we can now start creating partitions. Select the free space under the external drive, then click on the + button. For this tutorial, I chose to create three partitions – mounted at / (root), /home, and swap. It’s not necessary to create a separate partition for /boot, but it won’t hurt if you do.
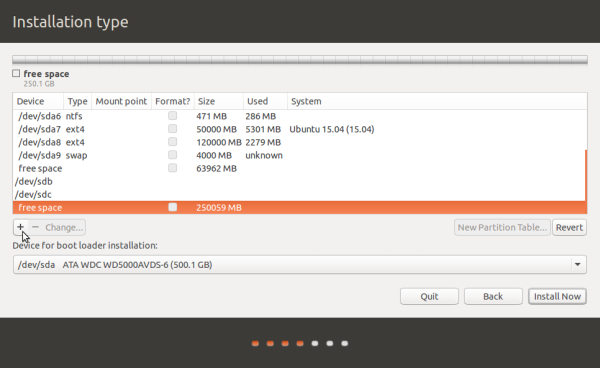
Figure 5: The advanced partition tool showing the external hard drive
This is the installer’s partition editor. All you have to do here is specify the size, filesystem, and mount point for each partition. For the swap partition, there will be no mount point, just the first two.
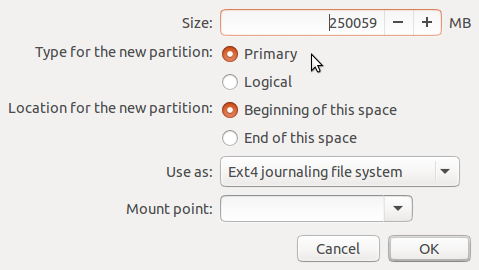
Figure 6: Partition editor of Ubuntu’s installer
We’ll start by creating the partition to be mounted at / (root). If you intend to use the system for a long time, allocate more than 10,000 MB (10 GB) to it. Stick with the default filesystem (Ext4 journaling file system), the select the mount point as shown in Figure 7. Click OK when finished.
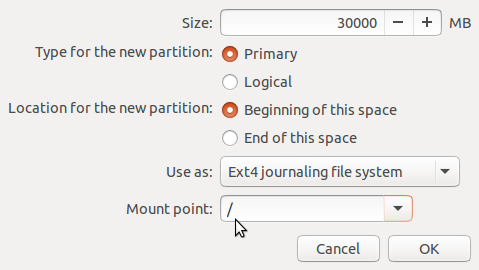
Figure 7: Creating the root partition for Ubuntu 15.04
For the second partition, which will be mounted at /home, allocate as much disk space as you have to spare. This is where all your data will be stored. OK.
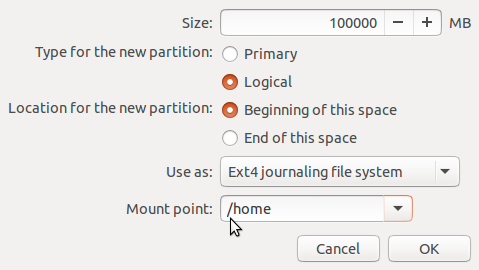
Figure 8: Creating the home partition for Ubuntu 15.04
The last partition will be for swap space. A size of 2000 MB (2 GB) should be enough. Less, if you’re tight on disk space. From the Use as menu, select swap area, then click OK.
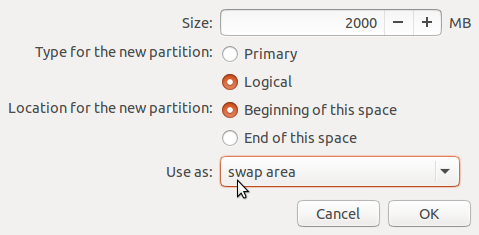
Figure 9: Creating the swap partition for Ubuntu 15.04
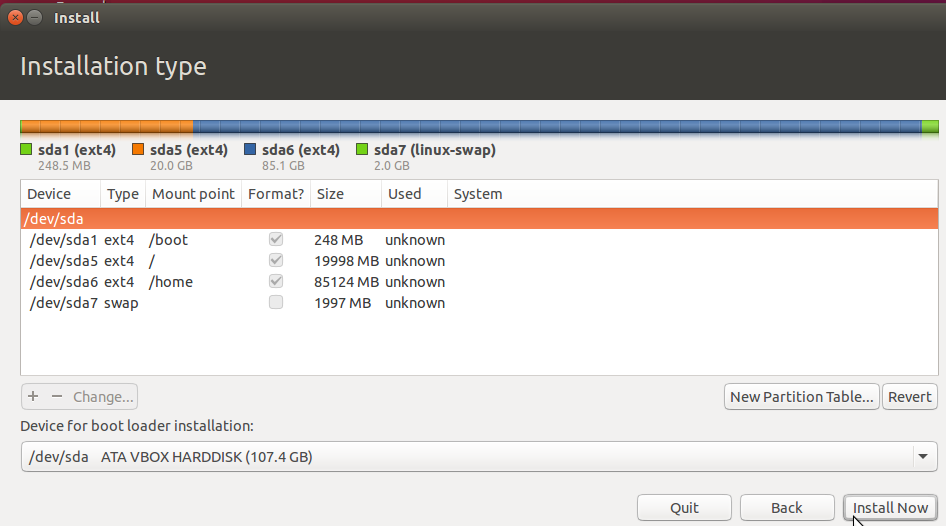
Back to the main partition tool’s window, all the newly created partitions should be listed under the external hard drive. The final task here before clicking the Install Now button, is to select the Device for boot loader installation. Since we did not create a separate partition for /boot, our best option is to install it in the Master Boot Record (MBR) of the external hard drive, which is /dev/sdc in this example. You may go ahead and click Install Now if you’re satisfied with your selection.

Figure 10: Partition on external hard drive ready for installing Ubuntu 15.04
Figure 11 shows the final prompt from the installer before the partitions are created. Note that it will offer to format an extra partition that you did not specify. That partition will be the swap space of the internal hard drive. In this example, it’s /dev/sda9. Click Continue to accept.
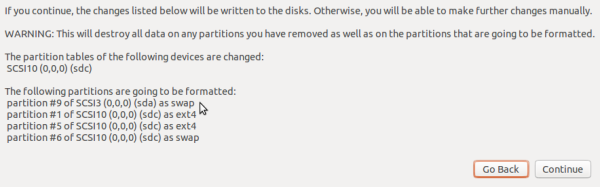
Figure 11: Partitions that will be formatted by the installer on external hard drive
After installation, reboot into the external drive to verify that it can boot. If you look in the /etc/fstab file, you should see an entry for the swap partition of the internal hard drive. Though not necessary, you may delete it. The true test of a successful installation of a Linux distribution on an external drive is whether it will boot from a computer other than the one it was connected to during installation. So, go ahead and perform that test…


@ twimc ……. Fyi, it can be a problem installing Linux Mint 17.3 on “newer”(post-2009) HDD that r 250GB or above in capacity bc of newer HDD technology = partitions not properly aligned with the disk. Something to do with 512 bytes data blocks in older HDD(= came in 120GB or less) n 4096 bytes data blocks in newer HDD. Eg the error message during installation = “… / partition offset of 3584 bytes from minimum alignment …”
For anyone who gets the error message during install of Linux Mint 17.3 on a modern external/USB HDD, u need to first use GParted to realign the hard disk, ie delete the whole old partition n create the 1st new partition, meant for the root partition(eg 20GB in size), with 1 MiB(= the default value) at the “beginning of this space” n 0 MiB at the “end of this space”, ensure “MiB” alignment box is checked(= do not select “cylinder”), set as Primary partition n format to fat32.
……. When creating the new 2nd partition meant for the home partition(eg 30GB in size), set 0 MiB for both the beginning n end of this space, Primary partition n format to fat32.
……. If u hv less than 4GB of RAM, u can also create a new 3rd partition for swap area(eg set as 2GB in size) or virtual memory/RAM on the hard disk, like for the home partition above.
Only then, can u proceed with the Install via the Live DVD or USB-stick. After clicking “Something else”, click the 1st partition that u had created earlier with GParted, click “Change”, click “ext 4 file system”, click “/”(= root) for Mount point, n so on.
……. Ensure that the device for the bootloader is set to the external HDD, eg /dev/sdb or /dev/sdc. The cptr’s internal HDD/SSD is always identified as /dev/sda.
I hv just successfully installed LM 17.3 on a “modern” 250GB external/USB HDD which initially had the above error message about the 1st / root partition not properly aligned with the HDD during install = could not proceed with the install.
Thanks.
How do I access the boot menu in Figure 1?
Depending on your computer, it could be the F12 or F11 key, or on recent Lenovo laptops, it’s via a small button on the left side.