This is an update to A beginner’s guide to disks and disk partitions in Linux, which itself was an update to Guide to disks and disk partitions in Linux. It is intended to be an absolute beginner’s guide to understanding how disks and disk partitions are handled in Linux. This update adds info on NVMe SSDs.
If you are migrating from Windows to Linux and are attempting to install any Linux distribution alongside Windows 10/11 on your computer, this article should come in handy. You’ll read about hard drive naming convention in Linux, how they are partitioned, partition tables, file systems and mount points.
By the time you are through reading this, you should have a pretty good idea of what you are doing when installing your next Linux distribution on your laptop or desktop computer. An understanding of all the aspects concerning how a disk is referenced and partitioned will put you in a better position to troubleshoot installation and disk-related problems. Most of the highly technical terms associated with this subject have been omitted, so this should be an easy read.
Hard drive naming convention in Linux
The first thing you need to know about disk in Linux is this: There’s no C or D drive in Linux. There are equivalents, but when you come across a reference to a hard drive in Linux, you’ll typically see something like /dev/sda, /dev/sdb, /dev/sdc, /dev/nvme0n1, /dev/nvme1n1 … etc. The “dev” is short for device, and, in this case, a block storage device. The “sd” is short for SCSI mass-storage driver. (SCSI stands for Small Computer System Interface.) You’ll see “nvme0n1” or something similar if your computer has an NVMe SSD, which is a newer SSD disk that plugs directly into a motherboard’s PCIe slot. For the rest of this article, the “/dev/” part will be dropped, so all references to hard drives (and partitions) will start with the last part only – sda, sdb… or nvme0n1 as the case may be.
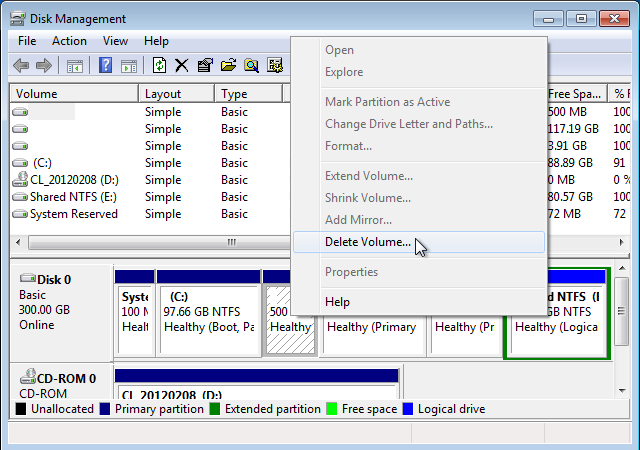
Let’s begin by taking a look at how hard drives are represented in Windows. Figure 1 was taken from a Windows 8 installation on a computer with two hard drives attached – Disk 0 and Disk 1.
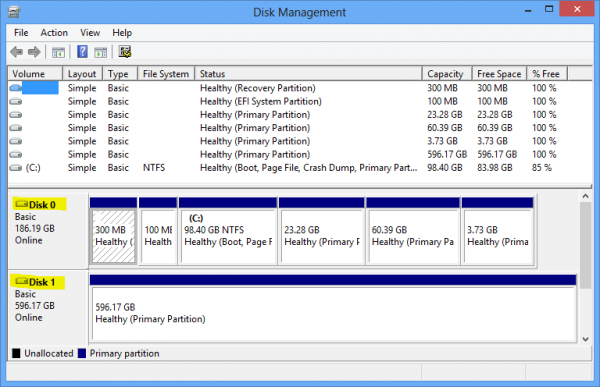
Figure 1: Disks and disks partitions as seen from the Windows 8 disk management tool
Figure 2 shows how those hard drives would be represented in Linux. Where Windows sees Disk 0 and Disk 1, Linux takes a different approach. The first hard drive detected by a Linux system carries the sda label. In numerical terms, it is hard drive 0 (zero; counting begins from 0, not 1). The second hard drive is sdb, the third drive, sdc, etc. In the screenshot below, there are two hard drives detected by the installer – sda and sdb.
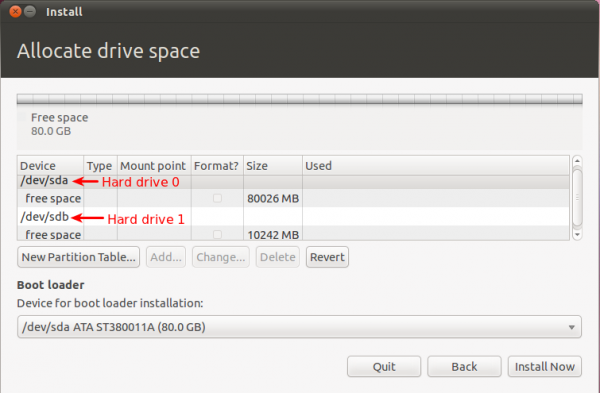
Figure 2: Hard drive naming convention in Linux
Figure 3 comes from a Linux system with three hard drives attached. So that’s how hard drives are referenced in Linux – sda, sdb, sdc, sdd, sde, …, sdz…, if your computer has a regular hard disk drive (HDD) or solid state drive, or SSD.
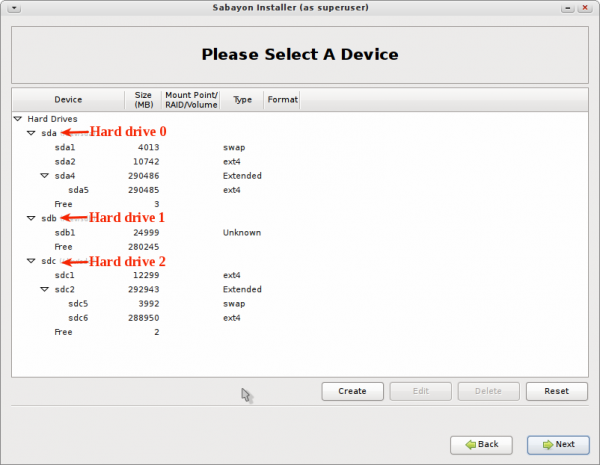
Figure 3: A Linux installer showing 3 detected hard drives
Figure 4 shows what you’ll see if your computer has an NVMe SSD. The motherboard of the computer from which this particular screenshot was taken has 2 PCIe slots for NVMe SSDs, but only one is occupied. The nvme0 is a pointer to the device controller, with nvme0n1 a reference to the first NVMe SSD. If the other PCIe slot were occupied, it would be been referenced as nvme0n2.
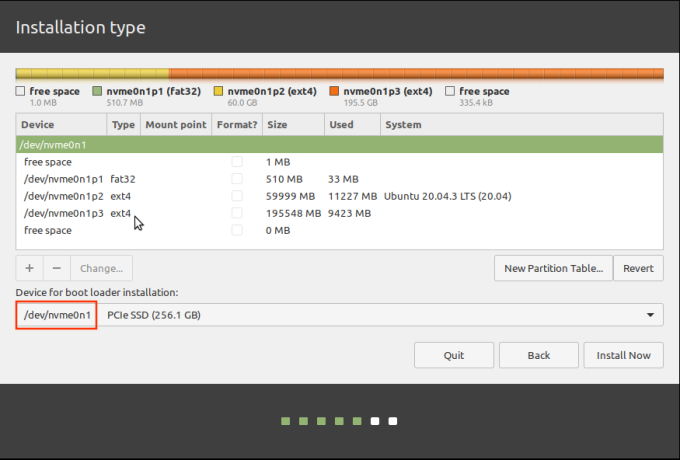
Figure 4: Linux Mint installer showing the target NVMe SSD.
Partition tables
In simple terms, a partition table describes the layout of partitions of a hard drive. There are two partition table standards – MBR (Master Boot Record) and GPT (GUID Partition Table). MBR, also know as ms-dos, is what you might call the first standard. GPT came much later. If you’re interested in the historical and technical details about both standards, see these Wikipedia articles – GUID Partition Table and Master Boot Record.
The MBR partitioning scheme is what you’ll find on older computers. Newer computers support both schemes, so it’s still possible to use an MBR partitioning scheme on those computers. MBR’s major limitations led to the development of GPT. Those limitations are:
- It does not allow the configuration of more than four main partitions. Those partitions are called primary partitions.
- Disk partitions are limited to 2TB
Newer computers come with a replacement firmware for the old BIOS system called UEFI (Unified Extensible Firmware interface), and GPT is a part of the UEFI standard. If you bought a recent Windows computer, it’s most certainly installed on a GPT partitioning scheme. If you’re already running a Linux distribution or attempting to install one on a recent Windows computer, the easiest method of finding out what partitioning standard is used is to launch a shell terminal and type <strong>sudo fdisk -l</strong>.
Figure 5 shows the output of sudo fdisk -l from a Ubuntu Linux installation. The Disklabel type: gpt line confirms that GPT is in use.
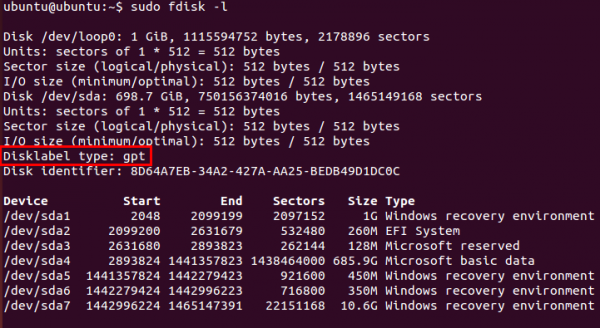
Figure 5: This output of fdisk -l shows GPT in use
Figure 6 was taken from a Fedora Linux installation. As in Figure 5, the Disklabel type: dos line confirms what partitioning scheme is in use. In this case, it’s MBR.
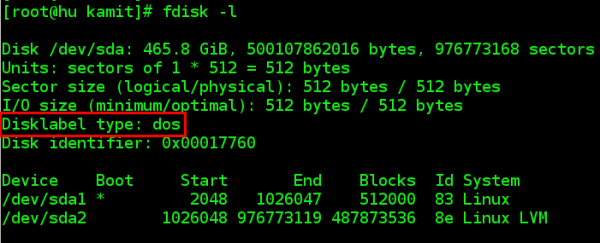
Figure 6: This output of fdisk -l shows MBR in use
You can also tell whether GPT or MBR is in use by accessing the UEFI setup utility. Under the Boot menu, look for PCI ROM Priority. You should see two options – EFI Compatible ROM and Legacy ROM. The latter indicates MBR.
Partitions and partition numbering in Linux
To install an operating system on a hard drive, it must first be subdivided into distinct storage units. Those storage units are called partitions. Under the MBR partitioning scheme, there are three different types of partitions – Primary, Extended, and Logical. Extended, and Logical partitions will be discussed further down.
With MBR, any partition that is not explicitly created as an extended or logical partition, is a primary partition. And, as stated earlier, there can be no more than four primary partitions. Figure 7 was taken from a Linux installation with four primary partitions. If you observe closely, you will see that the first primary partition is sda1 and the last sda4. Unlike hard drives, partition numbers start from 1, not 0 (zero). Any disk space that’s not allocated to the primary partitions is listed as Free or free space. But while it may be free, it is, however, unusable. And that is because as far as the system is concerned, that free space does not exist.
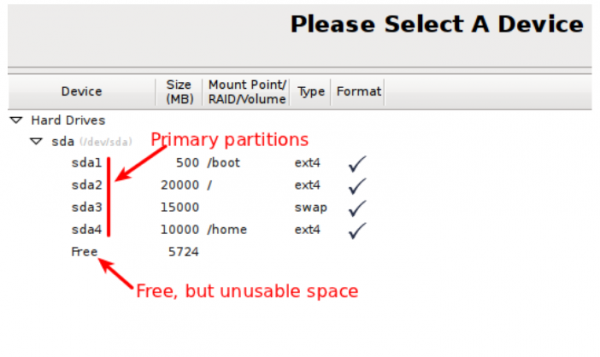
Figure 7: MBR partition numbering in Linux
So if you attempt to create another partition using the free space, the installer will throw up the type of error message shown in Figure 8. The error message will always say, “not enough free space,” even when you know that there is space available. And it does not matter whether that free space is 1 MB or 1 GB. It will be unusable.
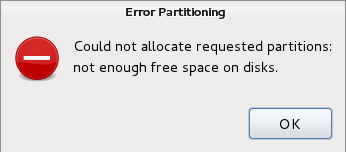
Figure 8: “Not enough free space on disk” error
To get around the four primary partition limitation of MBR, the smart guys involved came up with the concept of an extended partition. By tagging a partition as an extended partition, it is then possible to create many more partitions under it. Those partitions are called logical partitions. Theoretically, there is no limit to the number of logical partitions that you can create. Note: Only one extended partition may be configured on a single hard drive.
What the concept of extended partition brings to the table is illustrated in Figure 9. You can see that there are three primary partitions – sda1, sda2 and sda3. The fourth partition is an extended partition, which makes it possible to create more (logical) partitions – sda5, sda6 and sda7. Under an extended partition, you can have free space, and that free space will still be usable. So you do not have to allocate all the available free space to the logical partitions of an extended partition.
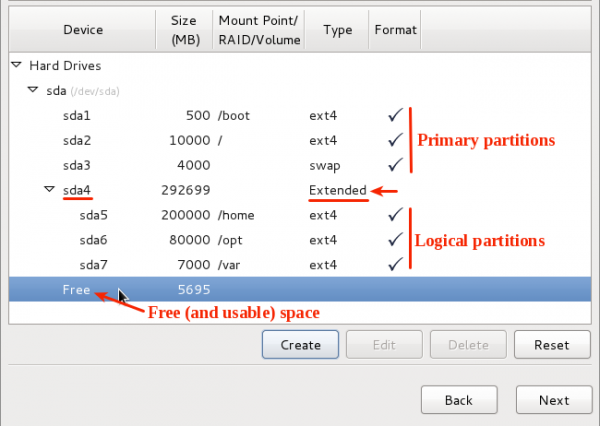
Figure 9: Primary, Extended and Logical partitions in Linux
Being able to create logical partitions comes in handy when you have to dual-boot Linux with other operating systems, like Windows, PC-BSD or even another Linux distribution on the same hard drive. And that is especially true if that other operating system has used up three primary partitions.
In Figure 10, which was taken while setting up a system to dual-boot Windows 7 and Fedora 15 (see how to dual-boot Fedora 15 and Windows 7), three Windows 7 partitions already exist on the target hard drive, leaving just one primary partition to play with. Only by setting up the available free space as an extended partition was it possible to install the system. What this also shows is that Linux can boot from a logical partition.
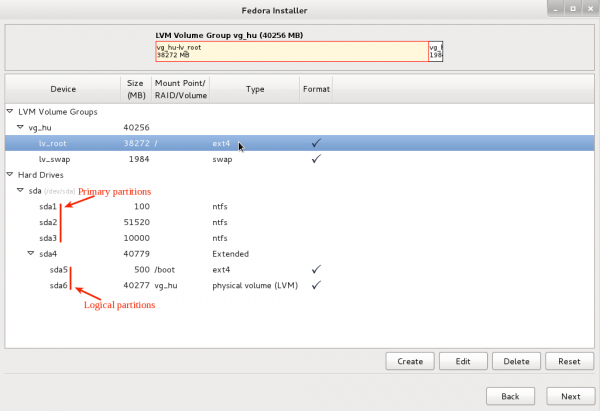
Figure 10: Another example of an Extended partition in Linux
In Figures 9 and 10, the extended partitions were the last primary partitions (sda4). But it does not have to be so. In Figure 11, for example, the extended partition is the second primary partition (sda2) and the first logical partition number is still 5 (sda5). So whether an extended partition is the last primary partition or not, the logical partition number always starts with 5.
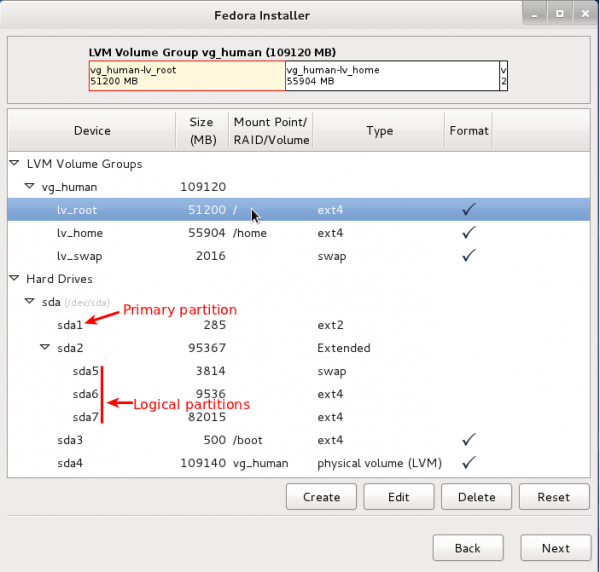
Figure 11: Logical partition numbering in Linux
Not all installation programs broadcast the presence of an extended partition. However, if you know what to look for, you can tell if one exists. In Figure 12, for example, you can see the partition numbers start from 1, then jump to 5, 6 and 7. In MBR, that break in numbering is the most obvious tell-tale sign of the existence of an extended partition.
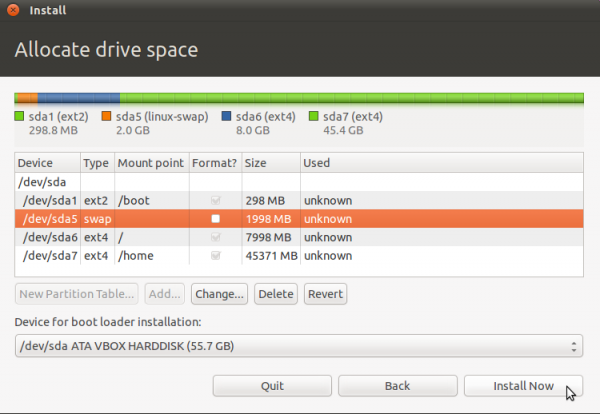
Figure 12: How to tell when an extended partition is in use
GPT – As stated earlier, GPT overcomes two limitations of the MBR scheme – maximum of four primary partitions, and the 2 TB limit to partition sizes. Figure 13 shows the partitions on a Toshiba Satellite C55-A Windows 8 computer as seen from the installer of Ubuntu 14.10. (See Dual-boot Ubuntu 14.10 and Window 8 on a Toshiba Satellite C55-A.)
It’s obvious that there are seven partitions. The most important point to note here is that all seven partitions are primary partitions, as the concept of extended and logical partitions is foreign to GPT.
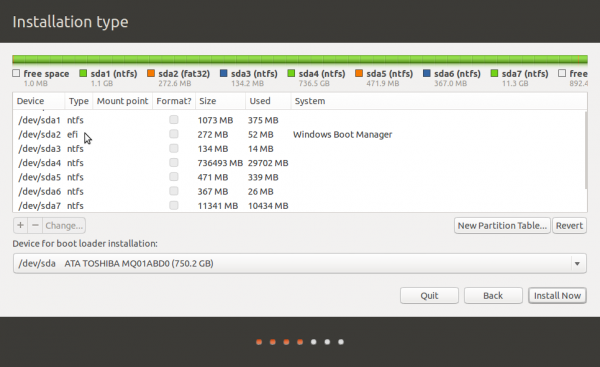
Figure 13: GPT partitions in Linux
With GPT, there can always be unallocated space at the end of existing partitions. And unlike in MBR, that “free space” can be used to create additional partitions, unless in the rare instance where the maximum number of partitions possible with GPT has been reached. In Figure 14, for example, there are four partitions and a free space at the end. That space may be used to create new partitions.
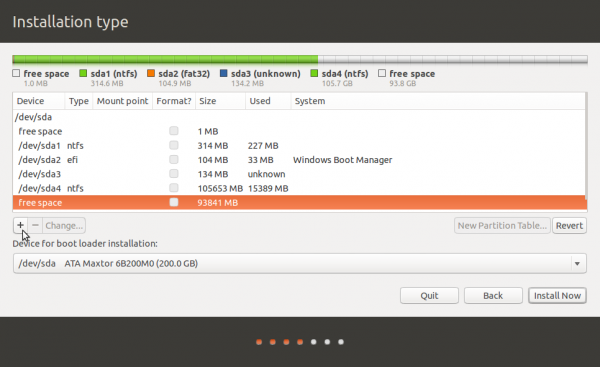
Figure 14: There is no “unusable” space in GPT
With NVMe SSDs, the numbering scheme is still the same, though the representation is different, as shown in figure 15. On such disks, the first partition is p1, the second p2 and so on. So nvme0n1p1 is the first partition on the first NVMe SSD, nvme0n1p2 is the second partition, nvme0n1p3 the third partition and so on.
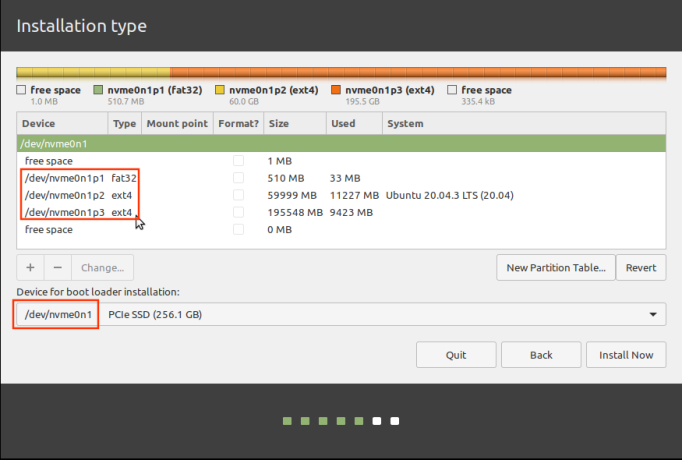
Figure 15: Linux Mint installer showing partitions in the target NVMe SSD.
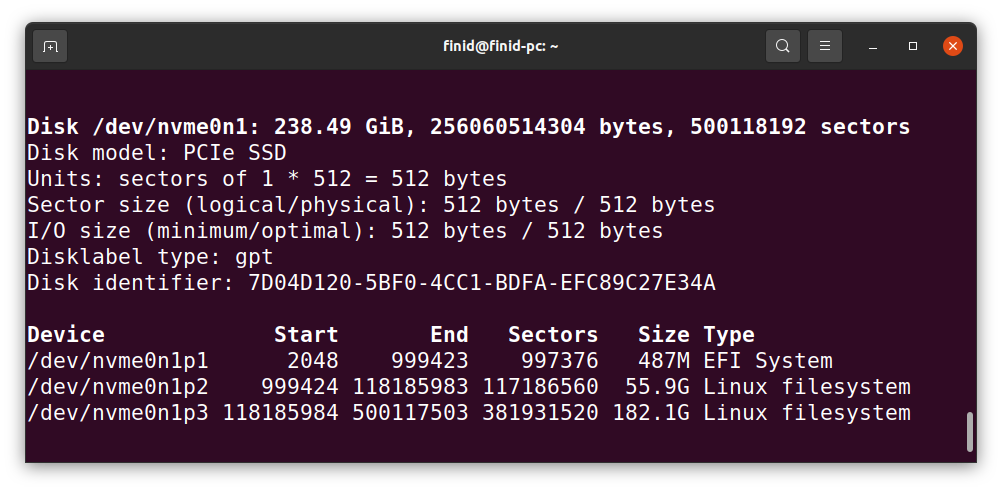
From the command line using the command sudo fdisk. you can see more info about the same NVMe SSD.
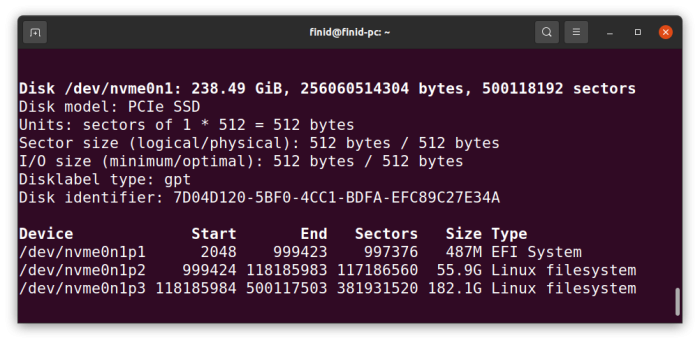
Figure 16: Info about a PCIe SSD in Linux from the command line.
File systems
Before a disk partition can be used to store data, it must first be formatted. The formatting process includes stamping it with a file system. On Windows, the file system NTFS (New Technology File System). It wasn’t really “new technology” when it was released, but everything that Microsoft comes out with is new, even when other outfits have been using it since the last ice age.
As with any thing in Linux, there are more than one file systems available. Actually, there are at least two dozen. Figure 17 shows a list of some of the supported file systems in Linux. Ext4, which is an enhanced version of Ext3, is the default on recent releases. Ext3, in turn, is an enhanced version of Ext2. Xfs is rarely used as the default in desktop distributions, but could still be in use in server deployments.
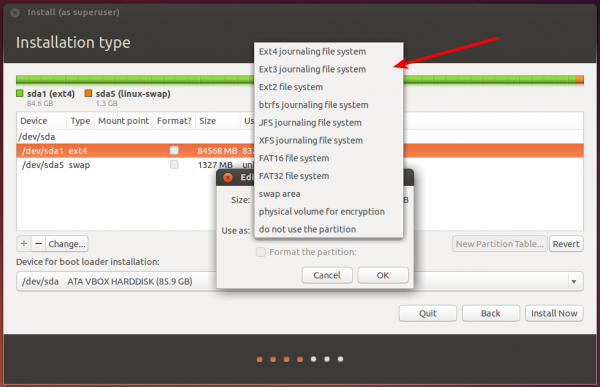
Figure 17: File systems in Linux
Figure 18 was taken from the advanced partitioning tool window of Ubuntu 14.10 while attempting to install it on a hard drive that already had Windows 8 on it. The Type column shows the file systems for the different partitions. The two with ntfs are Windows 8 partitions and the ext4 type marks a Linux partition.
What about the swap type? Yes, what about swap? Swap is a small section of unformatted hard drive that Linux and other operating systems use as virtual memory. It’s a method of increasing the amount of total RAM (Physical RAM + virtual memory). And it is a given that your distribution will set up a small amount (typically 1GB or 2 GB) of hard drive space as Swap. As in Windows, it is also possible to set up a swap file. However, that practice is most commonly associated with cloud server deployments.
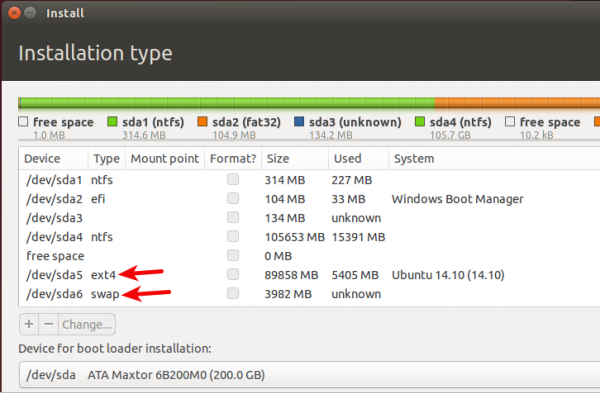
Figure 18: Swap partition usage in Linux
Mount points
Assigning a mount point to a partition is one of the things that comes with formatting it, aside from stamping it with a file system. In Linux, a partition may be mounted on one of several traditional mount points. On a Linux desktop, the most commonly used mount points are /, /boot, /boot/efi, /home, and swap. / is the Linux equivalent of the Windows C drive, /home is where the partition that will hold users’ home directories is mounted, and /boot and /boot/efi are the partitions for boot loader files.
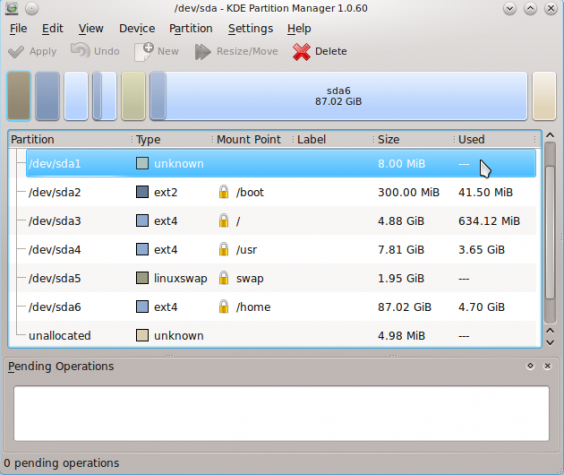
Figure 19: Common mount points in Linux
Conclusion
Long article, but I tried to cover all the bases, especially much of what somebody completely new to Linux would need to know about this topic. So that means fundamental info about disks, partitions, MBR, GPT, file systems, Swap, HDDs, SSDs, and NVMe SSDs, or PCIe SSDs. Hope it was a good read for you. Corrections are always welcome in the comments.



Have done ssd to legacy L/top: NVNm to a recent aquired L/top;plans to ssd netbook h/drive ;so I crashed out through the Gates and smashed windows. Have done a lot of changes then need better insight to Linx hard drives etc. The ease of understanding clear lingo without computer sci-fi degree is refreshing and just simply great, Have been using Mint on laptops plan for netbook another linux os. Really appreciate the update
Figure 10 and Figure 11 images are missing.
Fixed. Thank you.
“…home directories is mounted, and /boot and /boot/efi are the partitions for boot loader files.”
‘partition’ should be ‘mount points’
You’re right.