This post shows how to dual-boot Ubuntu 16.04 and Windows 10 on a computer with UEFI firmware and on a single hard drive.
If you intend to triple-boot Ubuntu 16.04, Windows 10 and Linux Mint 17.3 on the same hard drive, then consider this article part 1 of a 2-part series. Part 2 is available at Triple-boot Linux Mint 17.3, Ubuntu 16.04, Windows 10 on a PC with UEFI firmware
Enough space will have to be recovered from that single hard drive to use for creating the partitions for installing Ubuntu 16.04. For this article, we’ll be creating three partitions for Ubuntu 16.04 – a root partition, another one for your files and folders and a third that will be used as swap space. Swap is a portion of unformatted disk space that the system may use as virtual memory.
The computer used is self-built, so Secure Boot (Restricted Boot, actually) is not a factor. If you have an OEM (store-bought) computer that came with Windows 10, you might want to disable Secure Boot.
Also, shrink you C drive to make room for installing Ubuntu 16.04. Then download an installation image of Ubuntu 16.04 from here, transfer it to a USB stick or burn it to a blank DVD (are you still using that?). Finally, insert the installation media into the appropriate location and reboot the computer.
If the computer has been set up to boot from external media, you should see the Ubuntu 16.04 boot menu. One of the entries will be to boot into the Live desktop. I suggest you select that option, play around with the Live desktop, and if you’re satisfied, launch the installer by clicking on its icons on the dock or on the desktop.
After the installer starts, click through the first few steps until you get to the one shown in Figure 1. The installer should detect that Windows 10 is already installed and offer to install Ubuntu 16.04 alongside it. That’s great, but it will not create a separate partition for your files and folders.
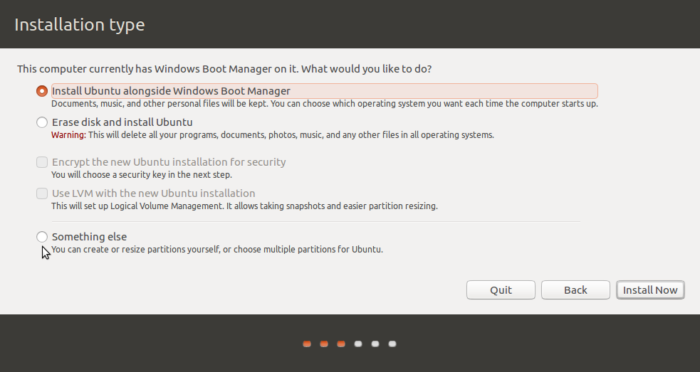
Figure 1: Partition methods of Ubuntu 16.04 installer
For that to happen, you’ll have to select the Something else option, then click on the Continue button to move to the next step.
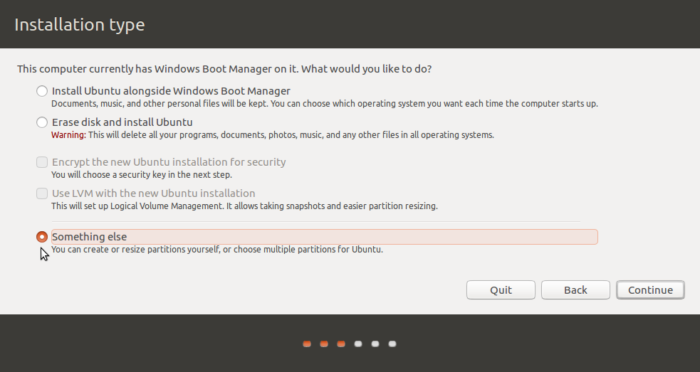
Figure 2: Something else option of Ubuntu 16.04 installer
That next step shows the so-called advanced partitioning tool, where you’ll see all the partitions detected by the installer. Of the existing Windows 10 partitions, the one of interest here is the one that has efi in the Type column and Windows Boot Manager in the System column. That is the EFI System Partition, where the boot loader files will be installed. To start creating partitions, select the free space, then click the + button.
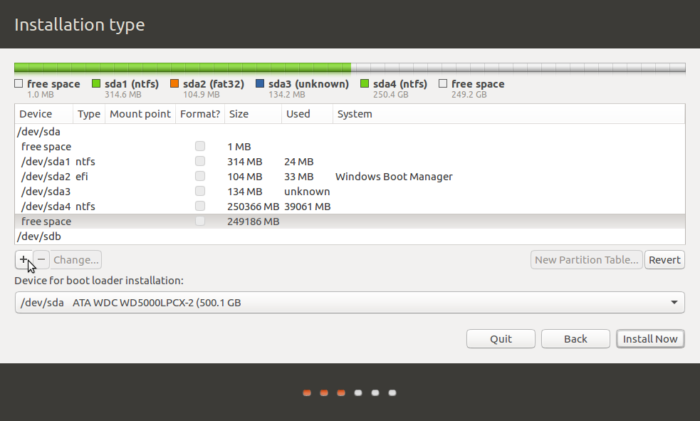
Figure 3: Advanced partitioning tool of Ubuntu 16.04
That should bring up the installer’s partition editor. For each partition, you only need to specify the size, the file system (from the Use as menu) and the mount point. For partitions other than the one that will be used as swap, stick with the default file system – Ext4 journaling file system.
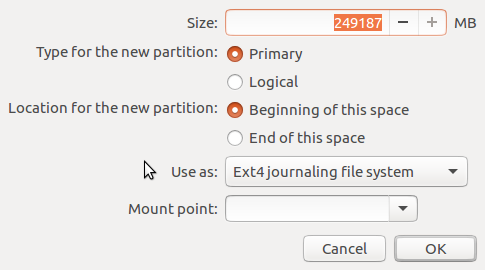
Figure 4: Ubuntu 16.04 partition editor
So let’s start by creating the root partition. For size, any value higher than 20 GB will do. From the Mount point, select /. Click OK.
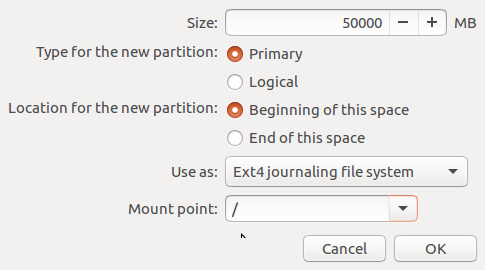
Figure 5: Ubuntu 16.04 root partition
The next partition will be mounted at /home. This is the partition that will hold all your files and folders, so assign most of the available disk space to it. When you’re finished setting it up, click OK.
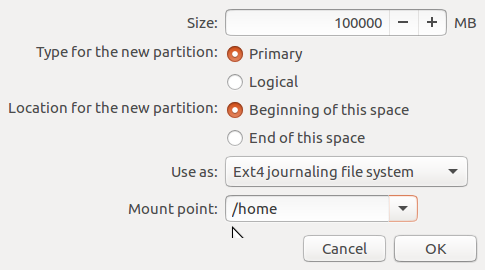
Figure 6: Ubuntu 16.04 home partition
For the partition that will be used as swap, a size of 2000 MB (2 GB) to 4000 MB (4 GB) should be enough. From Use as, select swap area. OK.
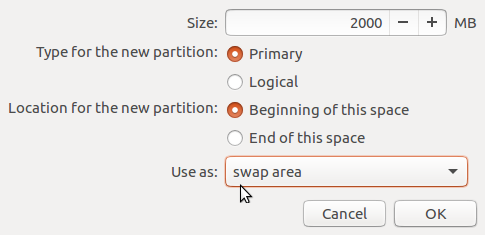
Figure 7: Ubuntu 16.04 swap partition
After creating that last partition, you should be back in the main partitioning tool’s window for the last time. From the Device for boot loader installation, select the efi partition. On the system used for this article, that partition corresponds to /dev/sda2, that is, the second partition on the hard drive. Then click on the Install Now button to continue with the rest of the installation.
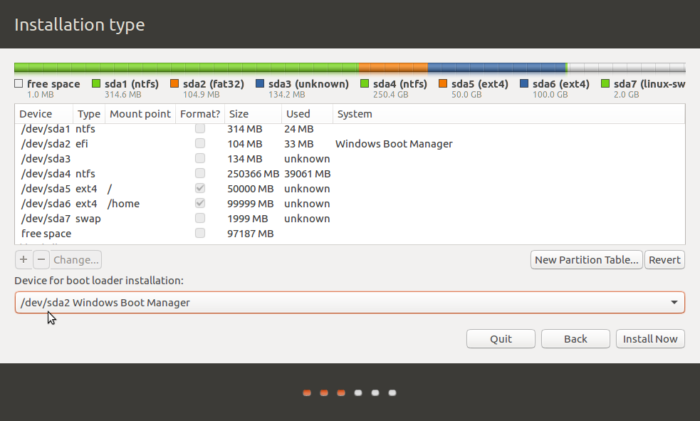
Figure 8: Advanced partitioning tool of Ubuntu 16.04 after creating partitions
After installation has completed successfully, rebooting the computer should reboot into the GRUB menu. GRUB (Grand Unified Bootloader) is the boot loader used on virtually all Linux distributions. Aside from the entries for Ubuntu 16.04, it will also have one for Windows 10, which makes it possible to boot into Windows from the GRUB menu. Unfortunately, you can’t add an entry for Ubuntu 16.04 in the Windows Boot Manager menu. More on that subject within the next few days.





i am using UEFI too but after installed success then restart i have to choose OS while booting my laptop,do u have idea how to make it automatically to windows OS?
You can do that from the UEFI/BIOS.
I did all of the above but my grub never shows up, but instead my bios just starts up and goes black in a constant cycle. Is there something I can do to remediate this situation?
Thanks for this tutorial, dual booting windows 10 and Ubuntu 16.10 on my Laptop. Thanks for this great tip and tutorial.
Does the process affect the performance of windows ?
Nope, not even a little.
In a dual boot setup, only one OS is running at a time, so the OS that’s not running does not impact the one that’s running.
“After the installer starts, click through the first few steps until you get to the one shown in Figure 1. ”
Easier said than done. It’s asking me about third-party drivers. I don’t know whether I need to check the box (and wrestle with secure-boot again). My EUFI setup doesn’t allow me to disable secure boot, so it might be impossible to proceed. Google is no help (yet) to tell me the consequences of this checkbox choice. Any pointers?
“Third-party drivers” typically deal with wireless and graphics cards, so it’s OK to check that box. Yes, go ahead and check it, but I’m not sure if that will make any difference with Secure Boot still enabled.
On not being able to disable Secure Boot, what brand of computer do you have? And what happens when you attempt to disable it?