
After upgrading to Windows 10, the next logical thing to do is install OpenSSH on it. Makes it easier to copy files from it to my Linux boxes when I’m writing Windows 10-related tutorials.
Installing OpenSSH on Windows 10 gives you access to commands that make it easy to securely copy files between computers and perform other security-related tasks.
To install OpenSSH on Windows 10, download the 64-bit binary from the project’s website. (There’s also a 32-bit binary, if you’d rather install that.)

The project is very active and so the binary you’re going to download will be the very latest portable release, which at the time of this publication, is OpenSSH 6.9p1-1. Save the file to your Downloads folder. Then open the file manager, navigate to the Downloads folder and double-click on the file to begin installation. That should open a window just like the one shown in Figure 1.

Figure 1: Installing OpenSSH on Windows 10
Click Next, then click through the next four steps until you get to the one shown in Figure 2. Click Next again to accept the defaults.
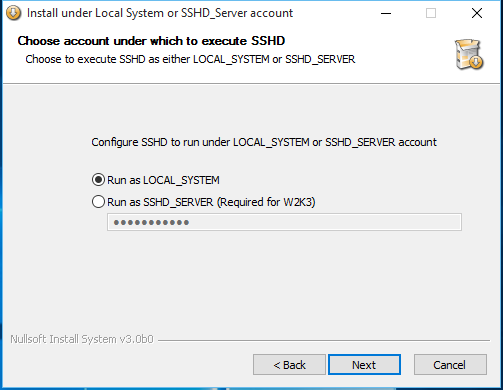
Figure 2: Installing OpenSSH on Windows 10
You may accept the default port that the service should listen on, or change it to an unused high port within your network. Next.
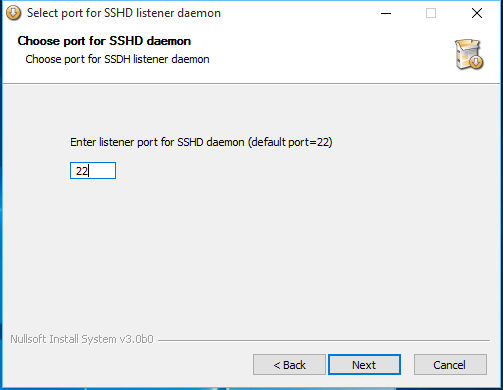
Figure 3: Set the OpenSSH listening port on Windows 10
You may also change the size of the key that will be generated, or accept the default. Next.

Figure 4: Set the OpenSSH key length on Windows 10
Unless you’re setting up a domain- or network-wide installation, accept the default here too. Next.
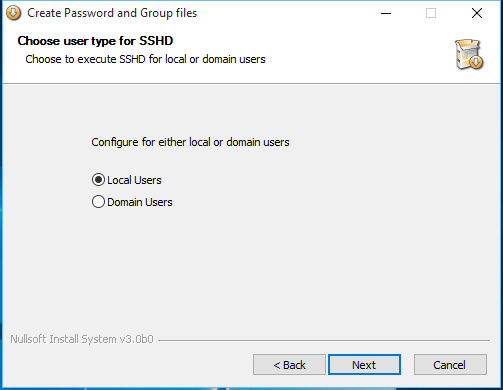
Figure 4: Local OpenSSH installation on Windows 10
After a minute or less, you should now have OpenSSH installed on your Windows 10 computer. Click Finish to close this window and enjoy. This is better than installing Cygwin just to get access to some Unix/Linux tools.

Figure 6: OpenSSH is now installed on Windows 10


It doesn’t work in windows 10 installation, I have found it’s an alternative solution.
the password is not correct i try using the default password when i connect with my linux is always say access denied please any solution?
Thanks for the app. I installed on Win 10 without issues. I can ssh with no problems to the Win 10 machine. I have been trying for several days to connect to the Win 10 via RSA Key Authentication. I have generated keys using the keygen packaged with the app. I have also used Putty keygen and others with no success. I keep getting a message that no auth methods can be found using my linux client. Putty simply throws a network error. Does this app support key authentication? I presume it does. Are there any guidelines regarding the location and permissions of the authorized_keys file? Any help would be appreciated. Thanks
Haven’t looked, but I’m sure the files should be somewhere on the system. Try using the file explorer to search for the location. I’ll do the same when I have some free time later tomorrow.
Thank you. I’ve been struggling for day to find a working, easy to set up solution.
It’s a week I’m using Win again, after 5 years. I looked hours for a solution to access my Ubuntu server on Windows 10 Pro but none of the results was eye catching. This app you introduced applies ability of using Linux commands via Windows command line. Just I need to open the command line and type my commands and it works. No! Let me write this way: IT WORKS!
Thank you so much for sharing!
Thanks finid, i can ssh to my Win10 box
Just brilliant !!!
I was getting a similar, but different error. I would get to the point where I would enter my username and hit enter. Putty would throw the error, “Server unexpectedly closed network connection.” Reinstalling and running OpenSSH with the dedicated account with privilege separation did the trick. Thanks!
Did you set a password or did you use the default password? When I reinstalled, I used the default password, so I’m just rygin to find out if it makes any difference, though I don’t think it should.
I’m having trouble with this on Windows 10. The ssh command line tools all work find, but accessing my Windows 10 desktop via ssh or scp from another computer fails. After I enter the password, the “Last login:” line appears, but then the connection is closed by Windows 10. ssh -v from the remote system shows the following after the “Last login:” is output:
debug1: client_input_channel_req: channel 0 rtype exit-status reply 0
debug1: client_input_channel_req: channel 0 rtype eow@openssh.com reply 0
debug2: channel 0: rcvd eow
debug2: channel 0: close_read
debug2: channel 0: input open -> closed
debug2: channel 0: rcvd eof
debug2: channel 0: output open -> drain
debug2: channel 0: obuf empty
debug2: channel 0: close_write
debug2: channel 0: output drain -> closed
debug2: channel 0: rcvd close
debug3: channel 0: will not send data after close
debug2: channel 0: almost dead
debug2: channel 0: gc: notify user
debug2: channel 0: gc: user detached
debug2: channel 0: send close
debug2: channel 0: is dead
debug2: channel 0: garbage collecting
debug1: channel 0: free: client-session, nchannels 1
debug3: channel 0: status: The following connections are open:
#0 client-session (t4 r0 i3/0 o3/0 fd -1/-1 cc -1)
Connection to 10.10.10.54 closed.
I’ve checked the usual suspects: /etc/passwd entry contains /bin/bash, and the /bin/bash executable is a stub that opens the regular Windows command line. This all works on Win8 and Win8.1, but fails on Win10, even after a fresh install of the OS.
Interesting. I’ll try to reproduce it on my end to see what’s going on.
Ok, I was able to reproduce it somewhat on my end and managed to figure out what the issue is. It’s with the installation, so the fix is to uninstall OpenSSH on Windows 10 and reinstall it.
This time, when you get to the step shown in Figure 2 of this article, select the alternate option, not the one selected in Figure 2. Change the default password, if you like.
After reisntalling, I was able to access the SSH server from my Linux box, and, of course, able to access the Linux box from Windows 10, via SSH.