Deepin 2014 is the latest edition of Deepin, a Chinese, Linux desktop distribution that’s based on Ubuntu.
Aside from the fact that it comes with its own desktop environment called Deepin Desktop Environment, it also uses its own graphical installation program.
The installer doesn’t have support for disk encryption and LVM, the Linux Logical Volume Manager, but for plain-vanilla installations and setting up dual-boot systems, it works. This tutorial shows how to set up a dual-boot system between it and Windows 7 on a computer with UEFI firmware. It’s a relatively simple operation, but a few users have screwed up their Windows 7 installation trying to set it up. Hope this article makes the process pain free.
1. Shrink Windows 7’s C Drive: This article assumes that there’s an existing installation of Windows 7 on the target hard drive, and that you have enough free space on it to install Deepin 2014. If you need help shrinking the Windows C drive to free up disk space, see this forum post.
This screenshot shows the Windows 7 partitions before reducing the size of the C drive to free up disk space.

This one shows the partitions after the operation. Deepin 2014 will be installed on the unallocated partition.

2. Install Deepin 2014: If you haven’t done so already, download an installation image of Deepin 2014 from here. Burn it to a DVD or transfer it to a USB stick. Insert the DVD in the optical drive or the USB stick in a USB port and reboot the computer. Before it reboots into the default boot device, press the keyboard key that lets you access the computer’s boot menu. You should see entries on the screen that looks that like the one shown in this screenshot. The entry that starts with UEFI: Ut165 … is the one that’s UEFI-aware. Select it, then press the Enter key to boot into Deepin 2014 live desktop.

Once in the live desktop, you should see an icon for the installer on the desktop. Click it to start launch the installer. This is a very simple, easy to navigate installer. The first step is for user setup. The second step, shown in this screenshot, is where the fun starts. It is the installer’s Simple Mode of disk partitioning. It should show the Windows 7 partitions and the free space that was recovered from the C drive. Click on the Expert Mode icon.

This is the installer’s Expert Mode view. You only need to click on the UEFI button here.

The window shoud look like this. Click on Simple Mode.

Then click on the Install button to begin the installation, which should take no more than five minutes to complete.

3. Configure Deepin 2014 Boot Menu: Assuming installation completed successfully, reboot the computer and access the computer’s boot menu. You should see an entry for linuxdeepin2014. That’s what you have to select to boot into your new installation of Deepin 2014.

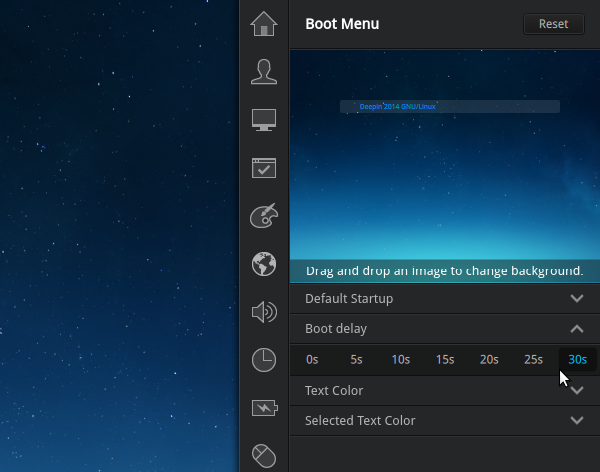
But you won’t see the GRUB menu because the boot delay time is too short. You only need to change it from 10s (the default) to 30s (“s” is for seconds).

After making that change, you should see the GRUB menu the next time you reboot the system, with entries for Deepin 2014 and Windows 7. That’s all. This guide should also work for dual-booting Deepin 2014 and Windows 8 on a computer with UEFI firmware.




Hi I tried to install but I can not pass the window that show the languages selection, I mean it shows the window where I should type my name, password etc..but as soon as It appears it returns to the language selection window. Further I realized that when it reads the usb it shows “error: -22”, I tried with two diferents usb but still the same fail
HAve you tried using the latest image of the Deepin 15 line? I just used it to write How to dual-boot Deepin 15, Windows 10 on a PC with UEFI firmware and didn’t have any such problems.
HEllo, im trying to install deeping alongside win8,but when i want install deeping, the window where the partitions appear, it doesn’t show the partitions, just only one of 111.10Gb (I have a SSD), 50Gb for windows, 45Gb for Storage, 18Gb for Deepin and none of this are showed.
I just need help,
Pd: i’m from Colombia- sorry for my bad english.
If you click on the Expert mode button, do you see the partitions. Did you create the partitions for Deepin already?
Btw, what brand of PC are you trying to install it on?
I follow the steps as you state but when restarting the pc after installation of Deepin I get blue screen windows recovery options and other options, but not the menu to select Deepin me appears. I have Windows 8 UEFI. I hope you can help me in google as no detailed information on installing Depping 2014 UEFI systems.
regards
Try accessing the computer’s boot menu and select to boot the Windows and Deepin options in turn and see what happens.
So I did but does not work! I think the problem is in the “System Reserved” hard drive does not have the option of EFI
That image of the Windows partition manager does not show a UEFI system partition, so I have to assume that Windows 7 is installed on MBR partitions.
If that’s the case and you’re booting the UEFI-aware version of the installer, which the second image shows that you are, then it’s no surprise that the installation is failing.
If the existing partition table is MBR, use the non-UEFI version of the installer. The 3rd image in this article shows how to access the non-UEFI version of the isntaller.
Btw, you may post images in the forum.
I can not install Deepin 2014 with windows 7 table Deepin not detected windows 7, it is as if not installed win7
You have to use the installer’s Expert Mode to partition the free space on the disk.