This post shows how to dual-boot Ubuntu 14.04 and Windows 7 on a computer with UEFI firmware. Note that the computer I used for the tutorial is not an OEM one. Rather, it is a custom-built computer, with an ASRock motherboard and Intel Core i3 processor. However, if you follow this guide step-by-step, you should be able to use it to dual-boot Ubuntu 14.04 and Windows 7 on any computer with UEFI firmware on a single hard drive.
An assumption made here is that you have Windows 7 already installed on the target hard drive. However if necessary, you can always install it afresh. So based on that assumption, here are the steps involved:
- Recover space for installing Ubuntu 14.04 by shrinking the Windows 7 C drive
- Install Ubuntu 14.04 on the recovered space. This assumes that you’ve already downloaded an installation image of Ubuntu 14.04 and burned or transferred it to an appropriate installation media.
- Set the default boot manager for the computer
Before we proceed to the instructions, this screenshot shows the partitions that the Windows 7 installer will likely create, as seen from the Windows 7 partition manager. Note that the C drive is about 420 GB and the EFI partition is about 100 MB. In the first step of the installation process, space that will be used to install Ubuntu 14.04 will have to be recovered from the C drive.

This is what you’ll see from the Ubuntu 14.04 installer. It offers a much clearer detail about the layout of the number and type of partitions than the Windows 7 partition manager. /dev/sda1 is the 100 MB EFI partition that you saw in the previous screenshot.

With all that introduction out of the way, let’s get this thing done.
Step 1. Shrink Windows 7’s C Drive: To shrink the C drive, launch the Windows 7 partition manager and right-click on the bar that represents the C drive. Select Shrink Volume from the context menu. You should be able to recover enough disk space to install Ubuntu. A detailed description of how to accomplish this step is available in this forum post.

Step 2. Install Ubuntu 14.04: Ubuntu 14.04 will be installed in the space that was recovered from step 1. To begin this step, reboot the computer with the installation media you created in the optical drive or in a USB port. Start the installer and click through until you get to the step shown in this screenshot. It is very likely that the installer will inform you that “This computer currently has no detected operating systems. What would you like to do?” Select the Something else option, then click Continue.

That should open the installer’s Advanced Partitioning Tool’s window. You should see all the partitions on the system, including the space that was recovered from Windows 7’s C drive. That space should be marked as “free space.” To start creating partitions to install Ubuntu 14.04, select it, then click on the + button directly below it.

That should open the installer’s partition editor. If you are new to the concept of disk partitions in Linux and creating partitions in Ubuntu Desktop, it is highly recommended that you read Guide to disks and disk partitions in Linux and How to install Ubuntu 14.04 on encrypted MBR partitions. For each partition that you’ll create at this step, all you need to modify are the values for “Size,” “Use as” and “Mount point.” And because a few of the partitions needed were already created during the installation of Windows 7, only partitions for / (root), /home and Swap will need to be created for Ubuntu 14.04 – in that order.

For the root partition, a disk space of 20 GB (20,000 MB) should be more than enough. The minimum required is actually 6.4 GB, so the extra should take care of future growth in disk usage. For file system (Use as), you may select the default (Ext4) or even btrfs. Be sure to select / from the “Mount point” menu. OK.

For the /home partition, assign the disk space you think you need and select /home for the mount point. OK.

For the Swap partition, a size of 4 GB (4000 MB) should be enough. From the “Use as” menu, select swap area. OK.

Back to the main partitioning window, you should see all the newly created partitions. Did you notice that we did not create a boot partition? That’s because on these systems, the EFI partition, which on the system used for this tutorial is /dev/sda1, serves as the boot partition. Boot files for GRUB will be installed there. GRUB (the GRand Unified Bootloader) is the boot program used by Ubuntu and virtually all Linux distributions. Before clicking Install Now, change the entry in the “Device for boot loader installation” from /dev/sda to /dev/sda1. Continue with the rest of the installation.

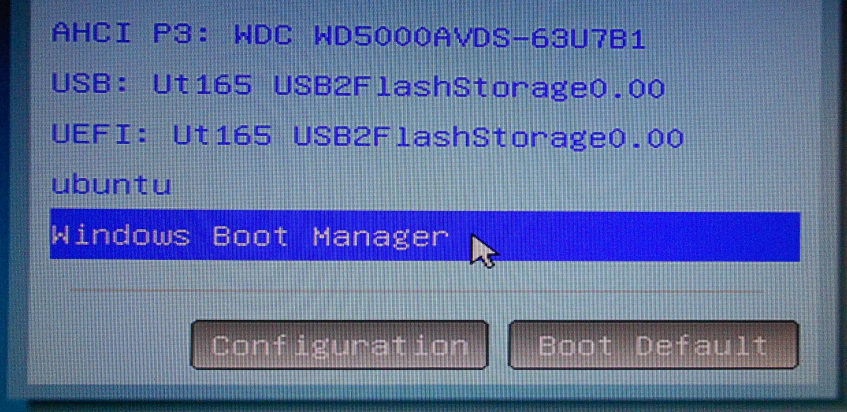
Step 3. Set the Default Boot Manager: After Step 2 has completed successfully, reboot the computer. Before it reboots into the default boot device, press the F key that will take you to the boot menu. For my computer, it is the F11 key. This screenshot shows the entries in the boot menu of the computer used for this tutorial. The AHCI P3: WDC W5000… entry is for the hard drive used for this installation. The OS entries are Ubuntu and Windows Boot Manager. If you select the AHCI P3: WDC W5000… entry, the computer will not boot.
That was the case with my computer. To boot into Ubuntu 14.04 or Windows 7, select the appropriate OS entry. After verifying that you can boot into Windows 7 and Ubuntu 14.04, you should get into your system’s UEFI setup utility and set the default boot device to Ubuntu, which should have entries for Ubuntu 14.04 and windows 7 in the GRUB menu. You might want to read Boot managers and boot devices on a PC with UEFI firmware for a brief discussion of the subject in this step.


I have read some of the solutions you provided here but not seen any that addressed my problem. I have hp windows 8 pre-installed which I installed ubuntu 16.04 on. my problem now is that when i start my system the windows boots first except i pressed esc and F9 before i can see my grub platform. Please how can i fix this. Thanks.
Did you disable Secure Boot?
I just installed Ubuntu 16.04 alongside Windows 10 on a Lenovo laptop. Works perfectly, with GRUB as the default boot manager. I did not even do anything extra. See the result here.
Disable Secure Boot and see if that solves your problem. See How to disable Secure Boot on a Lenovo G50 laptop for help in disabling it.
Hi,
Thanks for this article. I bought a new Lenovo B50 intel i3 laptop with pre installed Windows 7 Pro, UEFI firmware.
I shrinked the c: drive and created an unallocated space of 250 gb. I tried to boot the USB Ubuntu flash drive and the live version worked fine.
So, I tried to install it.
1. The first problem was it did not detect the Windows 7, so I did not get the option to install alongside Windows 7.
So, I chose the “Something else” option and continued.
2. The partition table showed the 250 gb unallocated space. But it was disabled and is not allowing me to select that to install it. It is showing as unsupported space.
What could be the issue ? Please help me to resolve it.
After I installed in the unallocated space. Will I be able to see the Windows 7 in the grub ? What needs to be done for that. Please help. Thanks in advance.
Update .. ooOOoo
My Windows Disk is Basic. But when I try to create a new volume, it is trying to convert it to Dynamic disk.
What could be the reason?
That is the reason why the unallocated free space is shown as Unusable space in Ubuntu..
How can I fix this ? Thanks
how can i install ubuntu 14.04 along with windows 7 without uefi? i installed ubuntu 14.04 using the same method as i used for 12.04 using easy bcd which was posted here, and it worked perfectly back then but now with ubuntu 14.04 the same method is not working.
When you say it’s not working, what exactly is not working? What aspect is failing? Are you booting into the non-UEFI-aware version of the installer?
P.S. EasyBCD with a dual-boot GPT/UEFI drive doesn’t work well.
I used EasyBCD with a MBR/BIOS drive be4 and it worked great. but the version 2.2 messed up my BCD when i tried to do dual boot on the GPT/UEFI.
and in EasyBCD’s beta version 2.3, it explicitly disables you from even trying to add a Linux entry to the BCD cause it knows window7/8 have some sort of ‘BCD locking’ is what the developer of EasyBCD told me and they dont want any issues where you mess up the 100MB BCD partition to pop up.
I used windows boot disk to eventually get my Windows working again by running various BCDRepair/fixboot commands. Then used a BootRepair iso to get dual boot working (it seems to install GRUB smartly).
Note: after installing ubuntu with the manual partitions, I had a GRUB boot menu which might have included Windows in it too. I shoulda just stuck with that instead of trying to use EasyBCD to fix Windows Boot Manager.
So precisely and clearly instructed with screenshot. Even a amateur like me able to use it. Brother simply I love almost each and every post of you. May Allah’s blessing and peace be on you.