This is a new user’s guide for installing Ubuntu 13.10 on a computer that has another OS already installed on the hard disk drive (HDD).
You would think that because Ubiquity, Ubuntu’s graphical installation is a point-and-click application, that users will not have any problem using it. But that does not seem to be the case. What’s easy for one person might not necessarily be for another.
I’ve been thinking about writing this for a while, but didn’t think there will be a real need for it until I saw this forum post, which I’ve quoted below:
When I went to install 13.10 I chose the option to remove windows and replace with Ubuntu. I had two partitions when I chose this. One with files I wanted to keep and the other being the windows 7 partition. When I chose to remove windows I assumed it would be placed on my C drive and not my other one. But what actually ended up happening was all my partitions merged into one deleting everything. Now I only have Ubuntu on my drive. I need help retrieving my files please!
Unfortunately for that guy, he lost his C drive and, with it, all his files. Not good. I don’t like Windows, but I don’t want anybody to lose data while installing any Linux distribution.
So, without further ado, here’s a step-by-step guide for installing Ubuntu 13.10 on your computer. For most users, that computer will likely be running either Windows 7 or 8, so I’ve used a test computer that’s running Windows 8 Pro for this tutorial.
Unlike Microsoft’s Windows or Apple’s Mac OS X, Ubuntu (13.10) and the vast majority of Linux distributions are free to download and use. A few will request a goodwill donation before you download, but you can still download without donating anything. Ubuntu is one of those. Yes, I know, Mac OS X Mavericks is free, but there’s a difference between OS X-free and Linux-free. That’s the subject of a separate article, so I won’t discuss it further. For now, let’s stay on topic. If you have not done so already, download a copy of Ubuntu 13.10 from here. And if you can, donate something, no matter how small. Ubuntu is produced by a commercial entity called Canonical. Employees have to be paid.
Ok, after downloading Ubuntu, the next task is to transfer it to a USB stick or burn it to a DVD. It’s almost 900 MB in size, so it won’t fit on a CD. The recommended method is to transfer it to a USB Stick. If you need help with that, see Install Ubuntu 13.10 using a USB key from Window or another Linux distribution. Once that’s done, insert the USB stick in a free USB port, or the DVD in the computer’s optical drive. Be sure to set the computer to boot from external media, then reboot the computer.
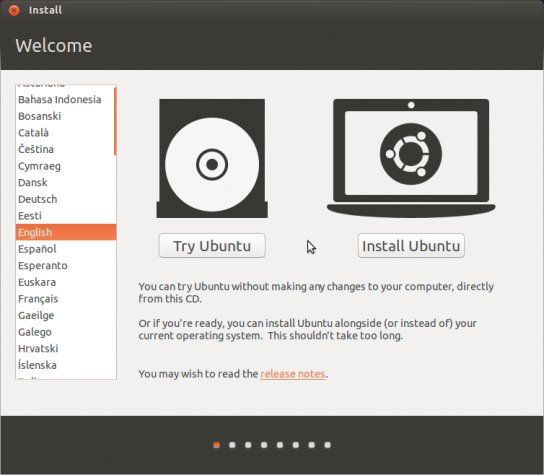
1. After the computer has booted, you will be presented with the choices shown in the screen shot below. Ubuntu 13.10’s installation image is a Live image, which means you can run it on your computer without installing it. It’s the easiest way to test-drive the OS. So If you’ve never used Ubuntu before, choose the Try Ubuntu option, otherwise, choose Install Ubuntu. I recommended the first option because if you start the installer from the Live desktop and something goes wrong, you can just quit the installer and restart it, without having to reboot the computer.

2. If you chose the first option, the computer will boot into the Live desktop. To launch the installer and begin the installation process, click on the second icon on the Dock (counting from the top). The installer should accurately detect your language and present it in the first step. If not choose your language from the list and click Continue.

3. This step just gives you information on what’s needed for the installation to complete successfully and a few options to enable. With Install this third-party software, the installer will install important utilities that you will need on a running system, so it’s best to enable it. Continue.

4. This is where you need to pay special attention, if you don’t want to lose your data. The installer has detected another operating system on the target HDD and has offered you several options. There’s nothing complicated about the options, but if you need help understanding what they mean, the rest of this article will explain each in detail. If you intend to install Ubuntu on the same HDD that you have the other OS on, retaining the other OS (and you data) in the process, Install Ubuntu alongside Windows 8 is the option to choose.

5. This screen shot show what the installer does to the other OS if you choose to install Ubuntu alongside it; it will create room for Ubuntu from the unused space left on the partition. In this case, where Windows is the other OS, that means your C drive. But it will do that only if there is enough space to install Ubuntu. With this option, data on your C drive will remain intact and after installation, you will be able to boot into Windows, log in and access your files. You will also be able to boot into Ubuntu, log in and access the newly installed system. This is called dual-booting. This automated method is not the best way to go about dual-booting Windows and a Linux distribution, but it gives you an idea of how it is accomplished.

This screen shot shows how Windows sees the partitions. The first two in the list are the default partitions created by the Ubuntu installer.

6. The other option to consider is Replace Windows 8 with Ubuntu. Note that the other OS can be any other version of Windows or even another Linux distribution. If you look carefully, you will see a line of text just below that selection that warns that selecting it will cause all your data to be deleted. Select this option only if you do not want to keep the other OS. AND after backing up your data. This option will not just delete your files, it will delete all the partitions of the other OS, and if that other OS is Windows, that means your C drive and everything on it. After installation, you will not be able to recover anything, so be careful with this option. Actually, there are tools you can use to recover the partitions and your data, but why would you want to go through the trouble. Just back up your data. To paraphrase a popular saying in the investment community, nobody ever lost data by backing it up.
With this option come two features – disk encryption and LVM. If you enable Encrypt the new Ubuntu installation for security, the entire HDD, minus the boot partition, will be encrypted. After installation, the system will boot only after you enter the correct encryption passphrase. The other option, LVM (Linux Logical Volume Manager), is a disk management feature that makes it easy to dynamically allocate disk space on the system. See this article for more on the subject.

When disk encryption is enabled, you will be required to specify a passphrase. You will have to enter the passphrase you specify here every time the computer boots up. If you fail to enter the correct passphrase, the computer will not boot. For better security, the passphrase should not be the same as your login password.

This image shows the screen you will be see at every system reboot or bootup. As stated earlier, the computer will not boot if you fail to enter the correct passphrase.

After six unsuccessful tries, the system will drop you to this screen. Good luck trying to figure out what to do. If you encrypt a disk. don’t lose the passphrase.

7. The last disk method to consider is Something else. This option lets you create partitions manually. Manual disk partitioning in Linux is not a very difficult task, but you do need to know what you are doing. If you’ve never partitioned an HDD in Linux, Guide to disks and disk partitions is a recommended read.

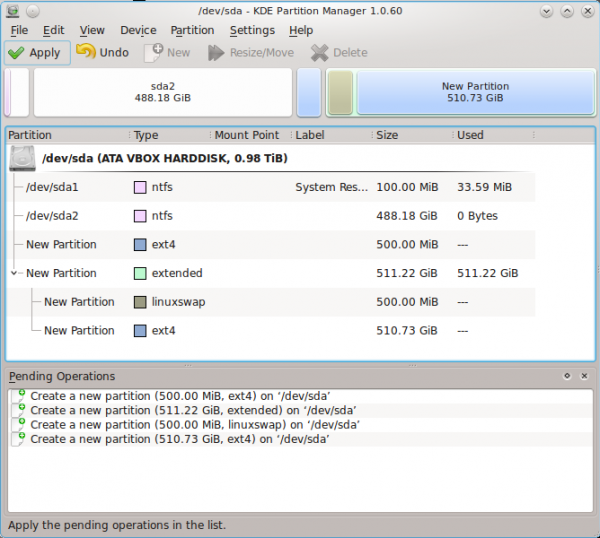
This is the next step after selecting “Something else” and clicking Continue from the previous step. This is the installer’s Advanced Partitioning Tool’s window. It shows all the HDDs detected by the installer and the partitions under them. The Windows 8 partitions you see in this screen shot are those created from a test installation of that operating system. If you have a store-bought Windows 7 or 8 machine, there will be more partitions that what you see here. If you are new to our world, note that there’s no C drive in Linux. In this screen shot, /dev/sda2 is what Windows calls the C drive. Creating partitions using this tool entails resizing the Windows partitions to create enough disk space for Ubuntu. To do that, simple select the target Windows partition and click on the + button. We’ll go though the process of creating custom sets of partitions in another article.

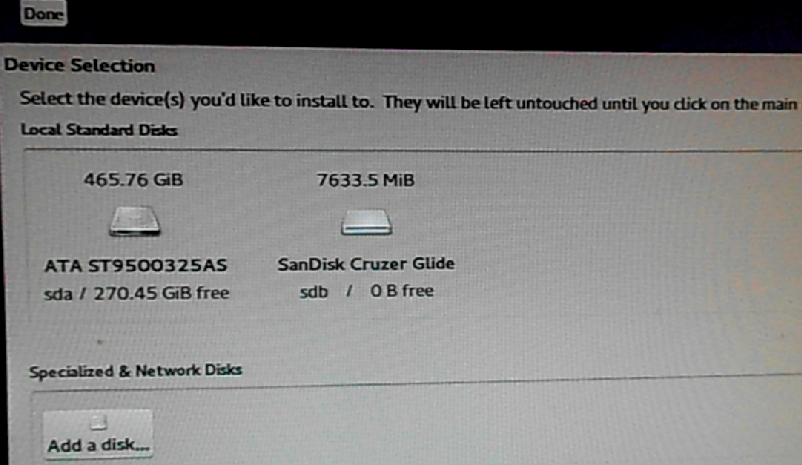
This is a photo of the Advanced Partitioning Tool’s window from a store-bought Windows 8 laptop. It’s not a good-quality picture, but if you look carefully, you will see that there are more Windows partitions than the one from the image above.

If you are reding this paragraph, you should now be able to use one of the installer’s automated disk partitioning options without wiping your Windows partitions.


my previous os is windows 7 i installed ubuntu 13.04 when i am installing ubuntu os i choose an option “replace windows 7 with ubuntu” after intalling ubuntu my “D drive and E drive” is not showing.i want my previous data so please help me out to recover my previous data.thank you in advance……..
If you selected the replace windows 7 with ubuntu option, you just screwed up your Windows and potentially lost all your data.
It’s still possible to recover your data, but it could take some effort.
sir please tell me the process how should i recover my data step by step……..
Thank you all for the help. Will give it another try tomorrow.
Thanks for the reply finid. No it doesnt apply to my case, i’ve already read the article before posting. Im using a worn out laptop, 4 years old this december. (win7) Im skeptical about using the something else option cause of my lack of understanding of its functions, what it will do to my existing files/drive/os and fearing im gonna make a mistake and be one of those guys searching desperately forums on how to retrieve their valuable files. Plus nobody got time for this and having been in a similar situation when my first external drive got busted i dont wanna get through this again. Backup is not an option unless i spend for a new drive, since my latest external HDD started being unreliable after 3 and a half years of hard work. I’ve also read the article about how manuall partitioning works on the installer but i read you cant make more than 4 partitions. My C drive currently has 3 [sda1 sd2 sda3] and Ubuntu requires at least 2 if i understood correctly [even though you made much more than 2 on that article/tutorial] so im still hesitating to try that option. Im gonna try again installing Ubuntu 12.04 LTS from inside windows with the installer hoping it will be able to install proprietary drivers without errors this time. I still dont understand why the wifi drivers would install on 13.10 with no problems and wouldnt on 12.04
Ok, I’ll help you through the installation, if you are willing to give it a try.
If you have 3 primary partitions on the system already, you can make the last partition an extended partition and create logical partitions from it that will be used to install Ubuntu.
So, go ahead and click on the Something else option and tell me how many partitions you see there.
Sorry that I do not have a forum to discuss it. Hopefully, that will change before the end of the year.
thank you man but i’ve decided to postpone my linux adventured a bit. I’ll definitely be back though . I can’t stress enough how kind you were. thnx again
I’m wanting to install 1310 alongside Mac OSX version 10.9 on mid 2009 MacBook and it’s only giving me the option to wipe Mac. Don’t want to do that!
Any thoughts?
You certainly don’t want to do that!
Choose the Something else option. that means manual partitioning, but it’s better than losing your OS X partitions.
Hi there Nick:
I am having the same problem. Did you manage to get it to work for you?
Have you tried the Something else option? If you did, what happened?
what happenes when the option install alongside windows is nowhere to be found?
The first time i installed ubuntu 13.10 alognside windows the option was there (obvsly) I then removed 13.10 and installed 12 something but had to remove that also cuz in that version the broadband drivers for the wifi function of the laptop could not fucking install for some weird reason (even with ethernet cable i couldnt download and istall manually the drivers and since i couldnt use the ethernet solution for long the system was close to useless without internet acces) So after removing ubuntu 12 and restoring the grub boot file a couple of times after removing ubuntu 13 and 12 and messing around with partitions created by the installer and me so they all would become one partition as it was before i decided to try 1310 again but this time the installer has no option for installing alongside my windows. Any ideas on what the actual fuck is going on? Cuz i sure as hell have no clue
I’ve come across that myself, but couldn’t figure out exactly why. Zap GPT data structures from a disk, while preserving existing MBR partitions could give a clue, though I don;t think that apples in this case, but you never know.
The best recommendation I can give you here is, Choose the Something else option. That means manual partitioning, but it’s not a difficult process.