Kali Linux is the latest incarnation of BackTrack Linux, a distribution designed for penetration testing and security professionals. The last edition of BackTrack was BackTrack 5 R3, with GNOME 2 and KDE installation images for 32- and 64-bit architectures made available for download. Released Kali Linux ISO image is for the GNOME 3 desktop, with a customized GNOME Shell.
However, Kali Linux’s build system makes it relatively easy to roll your own (custom) installation image using other well-known desktop environments, like KDE, MATE, LXDE, and Xfce. This article shows how to build a custom installation image built around KDE.
NOTE: If you are still using BackTrack, you might want to consider switching to Kali Linux. It’s based on Debian and offers more features than its predecessor.
A custom Kali Linux image can be built from an existing installation of Kali Linux, or form any other Linux distribution, The easiest route is to download Kali Linux 1.0 and install it in a virtual environment. From it, you can then build a custom image with your choice of desktop environment.
The instruction for building a custom Kali Linux ISO image is pretty simple. I chose to build mine using a combination of the default setting in the build environment and the installation instructions. The result is a 2.2 GB installation image of Kali Linux KDE.
There’s nothing special to it, but if you want to build one, these are the steps I took.
1. Install Kali Linux 1.0 in a virtual environment. You may download an installation image from here.
2. Set up the build environment. To prepare the build environment, the official documentation called for the installation of four packages. However, I found that two of those packages (git and kali-archive-keyring) were already installed on a new installation of Kali Linux 1.0, so I only needed to install the other two, which are cdebootstrap and kali-archive-keyring.
Therefore to prepare the build environment, issue the following commands:
I. Install required packages with this command: apt-get install cdebootstrap kali-archive-keyring.
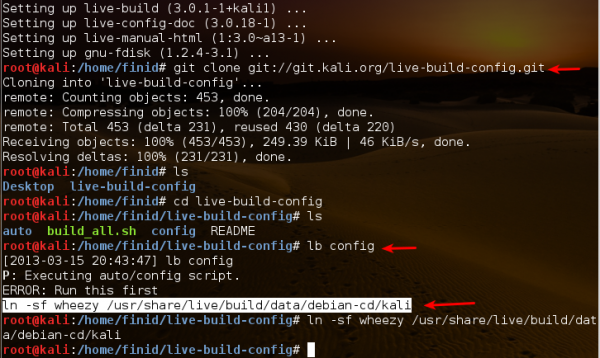
II. Clone the build environment with: git clone git://git.kali.org/live-build-config.git.
III. The build environment is in a directory called live-build-config. The next step is to change (cd) into that directory and start messing with it. So type this command: cd live-build-config.
IV. Then run this command: lb build. The system will respond with an error message, and will output a command for you to run that will take care of the cause of the error. The command it will output is: ln -sf wheezy /usr/share/live/build/data/debian-cd/kali.
This image shows the commands as I used them in my test installation.

This one shows the output of the lb build command without the error message.

3. Configuring the Kali ISO Build In the official documentation, this step is optional, but this is where you have to choose the desktop environment you wish to use for the build. The file to modify is kali.list.chroot in the config/package-lists directory. So change to that directory with: cd config/package-lists and open the file with; nano -w kali.list.chroot.
This is section of the file that you have to modify to use the desktop environment that you prefer. To use KDE, just uncomment everything, but the KDE line. Note that the default in this file is slightly different from what you’ll find in the official documentation.

This is the same file with the KDE lines uncommented. The two lines shown here worked just fine for me.

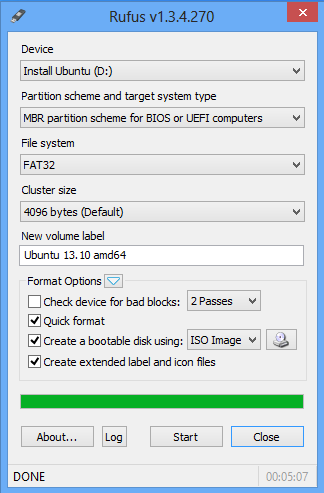
4. Build the ISO After modifying the file, type: lb config --architecture i386. Follow that with: lb build. That last command will take more than a few hours to build, so take a break or a nap. When it’s completed, you should see an ISO file of about 2.2 GB. That’s your custom Kali Linux ISO KDE image. You may know burn it to a DVD or transfer it to a USB key or flash drive.

This image shows a test installation of Kali Linux ISO KDE with the classic menu.

And this shows it with the Kickoff menu. Corrections, suggestions and requests are welcome.


I found a site with 32 bit Kali Linux Mate, Xfce, KDE, LXDE, KDE, e17, i3wm
[ URL Deletd ]
Always best to download a software from a known and trusted source. https://www.kali.org/downloads has 32-bit edition of the main image.
you used lb build where you should have used lb config
Can we set it up to run windows tools inside of wine?
I helped make a Kali Linux Family Tree – which shows how it came into being – i.e. from Knoppix to WHoppix to WHAX to BackTrack to Kali Linux
I hope I got it right! Ill be corrected if I am wrong
http://www.concise-courses.com/security/kali-linux-review-and-history/
Thought I’d share that
You forgot P.H.L.A.K. Professional Hackers Linux Assault Kit. 🙂
Is it still alive?