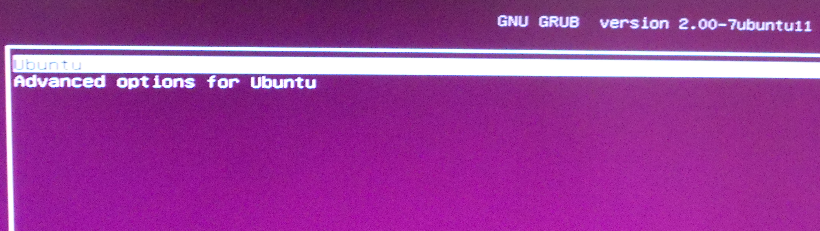
3. Install Boot-Repair After installation has completed. Reboot the computer. For all the times I installed this system, the computer rebooted straight into Ubuntu, without even showing its boot menu. And what happened is that a new entry was created in the UEFI boot menu called “Ubuntu.” It took several reboots before I could see the boot menu, and when I did, the expected entry for Windows 8 Pro was not even there. This screen shot shows what it loos like.

Notice that there is no entry for Windows 8 Pro, which is unusual. What this means is that I was not able into Windows 8 Pro. I had to do something extra to add an entry for it. That “something extra” involves installing and running a program called Boot-Repair. Installing it is done from the command-line, so start a shell terminal and type the following commands:
- sudo add-apt-repository ppa:yannubuntu/boot-repair – Adds the PPA to the system’s /etc/sources.list file
- sudo apt-get update – To update the package database
- sudo apt-get install boot-repair
After installation has completed successfully, start it from the Dash or from the same terminal window you installed it from by typing boot-repair. The screen shot below shows the program’s main interface. The only thing you need to do here is click on the first button – Recommended repair. There are other options in an “Advanced options” window, but you don’s need to change anything there.

OK.

After installing Boot-Repair, you should now see entries for Windows 8 Pro in the boot menu. This screen shot shows what it looks like on the system used for this tutorial.

4. Install GRUB in a PBR The final task inside Ubuntu is to install GRUB 2 in the boot partition’s PBR. If you’ve forgotten the device name of the boot partition, it will be shown in the output of the df -h command. In the output shown in this screen shot, you can see that it is /dev/sda5. To install GRUB 2 in its PBR, type sudo grub-install --force /dev/sda5. Without the --force option, the system will not execute the command. You may now reboot into Windows 8 Pro.

5. Restore Windows 8 Boot Manager Two more tasks before you can relax with your UEFI dual-boot system. First, is to restore Windows 8 boot manager to the first sector of the HDD. After that, add an entry for Ubuntu 12.10 in the boot manager’s menu.
To accomplish the first task, you’ll have to download and install EasyBCD, a free-for-personal-use program from Neosmart Technologies. Download it from here. This is the program’s main interface. You should see an entry for “Ubuntu,” which I deleted. I chose to add mine manually.

You can see it from the preview tab. You get here by clicking on the Edit Boot Menu tab. To restore Windows 8’s boot manager to the first sector of the HDD, click on the BCD Deployment tab.

Then click on the Write MBR button. To add a new entry for Ubuntu 12.10, click on the Add New Entry tab.

Click on the Linux/BSD tab, then select “GRUB 2” from the Type dropdown menu. Modify the Name field to match, then select the corresponding entry for Ubuntu’s boot partition from the Drive dropdown menu. Click on Add Entry.

Here’s the new preview window. You may now reboot the computer.

Notes: You’ll probably notice that the computer will not reboot in the same manner as when Windows 8 is not involved. You may have to go into the UEFI setup utility to set the computer to boot from a new entry called ‘Windows Boot Manager” or a similar name.
On my test system, whenever I set the computer to boot from the HDD entry in the UEFI setup utility or from the UEFI boot menu, all I get is a blank screen with a flashing cursor.
After installing Ubuntu, the entries you’ll find in the Windows 8 partition manager are shown below. The EFI System Partition (marked “EFI boot”) in this screen shot, is required on any UEFI system. Because it was created by the Windows 8 installer, there was no need to create another one during the installation of Ubuntu. All operating systems installed on the HDD will see and use it. So it will always show up in the output of the df -h command. If you look at the first image under section number 4 (Install GRUB in a PBR), /dev/sda2, mounted at /boot/efi, is the EFI System Partition.

From Ubuntu’s disk management tool, you can see more information about the EFI System Partition.


Hi! I followed all the tutorial step-by-step, but what I got is two partitions “F:” and “G:” into Windows.
And when I try to add Ubuntu 12.10 with EasyBCD, it shows “Bootloader Path: \NST\AutoNeoGrub1.mbr” instead of what you got in the picture.
Finally, I’m getting the same Ubuntu boot screen, and no Windows Boot Manager (BIOS primary).
What I did wrong and how can I fix that? Thanks in advance.
You have missed out on what to select for “device for boot loader installation” during Ubuntu Installation??
Should I select /dev/sda or /dev/sda1 or /dev/sda2 …. or so??
Please explain on that and what it does.
The bootloader should be installed in the boot partition of Ubuntu. In this tutorial, it is /dev/sda5.
Thanks.
I have another query for you. I have two disks. one HDD and another SSD. I have installed win 8.1 on HDD and Ubuntu 13.10 on ssd. due to booting issues I’ve formatted ssd. Now using EasyBCD I have made Windows boot manager and I can happily boot into win 8.1.
In my dell laptop UEFI boot settings(by pressing F12 during startup) I still see Ubuntu boot option along with Win boot manager. I want that to be removed from there, how can I do it?
Here is my EasyBCD settings –


I hope u can assist me in that.
If the Dell laptop is the same one with the HDD and SSD, you don’t need to use EasyBCD. Just install both on their separate drives as you have done, then make the Ubuntu drive the default from the BIOS or UEFI Setup utility.
Yes, It is the same laptop having both drives. But the problem is I didn’t create a /boot partition during ubuntu installation. So, from that grub menu I can’t goto Win 8.1, it says the path to efi is wrong or something.
If I create a /boot partition, will everything be OK?
Don’t use EasyBCD, you don’t need it with 2 drives involved.
I have done exactly as the tutorial guide. The result was the bootloader changed back to win8 metro style and shown 2 OS: win8(default) and Ubuntu, like the screenshot at the first page. But when I boot into Ubuntu, it displayed error message, that it cant be load or something is missing.
\NST\AutoNeoGrub.mbr
I’ve installed Win 8.1 Pro x64 on my UEFI computer’s SSD. Just wondering if Ubuntu would be better installed for dual-boot on a second GPT HDD? Thoughts?
If you can afford to, it’s always better to use a second HDD or SSD for the other OS in a dual-boot setup.
Hey finid,
I read your previous tutorial on how to dual boot windows 7 and ubuntu 12.04
I did that on my UEFI ASUS motherboard without any trouble.
But here at the end of STEP 2b , instead of selecting /boot partition to install GRUB there you just went along and installed it on the first sector of HDD where usually Windows files reside . RIGHT ???
Why would you do that ?? Is there a reason ?? Please tell me ..
Because I followed everything you said except that part where I chose to select /boot to install GRUB..
I booted straight to windows , where I made an entry for UBUNTU and restarted ..
After rebooting, I saw a blue screen (the one you have one page 1) ..
MY ONLY PROBLEM is that whenever I select UBUNTU , my computer used to restart and then boot UBUNTU..
Is there a solution to that finid??
Please tell what should I do ??
Thank You 🙂
I so hope that this works. I have spent 3 days so far trying to get Ubuntu to dual boot on my new Toshiba laptop which shipped with Windows 8. I have set up dual boot lots of times before with XP, Vista and Windows 7 without any problem but Windows 8 with this new BIOS is pure hell. I don’t care if the terminology is correct or not, I will try anything at this stage that sounds like it may also work for me. I wish I could just have Ubuntu on my laptop but I also need Windows to run Adobe Illustrator on the same machine. 🙁
Ok, everything is fine and smoothly possible! But there is a big problem! Most win8 sold laptops are coming with too many partitions which reach the limit partition possible to install any OS. Even if you manage to make a way around the UEFI or any other issue, you can’t work around this! Unless, you try to remove some of these partitions and I can’t imagine how it will affect the win8 functionality!
Instead you have two choices:
1- if your HDD easy removable, get another one for Linux
2- Make your mind and keep only one OS! Linux or Windows.
There is a third choice but I personally don’t like:
3- Use virtual machine to run Linux under windows. I don’t see the point!
My solution was easier, I have 2 laptops. One is Ubuntu 12.10 and the second is Win8.
Is it required to do step 5 or can you just use grub to boot to either operating system?
Not required, but recommended.
If you want to use GRUB as the “master” or only boot loader, then you have to make sure that the device for boot loader installation is set to /dev/sda during the installation of Ubuntu.
I’d like to use GRUB as boot loader. So if I make /dev/sda as the device for boot loader installation, is it necessary to create a /boot partition for ubuntu during ubuntu installation??
I mean is it essential to create PBR ?
As I’m getting confused with terminology, could you tell me difference between “First Boot partition” , “PBR” and “MBR”.
Sorry if I’m asking too many questions.
Thanks tough for ur tutorial.
If sda is the SSD that Ubuntu is installed, and it is the sole OS on it, then it is not necessary to have a separate partition for boot. It’s good to have, but not absolutely necessary. For the record, a default installation of Ubuntu does not make use of a separate boot partition.
Use PBR when referring to first sectors of a partition, MBR for the entire HDD.
You can put Ubuntu on a logical partition and it will be perfectly happy there. You can have up to 64 logical partitions so I think you would run out of HDD space before you run out of logical partition slots.
Windows NT versions also will install in a logical.
I have 4 OS’s on one machine with a UEFI BIOS and Windows 8 and Ubuntu is on a logical since there were no Primary slots left available.
If you buy a PC with Windows 8 preinstalled, you have no choice but to configure it to dual boot in UEFI mode. The trick is to disable Quick Boot (or Fast Boot, depending on how your BIOS labels this feature) and Secure Boot. This is because you cannot perform a clean install of Windows 8 using the recovery media that either came with your PC or that you created after buying it. Re-installing Windows 8 on such a PC will always re-install it in UEFI mode. Also, on such a PC, Secure Boot will be enabled. This prevents both Windows 8’s Boot Manager as well as GRUB from chain loading boot managers/loaders for other OS’s, because the boot manager/loader cannot validate other OS’s security certificate. Only the BIOS can do that. It would be nice if the BIOS on a system with Secure Boot functionality provided an interface to allow a boot loader to validate another OS’s security certificate, thus allowing the ability to dual-boot from either Windows 8’s boot manager or GRUB with Secure Boot enabled. Until that type of functionality is available, your choices are to either rely on the BIOS’s boot manager to dual boot Windows 8 and other OS’s in Secure Boot mode, or disable Secure Boot so you can use GRUB or the Windows 8 boot manager to dual boot between Windows 8 and Linux.
Rather than buy a PC, then, it is far better to build one yourself. That way, you avoid all the signing keys and Secure Boot madness.
Yeh, that is the more sensible option. Build your own or have someone build one that is not in a factory owned by a billion dollar OEM conglomerate being paid off by MS to load and aloww only Windows 8
I stopped using MBR partitioning scheme on my personal computers including a notebook, months ago, but I still use terms like those finid is using, even though I know they no longer apply to my systems.
And I can’t seem to get the terms out of my head. don’t blame me. blame years of using MBR and company. Like finid said, we are in a transitional phase. I’m slowing teaching myself (reminding myself) that I now live in a GPT-world.
Yes, MBR is dead (for me), but the terms still live on in my head. Again, don’t blame me.
Sorry, I meant winload.efi, not winload.exe
Apart from a partition table with one dummy “Protective” partition the first sector of a GPT drive is empty.
You said:
“Install Windows 8 Pro. After this first task, the Windows 8 boot loader will be installed in the first sector of the HDD.”
Windows has never installed its bootloader to the MBR. You mean the Initial Program Loader, which no longer exists on a GPT drive. Windows8 instead adds an entry to the EFI bootmanager to start the Windows bootmanager on the EFI system partittion, which will then start the Win8 bootloader, which is winload.exe on the Windows8 partition.
Again, a misuse of terms. Rather than “MBR” and the “first sector of the HDD,” perhaps the proper terms should have been used. We are all still adjusting to GPT and (U)EFI terminologies, and the misuse here does not invalidate the steps given in this article, unless you can point out where following this guide will fail to yield a successful dual-boot system.
Complete elimination of terms like MBR from an article on this subject is not impossible, but it’ll take a conscious effort, especially when a tool like EasyBCD, which has been updated to accommodate all the good and bad that Windows 8 brings to the table, still has a button that reads “Write MBR.” Maybe it should it read “Write GPT,” Write to LBA 1,” or “Write to EFI System Partition.” Whatever the button reads, it does the job, it just does not use the proper terms – yet.
I take your criticism in stride because I make a point of doing the same to distro developers who fail to do things the right way. It’s how you move forward.
I went through UEFI setup hell a few months ago with a new OEM Windows 7 box and Linux Mint 14-KDE. I also tried to use EasyBCD, but guess what, according to the guy who wrote EasyBCD, it does not support EFI booting at all. In any case, it’s just a shell around some command line stuff, and maybe in Windows 8, it can do what you describe – just saying, it didn’t work for me. I ultimately ended up using rEFInd, which is an EFI boot menu system – it can even locate an boot 64-bit EFI-capable Linux kernels directly. I did also have to use the Ubuntu boot-repair tool, and lots of other hellish stuff I don’t even remember.
I considered using rEFInd, but EasyBCD has always worked for me, and it did not fail for this article. And true, dual-booting between Linux and Windows 8 is one heck of a mess, especially with UEFI involved.
No doubt something Microsoft intended. If I buy a new laptop, I’ll just pick up a new 2.5in hard drive as well. I don’t use Windows enough (maybe 2-3x a year?) to stress it.
The interesting thing with EasyBCD is not only did it work in Windows 8, but it automatically created an entry for Ubuntu during its instllation. that has never happened with Windows 7 or 8 in Legacy mode.
This is what I’m going through now. I already had windows 7 installed and decided to install linux mint 17.3 to dual boot. Almost nothing went according to tutorials I saw. Linux didn’t detect windows 7 to install alongside it so I had to do the “something else” option. I installed it just fine and it all works, however, I noticed that I have an issue where whenever I hibernate the computer in windows, when I bring it back up, it cannot resume into windows. It has to just reboot. In trying to fix that problem, I wondered if using easybcd(which I just hadn’t gotten around to yet) to create that grub menu thing may help. But I got that same message about limited features due to efi mode. Can’t do anything under any of the tabs except windows.
smh
Gonna look up this refind thing you mentioned to see if it helps.
Thanks
I built a new system with Windows 8 in ti and I don’t have an EFI partition. Why would anyone need one unless they are in for pain and suffering??
You really have no idea what you are doing and you should not be publishing this stuff to encourage others to stumble blindly into the same mistakes and mis-conceptions. Where do I start? How about the fact that there is no MBR on a GPT styled drive.
It’s not a question of having “no idea what you are doing,” but more of intentional “misuse” of terminologies. Even the author of EasyBCD and similar tools still choose to use MBR, as in “Write MBR,” when that clearly no longer applies.
Even replacing “MBR” with the “first sector of the HDD” muddles things up a bit, but that seems to take the term that you are having a problem with out of the picture. Not that it really mattes, because as much as you want to convince yourself that “there is no MBR on a GPT styled drive,” the first sector of such a drive is called the “protective MBR.” We are still in a transitional phase between old and new, so don’t be too hard on terminologies.
So it’s not that I don’t know what I’m doing, just that some terms are so ingrained that they refuse to “die.”
Now, aside from MBR, what other “mistakes and mis-conceptions” do you want to point out?