Though you need to create at least three partitions for installing Ubuntu, I will create four just to show how it should be done if you want to have the home directory on a separate partition.
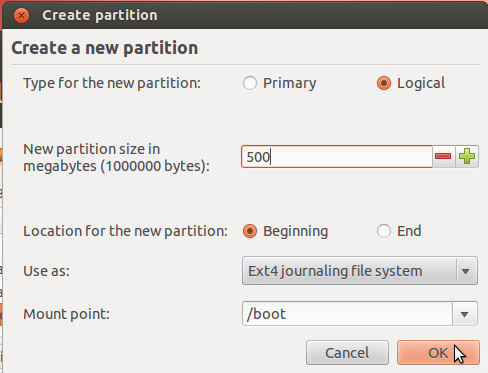
The boot partition is the first partition you want to create. The recommended size for it is 500 MB. That is way too much for the actual disk space that will be used initially, but if you expect to use the system for a long time, spanning several updates, you need the extra space. The mount point should be /boot. And you want to keep the default file system – ext4. This is important because errors have been reported when using ext2 for the boot partition. OK.
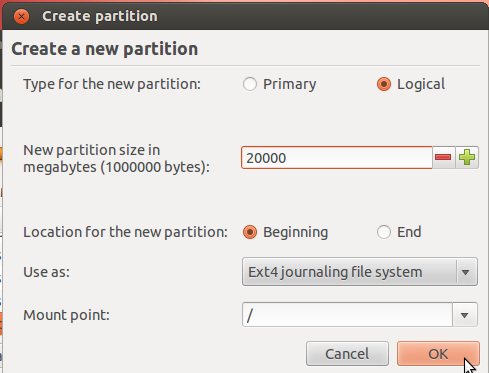
The second partition will be the root partition. For this tutorial, I assigned 20 GB to it. Anything that is at least more than 75% above the recommended minimum of 4.4 GB should be good. The mount point should be /. Keep the default file system. OK.
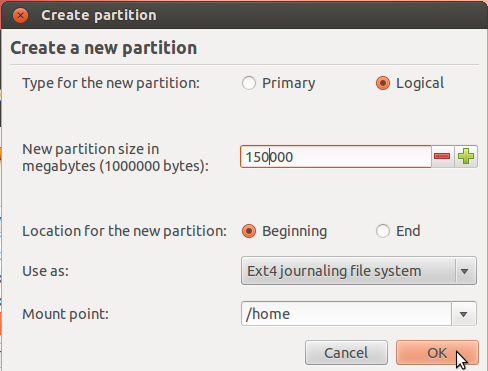
The third partition is for the home partition. Since this where any file you download or generate is stored, it should be assigned the bulk of the available disk space. Use /home as the mount point, and keep the default file system. OK.
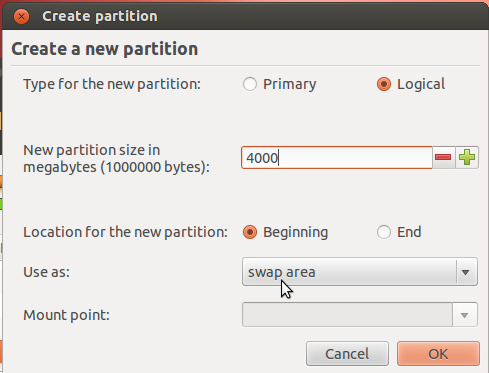
The fourth and last partition will be for Swap. This is disk space made available for the system to use as virtual memory whenever the need arises. Give it an appropriate size (4 GB or 4000 MB should be more than enough on any system). Select swap area from the Use as dropdown menu. OK.
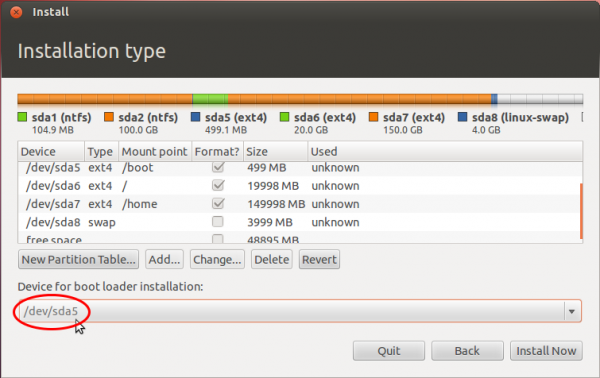
Back to the main advanced disk partitioning tool window, you should see the partitions you just created, besides the existing ntfs (Windows 7) partitions. Because the first Ubuntu partition was created as a logical partition (the installer does that by default), it is listed as sda5. This is the boot partition and it is where the boot files for Ubuntu will be installed.. Note that installing GRUB in the MBR is the same as installing it in sda. This is what you see in the Device for boot loader installation dropdown menu. So what you want to do here, is select sda5 (our boot partition) from that menu.
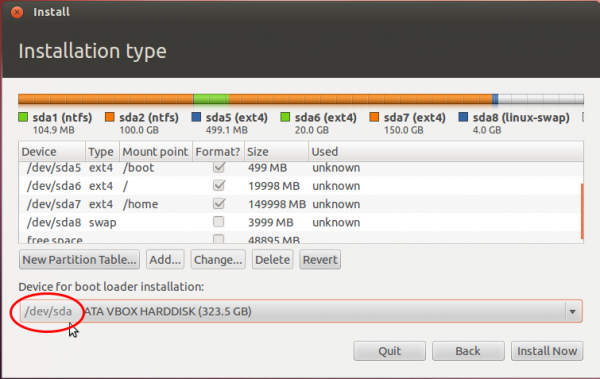
When you are done selecting it, the window should look like this. click Install Now to continue with the rest of the installation process.
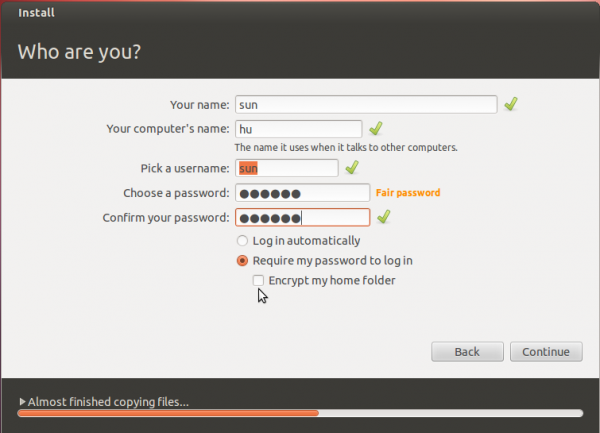
At the user account setup step, you might want to enable encryption of your home folder by enabling Encrypt my home folder. This does not afford you the same level of physical security as full disk encryption, but it is better than no encryption.
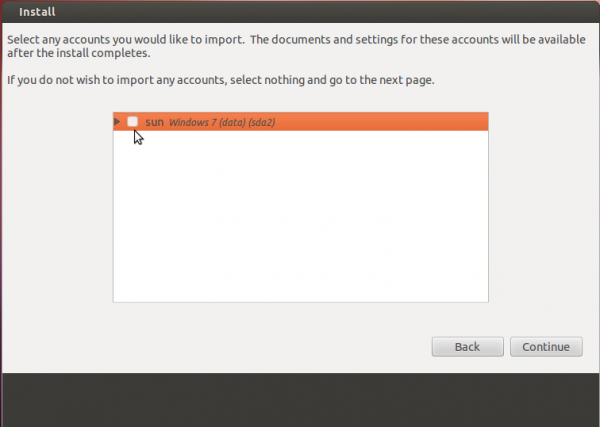
And you have the option of importing your settings from the Windows side to Ubuntu.
After installation has completed successfully, reboot the computer. It should reboot into Windows. This is expected. At this point, Windows does not know that it is now sharing the computer with another operating system. The next step is to tell it, and modify its boot menu to reflect that fact.
The easiest program to use for this task is EasyBCD, a free program by NeoSmart Technologies. There is a paid version, but for personal and non-commercial use, it is free. You may download it from here. Install it as you would any Windows 7 application. Start it. The main interface is shown in the image below. To begin the process of adding an entry for Ubuntu 12.04 in Windows 7’s boot menu, click on the Add New Entry tab.
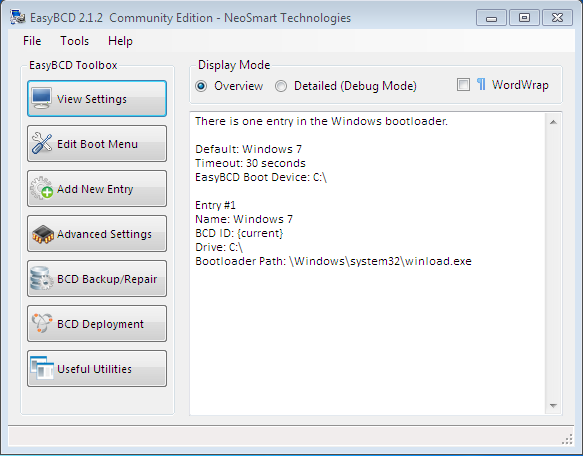
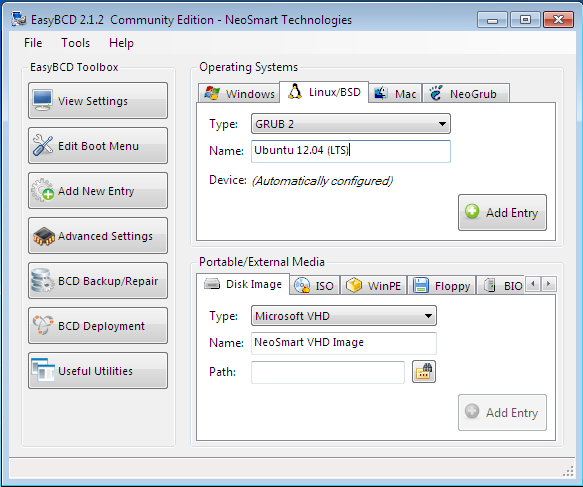
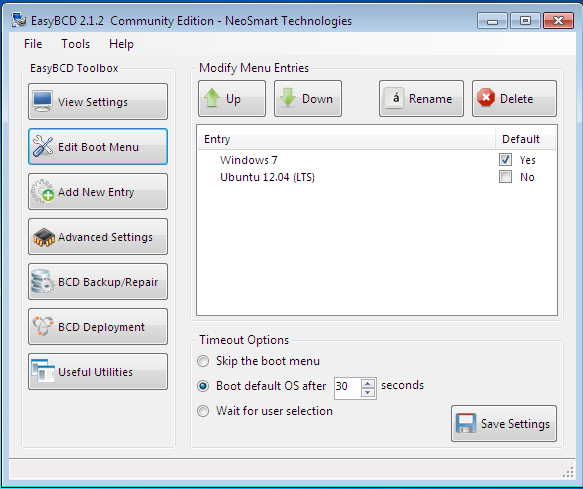
Then on the Linux/BSD tab. From the Type dropdown menu, select GRUB 2, the version of GRUB used by Ubuntu 12.04. Click on the Add Entry button. Click on Edit Boot Menu tab to view the new configuration.
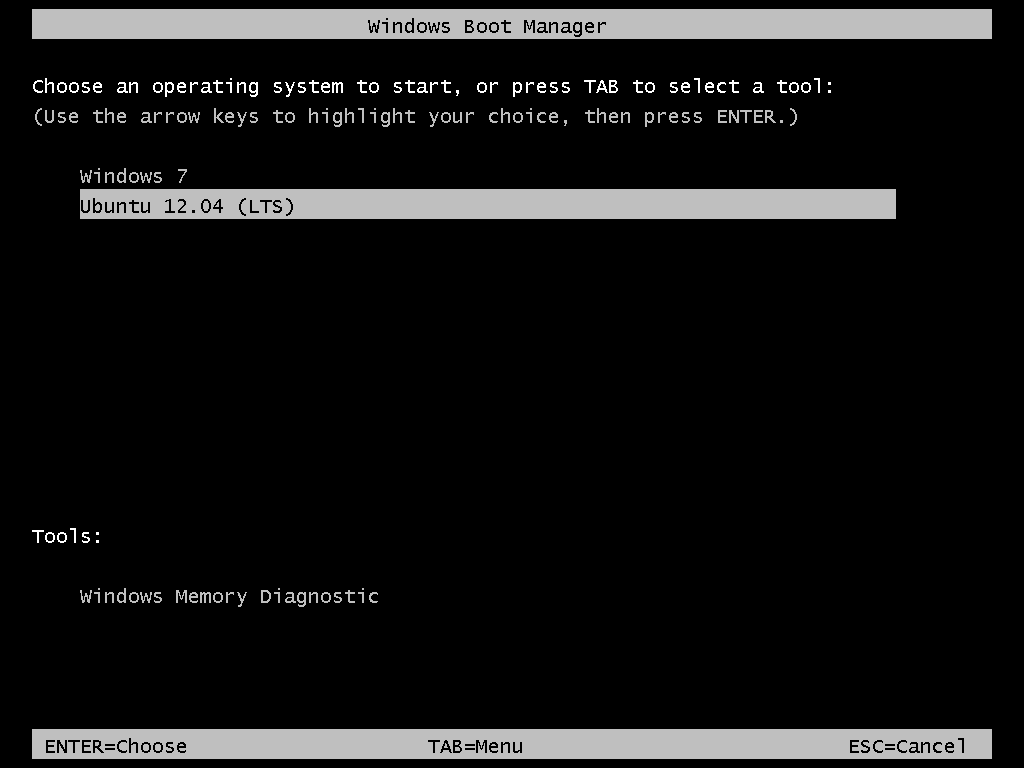
These are the two entries you will see every time you (re)boot the computer. The default is Window 7, but you can change it to Ubuntu 12.04 if you like. Exit EasyBCD and reboot.
That is it. Like I wrote earlier, this was done on real hardware and in a virtual environment on first try, so I do not think that you will encounter any issues if you follow this tutorial step-by-step.



Thank you. You saved me hours of pain.
I was able to do this one the first try. Very clear instructions!
I Agree. The instructions are concise. Worked great for me too.
I have tried this tutorial so early and it works greate but this i followed all steps but while installing i install ubuntu over 320 hardisk which lead to unable to open winows7 … Please healp me how can i get back to my windows with dual boot i have lots of file in windows7 please please help me ..
Well, how did you partition the disk and what error do you get when you try to use or boot into Windows?
I did same and made partition as u mentioned but at time installing ubuntu i install directly on dev 320GB wTa hardisk something like this which directly take me in to ubuntu no boot option comes…. Plz help me how to access back into windows7
I used these instructions to set up my dual-boot system OK. Where I ran into problems was when I plugged in the old disk drive from my old computer, which had been the boot drive. Once it was plugged in, the Wubi menu’s Ubuntu entry booted off the “new” (old) drive instead of the boot partition on its own drive. Even adding a new entry in EasyBCD didn’t help.
I’m currently just copying the data the hard way, but it would be nice to know how better to enforce which Ubuntu drive gets the boot.
thank you its working on my machine
What if, presumably in my case, you have “system”&”data” partitions only and it didn’t cross your mind to create a new one when installing Win7 so you installed it straight to “data” partition? Mind you, having 12.04. on the “system” partition already, but lack of space made the call.
TL;DU:
Partitions:
C:/ uses Ubuntu 12.04.
D:/ uses Windows 7
I am able to start only Windows 7, and C:/ partition is detectable only by Windows partition software as unknown region, and easyBoot detects it normally as Linux, yet creating a false MBR to try and boot diferently fixed nothing, and keeps showing me the GRUB2 fail on startup(OS doesn’t load at all).
Cheers.
I am trying to install ubuntu along with Windows 7. However on trying to manually edit the existing windows partition, the size option is not coming. Even on the installatio type window ( which comes just befor Edit partition window) The system is showing unused memory as unavailable.
My HDD is of 320GB with close to 100GB as available
Edit the Window partition from inside Windows, using the Windows partition manager. That’s the safest method.
HI,
I read your post and you seem to give the clearest and most concise instructions. Also, you appear to have quite a number of happy customers!
I want it to run Ubuntu 12.04 LTS alongside windows 7. on my machine.
I am an utter newbie to Linux based anything. Have used Windows for years, partly because I was initially given a windows machine, and also because it is easy for a non programmer.
I don’t like windows and never have never trusted Microsoft and even less now.
Form what I can see on the forums, there are disadvantages to using Wubi, including diminution of speed. I have also noted quite a lot of people repeatedly having problems with GRUB failure either on install or during update. This is a problem I hae now encountered in both contexts. I DO NOT want to risk my windows setup or data. I really can’t afford the time to attempt repairs etc. which may in any case prove impossible.
Can you please point me to the most stable, most reliable and efficient means of installing ubuntu on the same computer as win 7 with its own partition and the least amount of errors / problems etc. for my machine? And confirm for me, if I should be running ubuntu 32 bit or 64? I am unsure as the machine has windows 32 bit running now with 4 gig of ram – I am aware that 3 bit can only use 3.25 gig of ram, but there are 2 two gig sticks, – no point in taking them out.
I am, however somewhat concerned, as I read that ubuntu 64bit may not see the existing windows installation – especially if it is a 32 bit program.
I don’t need to re partiion anything – there is already a partition empty and waiting [currently formatted NTFS]. Labelled as I drive currently – in case that makes a difference.
AMD Athlon 64 x2 dual core 3800+ 2.00 GHz
4 gig RAM
32 bit OS
Acer
Added an NVIDIA graphics card added.
1 TB barracuda hard drive partitioned into 3
1 partition [201GB] set aside for Ubuntu
Any and all advice very much appreciated.
Sincerely,
E
I’ve never liked using Wubi for cases like this. Never used it, never will. For dual-booting, the proper way to do it is the way you are trying to.
If your HDD is 1 TB, with 210 GB reserved for Ubuntu, meaning that about 800 GB is used for the two Windows partitions, that setup has a small chance of causing a boot error after installing Ubuntu. That’s because there tends to be a problem with GRUB, the boot loader, if it is installed beyond a certain distance from the first sector of the HDD. That can usually be fixed, but it is something to be aware of.
If you really dislike Windows as much as I do, but still wish to set up a dual-boot system, the “most stable, most reliable and efficient means” is to get a 2nd HDD. Install Ubuntu on that 2nd HDD and be done with it. That’s the recommended approach. HDDs are cheap, so getting a new one shouldn’t be a big deal.
However, if you are unable to, your present setup will still work. Just be aware of the potential for fixable problem after installation. It doesn’t happen in all cases, but you never know …
Many thanks for your help!
Unfortunatley grub problem did arise; have tried 3 time now using grub repair with no luck.
am going to get another HD and use that as you suggest.
Regarding windows – i LOQATHE THEM! Howwever, haev a [not small] fotrune in WIn7 software that i leaned {painfully] to use and am unwilling to surrender.
When i get the new drive, i will let oyu know how it goes – usng your excellent instructions.
Thanks once again,
Eddy
HI,
ONE OTHER THING:
Hard drive ordered and on the way.
BUT i am still unsure wether to go for 12.04 32bit or 64bit?
i have win 7 32 bit installe, but 4 gig of ram is sufficient for 64 bit, and i have [as stated above] an AMD 64 dual core. The machine is a bit of a patchwork, im afraid, but it’s what i have for now.
I read that ubuntu 64 bit may not “see” windows 32 bit. WOuld be a great help if you could clarify this.
What do you think? 32 bit or 64??
many thanks
E
With Windows 7, you should be fine. It’s when GPT partitions and Windows 8 are involved that potential for Ubuntu “not seeing” Windows exists.
hey.. thanks.. this works perfectly..
hey,
i followed your guide and the installation was succesful, however after adding the entry in easybcd when i select “ubuntu 12.04” i get sent to command line grub. Please help!
Without knowing details about your setup, try Boot Repair.
I had a Windows 7 / Ubuntu 12.10 dual boot set up on my laptop. Recently, I “upgraded” the Win 7 Partion to Windows 8.1. Of course, the windows boot file is altered and I cannot access the Ubuntu installation. I was using EasyBCD, and saved a backup. Using it and the backup was not successful. Should I just reinstall, or do you know the exact commands to edit the boot manager using bcdedit?
I’ve not played with bcdedit on Windows 8 at all, so I don’t know what the command is, if there’s any on Windows 8.
Reinstalling, since you’ve backed up your data, takes no more than 10 minutes, so that should be the recommended option.
Thanks for the reply. I agree with your recommendation.
Happy New Year
I have one problem, few days ago i decided to install new Mint 16, in that time I had dual boot Win 7 and Mint 14. As it was my donno what version of Mint that I am using I didn’t expect no problems with installation and to be honest I wasn’t very careful when making new installation. Anyway I made installation, I noticed that installation process didn’t recognise my Win 7 but only Mint 14, so I went on manual installation. Anyway I messed it up, so I had to go from scratch.
To say I am not pc expert, donno all the thing just simple user. Anyway I try to put just linux, 1st Mint than just Ubuntu. But result was I couldn’t boot anything of it. So I gave laptop to friend just to put me Win 7 on and I will put Mint later.
So he did, put Win 7 on and made 2 NTFS partition. Win 7 boots ok, so started Mint instalation and I have this problem.
Mint instalation doesn’t recognise Win 7 nor the partitions?? I remember when I had win and Mint 14 instalation didn’t recognize Win but id did recognize parititon.
Now nothing of both. That why I with Gparted in Live Mint checked HD and it doesnt recognize partitions, but on the other hand, Disks program of same Live Mint recognize partitions as NTFS and also Disks usage analyzer recognize partitions.
just to ask you if you could help me what is going on, 1st why installation don’t see another OS and why it don’t see no partitions?
Simmilar problem I found on this page with same error msg when I start Gparted.
http://forum.linuxmint.com/viewtopic.php?f=46&t=140573
If you could help me or explain the problem I would be very grateful.
P.S. thank you for this great text, you have explained lot of things in good way and also to help me to understand more about installations and partition.
Send me a screen shot of the manual partition step, and of the step just before that. Let me see exactly what the installer is detecting or not detecting.
Post any other details about the PC here, like what was the original OS that came with the PC?
Use the email at here to send the files.
Sry for not replying before, thank you for fast reply and offering help, but I hadn’t time to start another installation.
I did manage to put Mint 14 on it, I was using your text for making partitions but and easybcd for boot options.
Unfortunately it couldn’t boot linux because UEFI, EFI and other s*it.
Anyway I looked around what is this and manage to boot linux by disabling ‘CSM’ in bios. Only problem is that in this form it wouldn’t boot win unless I enable it again. I can live with that as I rarely use Win and if I need it it just 10 sec job to get Win boot.
Thanks again for great text and help with, linuxbsdos.com in now on my ‘watch’ list.
P.S. if anyone needed additional info I get on this pages :
https://help.ubuntu.com/community/UEFI
http://ubuntuforums.org/showthread.php?t=2147295
HELP! I have followed your guide. I made a 115 GB partition for free space, but it’s showing up in the partition list as “unusable.” I can’t figure out how to delete it. Also, this partition has robbed 115 gigs from Windows, so I essentially am out 115 GB and cannot use it.
That just means that you already have 4 primary partitions on the HDD before you resized one of the partitions. What do you have 4 primary partitins.
Btw, to understand why the free space is marked a “unusable,” read Guide to disks and disk partitions in Linux.
I figured out my issue with the 115 GB of unassigned space.
What did you do? How did you figure it out?