The latest ISO installation images for Linux Mint Debian, the line of Linux Mint based on Debian, were made available for download a few days ago. While it is one of the most user-friendly desktop distributions out of the box, the installer is any thing but user-friendly.
Though the default disk partitioning scheme works, you may find yourself in a situation that requires creating partitions manually. At such times, you need to have a good knowledge of disks and disk partitions in Linux to create the partitions you need.
If you did not know how already, this tutorial gives you a step-by-step guide on how to proceed. Though it is easy to follow, reading guide to disks and disk partitions in Linux will bring you upto speed on some of the basic concepts you need to know.
Like all Linux Mint editions, Linux Mint Debian’s ISO images are Live CD/DVD images. Download the latest release from here. Whether you download a 32- or 64-bit image, burn it to a DVD, boot your computer from it and watch as it boots into the Live desktop. Then click on the Install Mint icon on the desktop to begin.
The window you see next depends on whether the target hard drive is brand new or has existing partitions on it. If new, this is the window that will be shown to you. Click Yes.

That will prompt the installer to create the following partitions. As far as Linux distributions go, it is highly unusual to see an installer create default partitions where the first partition is the Swap partition. The boot or root partition is usually the first, followed by home or Swap. But this is how the developers chose to do it.

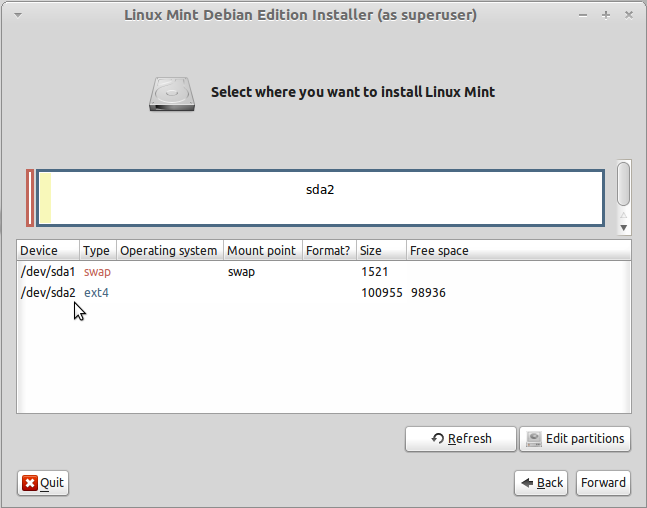
If there are existing partitions on the target disk, you will see a list of partitions that look similar to ones shown in the image below. Whatever the situation may be, whether the target disk is new or old, to create partitions manually, you need to click the Edit partitions button.

That should open another window, the GParted window. GParted (Gnome Partition Editor) is the tool the installer makes available for creating a custom set of partitions. The first task is to delete existing partitions. To do that, select each partition and click the delete button. (Use the position of the cursor as the indicator for where to click.)

After the delete operation is completed, click the Apply button to finalize it.

Now you are in business. Time to start creating partitions. Click the New button. Note: This step will have to be repeated for any partition you want to create.

Before going any further, here is the game plan. We know that the installer creates just two partitions (one for Swap, the other for the root partition). That works, but ideally, you want to create at least three partitions. Those three are for: Root, Swap and /home. Sometimes creating a separate partition for boot is also necessary. For this tutorial, that is exactly what is going to happen, just to show how to do it. So, the game plan is to create partitions for /boot, /, /home and Swap – in that order.
When you click the create new partition button, the window shown below should open. The task from here on is pretty simple: Specify the size for the partition in the New size box, select whether the partition is primary or extended, and when creating the Swap partition, select the appropriate option from the File system dropdown menu.

For the boot partition, which should always be the first partition, a size of 500 MB is more than enough. If this is the first partition on the disk, then it should be a primary partition. You do not need to specify the file system. That will be specified in the installer’s window, not in GParted’s. Click Add.


y is this kinda retarded? lmde not recommended and ext2 instead of ext4 ???
Is this “old”? I am trying to install Mint for the first time, and the Debian installer is completely different than this. It asks me about chroot, writing my own /etc and /fstab, and I have no idea what that stuff is.
But it basically tells me that I should simply delete my entire hard drive if I don’t know what that stuff is, meaning it is not in any way “newbie friendly” any longer.
If you are new to Linux, LMDE is not recommended. Try Linux Mint, the line that is based on Ubuntu. You can read all the reviews and tutorials that I’ve written about it at Linux Mint. You may download the latest edition from here.
I have made six LMDE installations on six different boxes using i5 and i7 processors no problems whatsoever, flawless installation with this partitioning guide; prior to finding this guide I could no pass partitioning, well I am a beginner, for the experienced users this may sound silly, but for those who are not, the road ends there.
THIS IS ABSOLUTELY BRILLIANT !!!!! I’ve been looking for a long long time, a hard drive partitioning guide, or tutorial for a debian based distro that is clear, concise, objective, simple, practical, one that will not leave guessing if I did it correctly. This is how a guide/tutorial should be made A million thanks to those who made this possible. This is going to make a lot of potential users very happy.
WOW, what a fantastic job. Congratulations !!!!!!
I made the first comment about this article and it is lack of benefits and got flamed. Just read the documentation of Gparted. Now they also provide as a live distro and you can do lots of stuff with it.
This tutorial may have sufficed back last April, but it isn’t working, now. First time I tried to preconfigure the partitions per the tutorial, and got a message saying the bootloader partition was too small. So then I started over with a brand new stick which only had a FAT32 partition, and through the installer’s version of GParted (which is different from Mint 13’s, which I’d used to pre-partition the first time), I reconfigured the partitions, still following the tutorial. It worked until it got to the bootloader at the END. It’s been in a hang now for about 45 minutes, claiming still to be configuring the bootloader.
This is the same problem I had when installing Debian itself to a stick, letting it decide what partitions to use. It also configured a boot of 524 MB, but it was FAT32, not ext2. And it also bombed. After, spending 15 whopping hours insisting on downloading updated package from the internet, which I couldn’t stop it from doing. So there I lost 15 hours and ended with the same problem, so it didn’t install, even though it closed and said the installation was successful. Wouldn’t boot, claimed to be looking for a hard drive in conjunction with the pen drive.
I don’t get the logic of installing the bootloader LAST. Nor do I understand why, if the boot is specified at a certain sdX, it doesn’t ‘remember’ to look there.
My Mint 13 pendrive installation went just fine, but with a very different procedure.
So now I’ll try redoing it, but will change the boot partition to FAT32 and make it 1GB or so.
RESULTS FAIL. Still the same hangup at the end, ‘configuring bootloader’ going on and on and on after all else is installed, with the result that you have to kill the process and everything but grub got on the stick. So the problem is in the installer. If the problem were in the size of the boot partition, or its formatting, something should have alerted the user to that. So a bigger partition and even on FAT32, didn’t help (I tried up to 2GB limit).
However, the install went faster when I used a 2GB FAT 32 as the boot partition, else nearly same specs as the tutorial (I’m using a Kingston 64GB pen drive, not a hard drive, but allocated 30GB to root, 20GB to home, same 4997 for swap, middle two inside extended partition which the installer reformatted from ext2 to ext4, each).
So, I quit trying. Mint 13 and Fedora 17 work well, the former using Unetbootin, the latter using its own hard drive installer. Pity.
Thank you, thank you, THANK YOU for posting this! I had made three unsuccessful attempts at installing this distro, failing because I’m still unfamiliar with the fine art of partitioning. Frankly, I don’t care if the author copied these instructions from a $hithouse wall – they WORKED SUCCESSFULLY for me and I am now running this distro. I was on the verge of giving up. I’m glad I found this information.
Thank you
I work a grave yard, 10:30 pm to 6:30 am and any help i can get is appreciated. The one thing to point out to the audience would be a partition in Linux is a partition in Linux yet its the GUI to the cmi that can be difficult to navigate at times.
As far as miss priss Leons, thats sad, must have been a full moon and needing some one to rag on.
Suggested partition size for /var would be good advice.
Thanks
Great guide. Simple and it works. I really appreciate the step-by-step with screenshots, along with the explanation about why/why not certain steps are necessary. I have used distros before Fedora Project, before Ubuntu, back when SuSE did its first LiveCD. The one thing I have always found daunting is partitioning, so I’ve always avoided doing it manually. Your tutorial made it a breeze. Thanks!
You are welcome.
i am fresh begginer in linux stuff ===>> TOTAL NEWBIE
i just wanna to say that this artice helpd me a lot and i dont care if it is an original or some copy of something, all i care is that it HELPD me understand how it is done (i hope i done it right and i hope it will work), and it pop up first on my google search!
THX to author
Leslie, my first distro was so long ago that we had to allocate different batches of punched-cards instead of partitions. Keeping the “Swap” cards in order was a royal pain. ;-))
I’m relatively new to all this and your tutorial helped me a lot. Thank you!
You are very welcome.
Actually, it is nothing but Gparted documentation. I don’t see any contribution. I don’t usually post negative comments but yours is not a big contribution
So the text and images were all from GParted documentation? Have you read GParted’s documentation?
My comment was not a personal attack to you. Please don’t take it personal. Only your article does not contain some new information but looks like a time filler. I appreciate you and every one who contributes into Linux world. my $.02
And your negative comment is more than a “time-filler”? I’m a user/developer of Unix/Linux for 32 years. The contribution for beginners pulls together and simplifies some of the varied intro material on partitioning in a thoughtful & conversational style that is frequently appreciated by people less-knowledgeable and more timid that people such as yourself. If you have something constructive to add, please do so. If you were looking for specific additional information, you can ask for it. Surely, some one has done so before, but you would at least not demonstrate your grumpy negativism. Someone might even try to help you without disparagement.
Thanks but no thanks for your $0.00 contribution. What is this issue got to do with your 32 years of knowledge? Linux really did not take off because of the brains like yours who can not even read a constructive criticism. I don’t remember asking for any help from you. The main issue is, this article gets shared around on the internet while doesn’t really bring new content into the help area but like chewing the same gum. Try to understand my comment before jumping into.
Michael L.,
what the **** is your problem? A brilliant article to ease the introduction for a newbie into the “scary” world of partitioning a hard disk! So what if one can gather all this from “the official documentation”? Does the article contain any errors? Has the author offended someone? DOES IT MATTER IF YOU DO NOT REAP BENEFIT FROM THIS? No, because plenty other “newbies” will! Take your “$0.2” and spend it somewhere else, please!
Hi Ben,
I concur with your response about the value of the article.
My very first distro was Fedora 6, and therefore it is the one I know best. I did use Mint, but somehow, after a month of updates, it refused to boot. This happened more than once on different systems.
With Fedora (anaconda installer), and what appears to be anaconda in Linux Mint, I found that the best approach was to use gparted to define the partitions, and then delete the partition which I wanted anaconda to choose.
I would have loved to be able to use a GUI interface like Gparted, as part of the installer. This should be possible and desirable. I can think of simple ways this can be done.
And by deleting a partition and telling Mint to use the empty space, all I have left is to indicate which drive to use to install grub2.
Leslie in Montreal
Wow. My bad. I misunderstood what your point of view was. Guess I’ve been reading waaay too much about SOPA, etc. I thought you were advocating the Web be restricted only to *original* content that actually *adds something of value*.
I wish more people like yourself–those that have a firm grip on judging what constitutes “originality” and “of value”–would post their thoughts on the matter as you have.
Oh, wait…they couldn’t post comments similar to your own, because, by definition, that content wouldn’t be “Original” or of “Added-Value”? Unless, would you be OK with posting web content that repeats what was online elsewhere so long as it had some kind of existential value?
I’m not sure if it would be “Original” to do so, but you just might want to elaborate on & post what you consider “Original” and”Added-Value”, so we could propose your observations, rules, formulas and criteria to the W3C for formal consideration. We’d also, of course, need to qualify/elaborate on some of the darn detail implode a good presentation.
It it not correct that your guiding critique applies to (*virtually) all content on the Web, not just the example before us consisting of educational material, such as “tutorials”?
It would speed adoption of the asserted content standard if you would provide us a robust model for quantifying the monetary value of content, as you demonstrated for us. While we would need to present specific logic, formula, syntax and valid processing methodology, I think it can be readily deduced the broad applicability said model would have regarding Web content.
Would content put online and addressed to one demographic or group, or presented in one context, knowledge-domain, language, presentation style, media type and/or vocabulary-level be considered “Original” or “Added-Value” if it was presented in a totally different context, knowledge-domain, language, presentation style, media type or vocabulary-level, etc.?
I think we can all agree that simply changing font size, color, page dimensions, underlying web-coding technique or sense of humor employed would not sufficiently differentiate content expressing the same “meaning” (same context or otherwise, TBD).
Lastly, expect significant push-back from Google, as the de-duplication and expungement of un-originality on the Web will have significant impact on their Adsense cash cow (although “overlapping content meaning” may provide sufficient room for negotiation…?)
Please kindly note, none of the above is meant to judge you personally for “Originality” or “Added-Value”. It’s just that I found dark humor in your comments, and wanted to share some back. This has also helped me distract myself from the dentist…that is apparently ready to seem me now.