Ubuntu Desktop 11.10, code-named Oneiric Ocelot, is the latest stable release of Ubuntu, a Linux distribution whose development is sponsored by Canonical Ltd., a Linux software provider with headquarters in the UK.
Aside from Ubuntu, Canonical also sponsors Kubuntu (based on KDE, the K Desktop Environment), Lubuntu (LXDE, the Lightweight X11 Desktop Environment), Xubuntu (Xfce), Mythbuntu (built around MythTV), Edubuntu (education-oriented packages) and Ubuntu Studio (centered around multimedia packages).
32- and 64-bit editions of all are released at or about the same time. Ubuntu provides three different installation ISO images for download – Ubuntu Desktop Graphical Installer (CD image), Ubuntu Desktop Alternate Installer (CD image), and Ubuntu Desktop DVD edition. This review is based on test installations of the 32-bit versions of all three on real hardware and in a virtual environment. Keep in mind that the DVD and Graphical Installer images use the same installer. The DVD edition just contains more language packs.
This is a screenshot of the boot screen of the Alternate Installer edition. Installation begins from the boot menu. There is no Live mode.

This one is of the DVD image’s boot screen. Like the CD edition with graphical installer, it has a Live mode and an install mode.

Installing A New System: Depending on the installation image you choose to use, you might get a point-and-click graphical installer (Graphical Installer and DVD images), or an ncurses based one (Alternate Installer image).
Except for a few minor differences, the installation program in Ubuntu 11.10 is the same available on recent releases. One not-very-significant difference is that in this release, the advice to ensure that the computer “is plugged into a power source” has been removed, leaving just “is connected to the Internet” and “has at least X.Y GB available drive space.” The minimum drive space recommended when using the DVD edition is 8.6 GB, and 4.4 for the CD images. The recommended minimum for the DVD edition is more than double the disk space consumed by a new installation.

The graphical installation program is just a simple, point-and-click installation program with little or no advanced features. It does not have support for the Linux Logical Volume Manager, LVM, RAID or disk encryption. What is considered an advanced tool in this installer is not really advanced, but more like a tool for advanced users, that is, those with expert-level or advanced knowledge of disk partitioning in Linux. That level of knowledge, or a good tutorial, is needed to use the advanced partitioning tool, shown below, to create a custom set of partitions.

The truly advanced installation program is only available if you use an Alternate Installer image. Though not point-and-click, it has all the features I expect to see on a modern Linux installation program – LVM, RAID and disk encryption. Like the graphical installer, it has automated and manual installation options, so you do not need to have an expert level knowledge of disk partitioning in Linux to use some of the features. But if you want to exercise complete control over how the system is partitioned, you might want to read this tutorial. It was written for Ubuntu 11.04, but the steps still apply to this edition.

Regardless of the installation image or program used, the default file system is ext4, with btrfs, ext3, reiserfs, xfs and jfs as optional journaling file systems. By the time you are done with a new installation, you would have a system that takes up 2.7 GB of disk space, if you used the graphical or Alternate CD installer, or 3.7 GB, if you used a DVD installation image. Because of the additional features it offers, I always recommend that an Alternate Installer image be used.
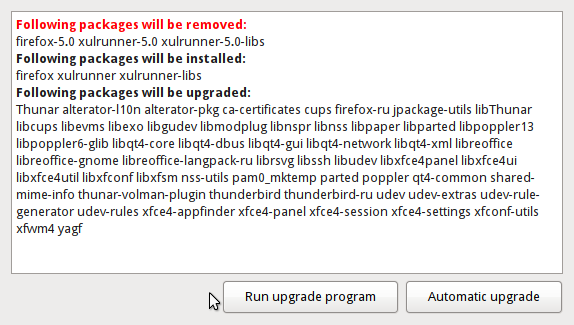
Upgrading An Existing Installation of Ubuntu to Ubuntu 11.10 is pretty straightforward. On a test system running Ubuntu 11.04, fully updated, the following window was displayed when the system detected the availability of a new version. The new version was, of course, Ubuntu 11.10. The upgrade process is completely automated.

Even when there are obsolete or orphaned packages that need to be removed, the upgrade script does it for you. This makes the upgrade process in Ubuntu better than Sabayon’s, where orphaned packages have to be manually removed. (See Sabayon 7 GNOME review.)

At the end of the upgrade process, I had changed an existing installation of Ubuntu 11.04 with a core of Linux kernel 2.6.38 to one running Ubuntu 11.10 with a core of Linux kernel 3.0.0, with no loss of existing data. Very nice. Though I did not backup my data because there was no useful data on the system, it is always a good idea to keep a backup of your data before an upgrade. You just never know.
Logging In And Using A new or upgraded installation of Ubuntu 11.10 means interfacing with LightDM, a nimble display manager with a Webkit back-end. It is the replacement display manager for GDM, the GNOME Display Manager.
From the login screen, you could log into the system using the user account created during installation – on a new system, any existing user account – on an upgraded system, or a default guest (Guest Session) account courtesy of LightDM. This screenshot of the login screen shows the onscreen keyboard activated.


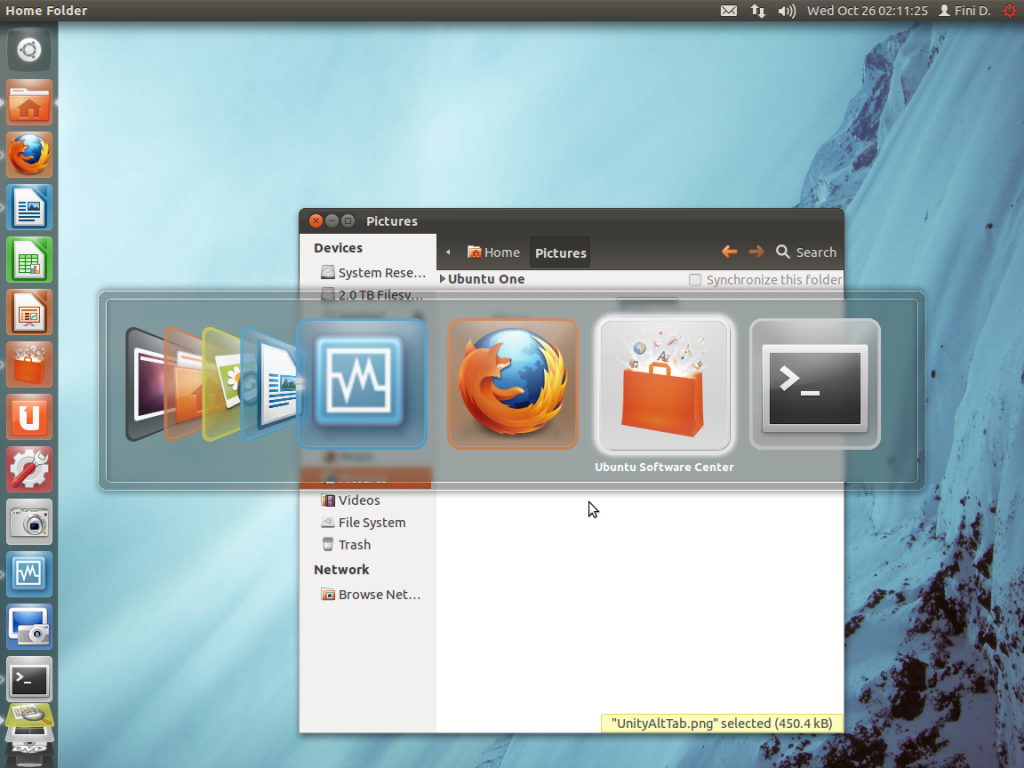


@finid:
What do you think of the disappearing global menu and the Mac OS-like left positioning of the window buttons.
(Would have used Ubuntu 11.10 to introduce folks to Linux. Looks like it’s going to be Mint 12 – the RC runs great on my ThinkPad T61 so far.)
I’m surprised you prefer Unity to GNOME Shell 🙂 Great review BTW.
Thanks.
I’ve been using Ubuntu almost exclusively for the past 3 weeks. Overall, it’s not much better than GNOME 3. These new desktops look good at first glance, but with time, you get to see how much they get in the way.
Mint 12, with MGSE looks a little bit better, but also not by much. That’s my opinion after 1 day of use. Might change my opinion after a week or two, but certain aspects of it are just as annoying as the others.
Eventually, I’m moving back to KDE 4. With this pair, desktop computing will be a lot less annoying.
Unity, GNOME, KDE:
KDE has weathered the storm of transitioning from 3.x to 4.x & has now been polished beyond imagination. (Waiting for Chakra/Pardus/Mageia to mature.) Hopefully, Unity & GNOME will evolve into awesome interfaces too. GNOME-Do + Cairo-Dock helps get around some of the aggravations of Shell. Been using Mint 12 RC since release… I like it so far.
You might have already seen this, but Unity is a lot more usable using keyboard shortcuts. I even had this as my wallpaper for a while http://www.webupd8.org/2011/04/ubuntu-unity-keyboard-shortcuts.html
Yeah, with MGSE, GNOME shell should be easier for my parents (fervently hope so :)). Otherwise, I’ll just have them use LM 9. I’m choosing Mint for my folks ‘coz Clem & team really seem to make sane decisions and using feedback well. Hope Mint supports LVM, btrfs & disk encryption in future.
Thanks for your reply.
I have literally experience non of the problems you guys are having with the ram usage and hardware. I’ve tweaked up ubuntu 11.10 enough so that i will be able to get some things on. If you guys read at all, they made ubuntu less configurable because they wanted to get the defaults down before they could have people start tweaking it. This makes SO MUCH sense because its a WHOLE new UI. They are going the right way with this, obviously there needed to be a change if Linux still wasnt going forward as much as it could. I can guarantee you that gnome 3 wasnt going to change that so ubuntu decided to try their own thing.
haters gonna hate for the sake of hating. I install this on a wide variety of machines, it works perfectly and unity is good. don’t listen to the haters, their just hating to hate.
Wow, seriously, for the first time since 1995, I have actually come across a Linux distro which I’m embarrassed to show to my colleagues. It’s buggy (I keep getting a “black screen of death”!!!), sound is broken, unloading USB drives crashes the kernel with a kernel panic, directory structure is broken (/var/run/), Unity is a POS that would make Microsoft 3.1 proud, and overall the entire experience with the entire OS feels lethargic and constraining which is exactly the opposite feeling to what Linux normally provides and the reason I have avoided other operating systems.
I truly truly truly am disappointed in this version of Ubuntu.
I can forgive a lot, but in this case we should take the Ubuntu decision makers who approved this POS and give them some serious atomic wedgies. How could they approve this for general distribution?
i have successfully installed gnome-shell from the software center in few minutes which also come with gnome classic session (an option not offered by any other non ubuntu based distro.and installed kubuntu and xubuntu on top of it and all work flawlessly especially kubuntu (now snappier than sabayon).debian is an untamed outdated distro, mint is ubuntu after 3 weeks of tweaking (when all the bugs are already fixed),claiming that they are something else is absurd and hilarious(it takes them a month to make it while it takes ubuntu 6 months and opensuse 8-9 months! yeah we believe them!!).ubuntu is premiere linux distro for a reason (taking chances)and they have the best developers, jealousy is cancer of opensource community and it stinks .
OpenSUSE has an 8 months release cycle so it will be more stable and also to align with KDE releases.
Ubuntu has become too buggy and broken. That’s why people are starting to turn away from it.
I have used Unity from time to time. But I have problem with it as describes here(translated with google):
http://translate.google.se/translate?sl=sv&tl=en&js=n&prev=_t&hl=sv&ie=UTF-8&layout=2&eotf=1&u=http%3A%2F%2Fpavel.frimix.se%2F2011%2F10%2F13%2Fubuntu-11-10-oneiric-ozelot-ar-har-2%2F
So I prefeer the latest KDE distributions now. But I probably will come back to Ubuntu later.Next version will be a LTS.
I guess it is secure;if you can’t even use your own desktop how could someone else use it? I can’t even imagine someone not out of their mind putting trash like this out for the public to use. This is the worst trash I’ve ever seen and makes Microsoft look good which is hard to do.
Yeah well I understood Gnome 3 was in the software center.I couldn’t find it ;or even other things I was used to finding.I would try Gnome 3 but maybe it is time to try Fedora or maybe Debian. I found similar problems in Kubuntu except for that *** awful Unity. Yes Kubuntu 11:10 was broken too if you try to use it on wi-fi.
I was looking forward to the 11:10 until updating broke my laptop dualboot. I put it on my desktop to see what it really is like. Ubuntu 11:10 reminds me of Windows Vista yeah IMO it sucks that bad.I like Mint better on a desktop anyway and heck Super OS is Ubuntu plus but I can’t see myself ever using Ubuntu again unless they fix this mess like 10:10 which I had to put on my destroyed laptop. I guess I was a fool but I trusted Ubuntu lol never again.
Ubuntu isn’t actually using 2 GB of ram -but rather RESERVING IT. Different than Windows. Unity 2D iin 11.10 is great especially if you’re having any problem with speed or unresolved bugs (new OS’s allways have them)
I have been using Ubuntu for years now. I have frowned a few times but, they seem to fix it before I get time to complain. That is until now; 11.10 is junk and has forced me to go back to 10.04 LTS. I hear Gnome has done the same thing messed up a great desktop
I used Ubuntu for 6 years now and made other use it too, but this last version is the worst ever, I find myself with tied hands if front of it, that freakin’ launcher drives me crazy, all the flexibility is lost. I still hope ubuntu guys will come to their senses and dump the unity or make it usable, until then I am not using it and recommend the same to others.
good luck ubuntu!!!
I compared GNOME3 and Unity. My opinion is thay Unity is better ( http://linuxblog.darkduck.com/2011/10/gnome3-vs-unity-on-ubuntu-1110-my-score.html )
But neither of them is good enough to keep me. I’ll probably stick to my current Mageia 1 KDE, or maybe switch to Kubuntu, which I still have to try in installed mode.
I use ubuntu because it was simple and easy, and I was using it for years. But everything is lost. Unity not only drives me crazy and it slows down my PC. I can’t get a single work done. Useless at all. I have switched to OpenSuse. It’s great and that’s better.
If you have a PC with less 2 GB of RAM, it will definitely slow it down. I’m writing this on a PC with 4 GB of RAM and the output of free -m says that it is using more than 2.1 GB of RAM, with just Firefox (2 tabs open) running. That is a huge memory footprint.
In spite of that and several other issues, I’m warming up to it.
Unity makes me physically ill. KDE 4.0 was 1000 times better than Unity will ever be, and we all know how godaweful that was.