 Say, you have a Linux Mint 10-powered computer that you share with a friend or family member you do not completely trust. How do you continue to give this friend or family member access to your computer and still keep your data private? You have two options. The first is to let your guest use the built-in guest session. The other option is to create another user account with limited privileges. This second option is the recommended one, for reasons that will be presented later. But before we get to that, let us take a look at the first option, which is the built-in guest account, or the GDM Guest Session.
GDM Guest Session: The GDM Guest Session account is a temporary account that can only be started from a current real user session. You have to be logged in to an active session. The script used to start the Guest Session is installed by default. To use it, launch a shell terminal and type in the following command: /usr/share/gdm/guest-session/guest-session-launch. The GDM Guest Session has very limited privileges. However, the requirement of having to start it from a current session might be too inconvenient for some users. The best option is to create another user account.
Create New User Account: If you want a more permanent solution, launch the Users and Groups utility – Menu > Administration > Users and Groups, to create a real user account.
You will see all existing user accounts on the system. If your system is a new installation, the only account you will see is the one created during installation. To create a new account, click on Add.

Fill in the account information. You have the option of encrypting the account’s home folder. However, for a guest account, this is not necessary. OK.

Next step in the account creation process is to set a password for the account. There is the option of letting the system generate a random password. However, system-generated passwords can be difficult to remember, something that is not necessary for a guest account. Passwordless logins is possible if you enable “don’t ask for password on login.” OK.

Back to the main account manager window. The new account is shown below or above the existing one(s). Because it is a “Desktop user” account type, this new account will not have root privileges. To view the other account types available, click on Change next to the Account type.

Aside from the Desktop user, there are two other account types – the Administrator, and the Custom.

These are the default privileges that a Desktop user account type has. If you make any changes to the default privileges, the account type changes to Custom automatically. You get to this window by clicking on Advanced Settings on the main account manager window.

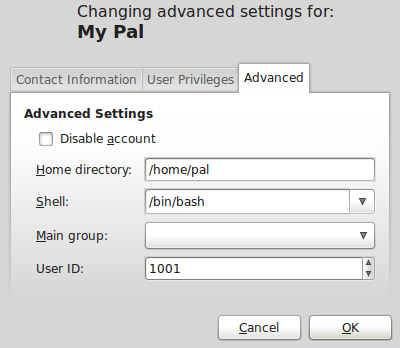
If your guest leaves, or you just want to deny access to use of the computer to your guest, you can disable the account from the Advanced tab of the Advanced Settings window. That is all there is to managing new user accounts on Linux Mint 10.


This is just what I’m looking for.
BUT, we’re up to Mint 16 now. The “Don’t ask for password on login check box” is disabled.
Any way to enable it or make the setting at the command line?
The Users Groups utility for Cinnamon does not have that option. Looks like the command line is the way to go.
Ok. And what command to use?
I looked at…
useradd
usermod
groupadd
groupmod
passwd
chfn
…and didn’t see that any of them included parameters to enable an account to auto-login.
Ok, forget all that.
Open Systems Settings, then under the Administration section, click on the Login Screen module. After authenticating, click on the Auto login tab. The option is right there. You may also want to enable “Automatically select the last logged in user” under the Options tab.
Note. You may have to reboot the computer for it to work. Please post an update.
The problem is that the setting you describe on the Options tab *is not* enabled.
I tried going to the command line bcause your earlier post said “The Users Groups utility for Cinnamon does not have that option. Looks like the command line is the way to go.”
Do you know the command to use for this setting?