The next partition is going to be for swap. To ensure that the Suspend feature works properly, it is recommended that the disk space allocated to swap be a little bit more than the amount of RAM installed on the computer. I always like to assign 5000 MB (5 GB). OK.
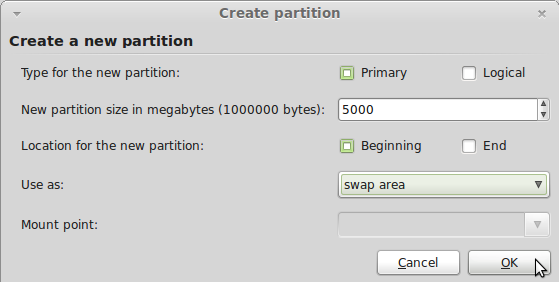
Create swap
The third partition to create will be for /, the root file system. The fact that a new installation of Mint 10 takes up less than 3 GB of disk space (about 4.5 when installing from a DVD image) should be give you an idea of how much disk space to allocate to this partition. Try 15 to 20 GB. That should give you plenty of room. Depending on your needs, it might be necessary to create separate partitions for the other major file system directories, like /usr, /tmp, and /var. In that case, the space allocated to the / partition should be much smaller, especially if /usr is on a separate partition.OK.
Note: The first two partitions were primary partitions. This third partition was created as a logical one. If the last partition is also a logical one, you are left with an extra primary partition to use. You do that for insurance purposes.
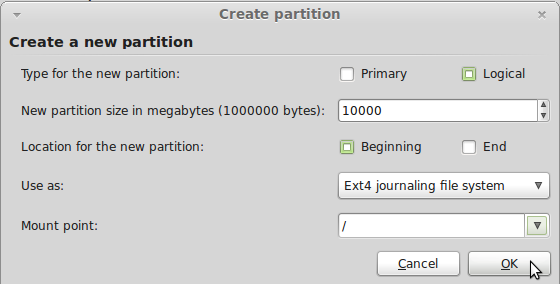
Create partition for /
The last partition will be for /home. The file system type is ext4, the default, and the mount point is, of course, /home. Like the previous one, this partition is also a logical partition. OK.
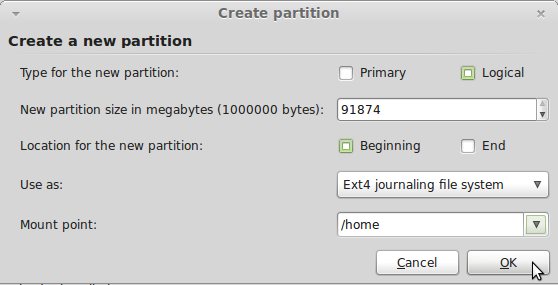
Create partition for /home
This is the last image related to disk partitioning that you will see. Double-check your work, and if you are satisfied, click on the Install Now button to continue with the rest of the installation.
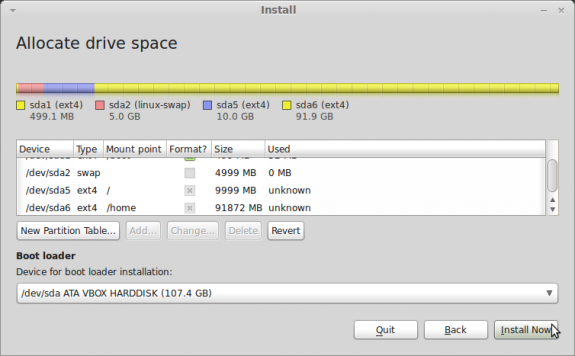
All partitions created.
Resources: Download Linux Mint 10 here, and read more tutorials on Linux Mint here.

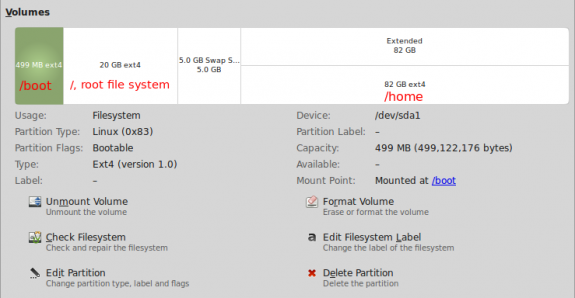


500MB boot seems large from what I have read. Maybe I am misunderstanding; does this contain the necessary files to get linux running or the who of the linux OS?
I think Fedora was the first Linux distribution to assign 500MB disk space to a boot partition, when it was recognized that upgrading a system uses up far more than the usual default disk space assigned to boot, so those system tend to have issues during an upgrade. While 500MB over-compensates to solve the problem, it doesn’t hurt the system in any way. Consider it an insurance policy.
Keep in mind that less than about 30MB of the disk space assigned to the boot partition is typically used up on new Linux installations, so you can go lower than 500MB if you do not have the disk space to spare.
And yes, it contains “the necessary files to get linux running.”
Hi, I’m a new user to Linux… I have downloaded Linux mint 10 from the Linux website but, when i tried to install it on my Desktop, i’m unable to complete the installation because when it comes to the window “”who are you?”” My forward button shows as Unavailable… I have filled all the fields correctly but still no result…. Please Help….
I think you use uppercase in “Pick a username”. Use lowercase letters.
– this newbie lesson is super: short & sweet
-thanks to it,at long last, the penny has dropped & my numbskull brain’s door has creaked open! ManyThanks
cheers