![]() The installation program on Ubuntu desktop is pretty basic. It lacks the other features, like support for LVM, RAID, and full disk encryption, that the Ubuntu text installer edition has. By default, it creates just one partition onto which it installs everything. If you want to install Ubuntu on a disk with separate partitions for the major file systems, you will have to partition the disk manually.
The installation program on Ubuntu desktop is pretty basic. It lacks the other features, like support for LVM, RAID, and full disk encryption, that the Ubuntu text installer edition has. By default, it creates just one partition onto which it installs everything. If you want to install Ubuntu on a disk with separate partitions for the major file systems, you will have to partition the disk manually.
This tutorial presents a step by step guide on how to partition a hard disk manually for installing Ubuntu 10.10. Note: This tutorial covers installation on a computer with a single disk and no other operating system already installed.
The image below is the first during the installation process where disk partitioning is about to begin. Like virtually all graphical installation programs, the Ubuntu installer is capable of detecting the presence of another OS on the disk. If there is, it is also capable of installing itself alongside the other OS – if you opt to. For this tutorial, the option to select is “Specify partitions manually (Advanced)”. That option offers the freedom to partition the disk anyway you want. Click on the Forward button to continue.
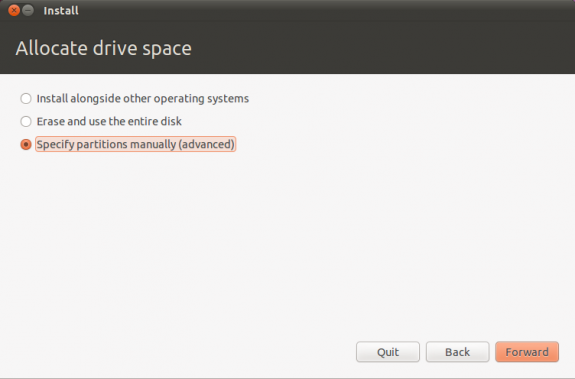
Select manual option
The hard drive on the computer used for this tutorial is about 640 GB in size, but I am going to use just a fraction for this installation. The rest will be used to installation another OS in a dual-boot configuration. I could have installed the other OS first and then Ubuntu last, but it does not matter. It works either way. Note: If the other OS is Windows (any version), always install it first, then install Ubuntu last.
To begin creating partitions, select the free space and click on the Add… button.
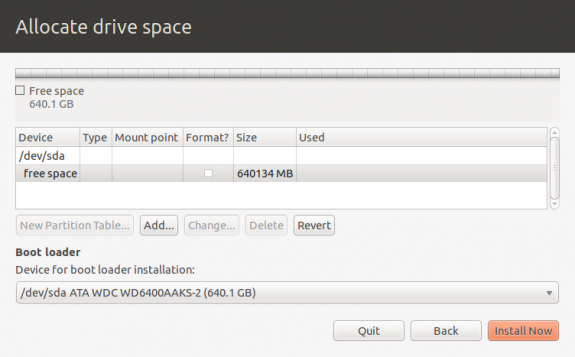
Select free space to start creating partitions
In a default installation of Ubuntu, the installer creates just one primary and one logical partition. The primary partition is for /, the root file system, while the logical partition is used for swap. In this tutorial, we are going to create three primary partitions (one less than the maximum of four allowed by the traditional disk partitioning system), and one logical partition.
The first primary partition will be for /boot, which is the file system where boot-related files are kept. The space requirement of this partition is minimal.About 500 MB is recommended. For file system type (Use as), the default is Ext4 journaling file system. The Mount Point should, of course, be /boot. OK.
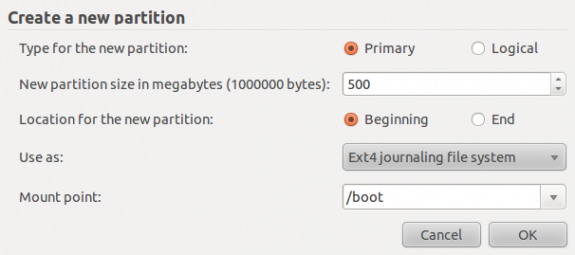
Create the /boot partition
With the first partition out of the way, repeat the process to create the next partition, which will be used for /. Note that by default, the installer will try to create any partition after the first one created above as a logical partition. So be sure to select Primary. Sticking with the default, that is, Logical will not break anything, but it just does not make much sense. The size assigned is 20 GB, and the mount point is, of course, /.
Keep in mind that a default installation of Ubuntu 10.10 takes up less than 3 GB of disk space, so 20 GB is more than enough for /. If you intend to create separate partitions for the other major file systems, like /usr, /tmp and /var, you may reduce the size allocated to this partition. OK.
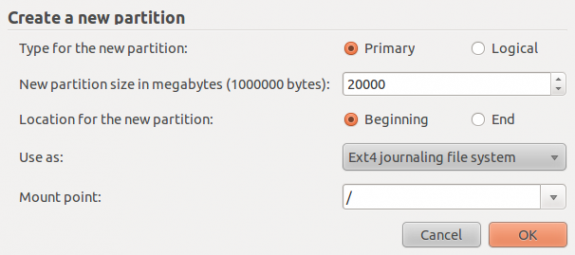
Create the / partition
The next partition, which will be the last primary partition, will be for swap space. If I have the disk space to spare, I normally allocate about 4 GB to 5 GB to the swap partition. For Use as, select swap area. OK.
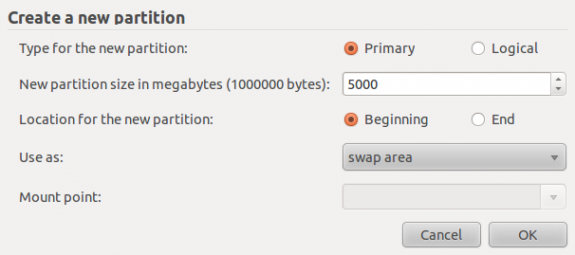
Create the swap partition

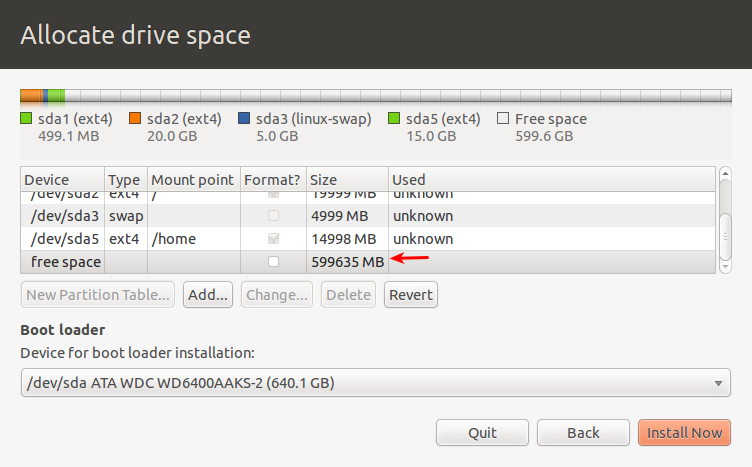




Can you help me? My older brother installed Linux on my computer and created another partiton just for other data, like files, gtames, images and so on. And he left, not telling me how to swap partitions from the main one, with ubuntu system files to the other, memory one. I would be glad if you can reply, as I couldn’t find anything.
Apkarp
Provide a little bit more detail, and we’ll see if we can help. What operating systems are installed on the PC?
Have you called your bro to find out exactly what he did?
I don’t have contact with him right now, but I was watching what he was doing. First he started installing Ubuntu, and created a system partition, on which system was saved. There is a little place for files too, but it’s not much, then he added a swap partition and a partition only fro files, with no system on it (not sure how is it called though). I have only Ubuntu on my computer. Ah, and he said, that he is adding a partition, so if someday I would install windows, then files on this partition could be used from both linux and windows
Sorry for my english, I’m from Poland.
Ok, what do you want to do, that is, what do you want help with? What edition of Ubuntu is installed on the PC?
Also, can you post the output of “df -h”. To do that, open a shell terminal, then type “df -h” without the quotes. Then, copy and paste the output so we can see what the partitioning scheme looks like. I think your bro likely created an NTFS partition, but post the output and let’s confirm.
I have Ubuntu 11.04, but I use ubuntu classic skin (probably it doesn’t change anything, but in case of…)
/dev/sda1 33G 24G 7.6G 76% /
none 1.6G 680K 1.6G 1% /dev
none 1.6G 1.4M 1.6G 1% /dev/shm
none 1.6G 216K 1.6G 1% /var/run
none 1.6G 0 1.6G 0% /var/lock
/home/adam/.Private 33G 24G 7.6G 76% /home/adam
This is what was shown when I entered “df -h”, but I’m kinda sure, that I have more memory there… But I am still learning very basics of Ubuntu, so probably I’m wrong.
My instalation gets stuck at “detecting file systems” ? please help me out. how to continue instalation after that.
Have you tried restarting the installation? What are our hardware specs?
Btw, I hope you are aware that Ubuntu 11.10 has been released. If you are going to install a distro, you might have well install the latest. See the review here
I have one physical and one logical for my WinXP. When I try to install Ubuntu 10.10, I cannot create more than 2 partitions. May I know how to do it? (creating 3 primary and 1 logical as shown in this example)
I tried to partition in my WinXP first, but I found out now, I can only create logical partition in WinXP.
Please advise. Thanks
If you have 1 primary and 1 logical in WinXP, how does Ubuntu’s installer see them – /dev/sda1 and /dev/sda2, or /dev/sda1 and /dev/sda5?
In either case, you can only create two more primary partitions because the system will not allow more than 4 primary partitions. That’s the way it is.
If the installer recognizes the partitions as sda1 and sda2, you can create the first partition as a primary partition, and subsequent partitions as logical. In this case, the first partition created will be /dev/sda3, and the logical partitions will be /dev/sda5, /dev/sda5, etc.
If your goal is to dual boot WinXp and Ubuntu, these tutorials could be of help:
Hey, I’ve installed Ubuntu 10.10 with no swap, and now I want the system to use a swap memory. With GParted I created the swap space and formated it for doing that, and now this memory is not in use. How do I make Ubuntu see and use this swap memory? Thanks in advance!
I think you have to add an entry for it in /etc/fstab.
Here’s what an entry in Linux Mint 10 looks like:
proc            /proc           proc    nodev,noexec,nosuid 0       0
/dev/sda3       /               ext4    errors=remount-ro 0       1
/dev/sda1       /boot           ext2    defaults        0       2
<strong>/dev/sda2       none            swap    sw              0       0</strong>
Be sure to change the file system (/dev/sda2 above) to match your system.
Btw, I did not know that you could install Ubuntu without swap.
Hey, I am wondering how I get past the ‘Detecting File Systems… 0%’ stage?
A little bit more info will help us help you. What exactly is happening?
agreed! no ext4 for /boot, this is a case where journaling doesn’t apply. ext2 is sufficient and faster.
and further i can’t see anyone needing 20GB for /, ever! unless they are using /opt for extra programs. 8GB should be a super dooper liberal amount even for the most “load every program from the repository and never clean apt” kinda user.
You love troubles. Or is there other reason why you formated /boot with ext4 fs? ext2 is far better option for /boot partition…
If that’s the case, then the Linux community loves trouble because ext4 is the default everywhere.
Yes, they love troubles and they use GRUB2… 😉
Another note: the Ubuntu desktop installer is pretty lo-fi. But you can use encrypted partitions with it anyway. Just prepare your partitions with fdisk, set it up as LUKS, pre-mount the crypted partitions, and start the installer afterwards. It will pick those settings up. However, it requires some post-processing still (chroot to target partition, adapt fstab and crypttab, and install ‘cryptsetup’ package to have boot image updated).