![]() Fedora 13 is one of the Linux distributions that supports and uses Linux Logical Volume Manager (LVM) as the default disk partitioning scheme. While this is a good thing (it has its benefits), the space allocation to the partitions and logical volumes is not optimal. This tutorial provides a step by step guide on how to configure LVM (on Fedora 13) in a manner that satisfies the basic guidelines of LVM configuration.
Fedora 13 is one of the Linux distributions that supports and uses Linux Logical Volume Manager (LVM) as the default disk partitioning scheme. While this is a good thing (it has its benefits), the space allocation to the partitions and logical volumes is not optimal. This tutorial provides a step by step guide on how to configure LVM (on Fedora 13) in a manner that satisfies the basic guidelines of LVM configuration.
So if you have the installation disk ready, insert into your computer’s optical drive and let’s get started. Note that this tutorial involves a computer with only one hard disk.
You may or may not get to see this window, but if you do, just select the disk you would like to use for the installation, then click “Next.”
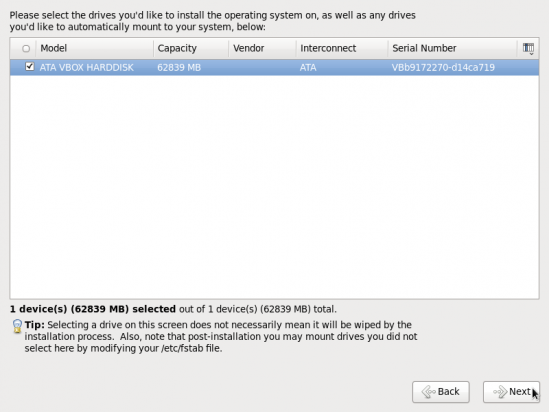
Select disk to use for installation
Fedora 13 gives you all kinds of options here. Because Anaconda’s default allocation of space to /boot and logical volumes does not make sense, we want to create a custom configuration. So select “Create Custom Layout.” Next.
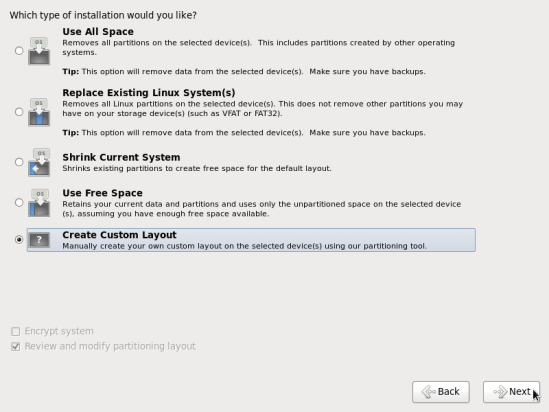
Select partition mode
The disk should already be initialized. So select the free space and click “Create.”
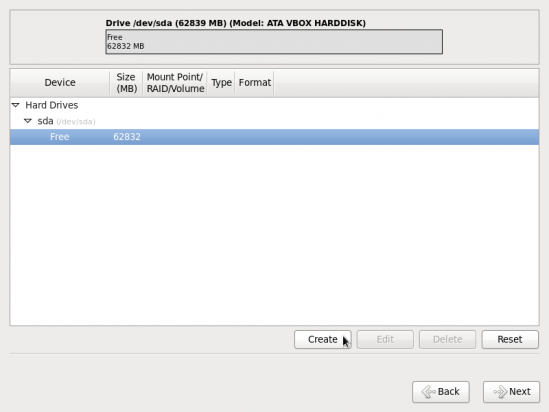
Select initialized free space to partition
The first partition we must create is a standard partition for /boot. Create.
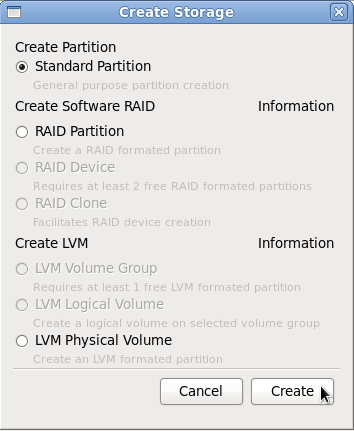
Select the Partition type to create
To create the partition for /boot, select the options as shown in the image below. The size does not have to be 100 MB. For guidance, a default installation of Fedora 13 uses only 28 MB of the disk space allocated to /boot. OK.
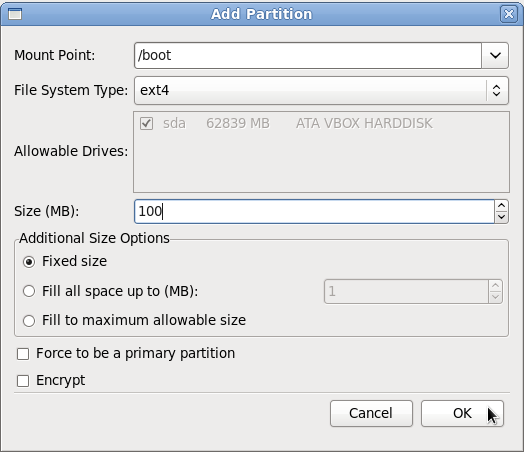
Create the /boot partition
With the partition for /boot created, select the remaining free space and click “Create.”
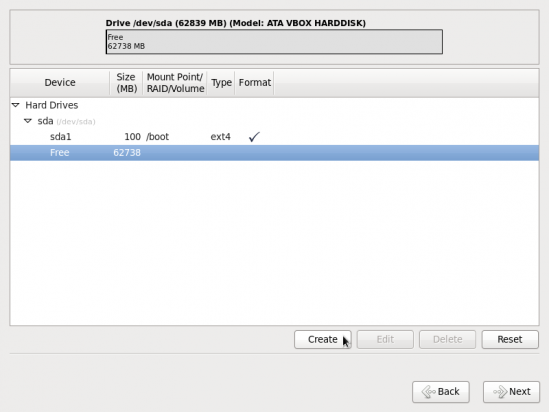
Select the free space to create additional partitions
The option to choose here is LVM Physical Volume. This just means that we want to initialize the free space for use by LVM. Create.
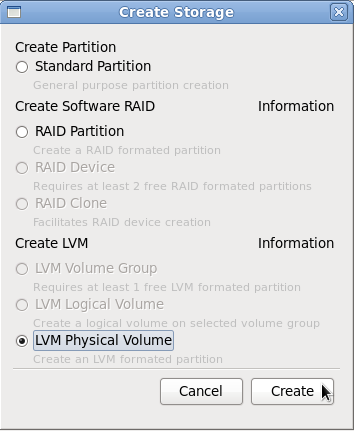
Initialize the free space for use by LVM
The File System Type should already be pre-select. If not, click on the drop down menu and select “physical volume (LVM).” Click the “Fill to maximum allowable size” radio button, and to encrypt the disk, check “Encrypt.” OK.
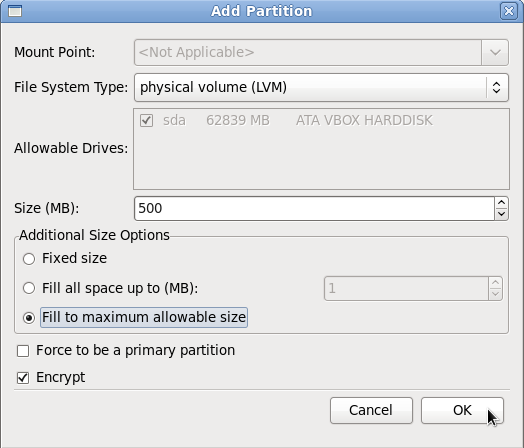
Specify the properties of the physical volume (PV)
With the physical volume created, make sure it’s selected and click on “Create.”
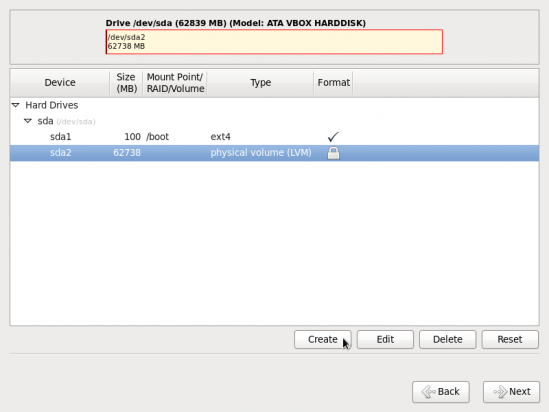
Select the PV to create the volume group (VG)




Thanks, I am facing trouble with Fedora 14 installation on a new 1 TB hard disk. Got help from this site and now it is successfully created. Great tutorial. Thanks again.
Anil
my machine is dell inspiron1440 with intel i3 processor. I have installed windows 7. Now i want to do a dual installation. I am having 32 gb of free space in that. I am getting all the above screens but when i select OK in the Add Partition Screen it Gives me the following message.
Error Partioning (Dialog)
Could Not allocate requested Partitions:
not enough free space on the disks.
while there is free space available in the disk.
following are the partitions of my disk.
HDD 320 GB
window7
sda1 100 Mb ntfs
sda2 76700 Mb ntfs
sda3 113664 Mb ntfs
sda4 81920 Mb ntfs
Free 32860
On the “Installation type” window, the second image in this tutorial, what option did you choose? Given that you said that your disk has space already marked as “free,” you should select the “Use Free Space” option. Make sure to check “Review and modify partitioning layout” before clicking the Next button.
Once the installer creates the default layout using the free space, then you can modify it.
By the way, how many logical volumes are you trying to create and what are the size allocations?
It’s not a good idea to use a boot partition smaller than 500MB. Fedora upgrades require that installation images be copied to the boot partition and will take considerably more than 100MB. Fedora 13 uses a default boot partition size of 500MB (increased from 200MB) specifically for this reason.
Please don’t advise people to create such a tiny /boot partition.
First, sure only 28MB or so is used after the installation. That’s because the churn has finished, and there’s only one kernel installed. When kernel updates are available, Fedora installs up to three kernels at the same time, so that if you have trouble with later kernels you can still use earlier ones. /boot needs to be large enough to allow this.
Secondly, more wiggle room is needed in /boot in order to use preupgrade – the recommended method – to upgrade to a later Fedora release. Up until F13, Fedora releases defaulted to creating a 200MB /boot, and even this is usually not enough space to do a preupgrade to Fedora 12 or later. From F13 onwards, we’re defaulting to 500MB to make sure this works okay in future.
Bottom line, I’d highly recommend making /boot 500MB. If you’re REALLY trying to save on space, 300MB should probably be okay for doing preupgrades for the foreseeable future, and 200MB is okay if you only need enough space to cover the needs of the installed system, and you don’t intend to use preupgrade to upgrade in future.
The rationale for a 500 MB /boot was not stated. Then I came across this, and now we know. So yes, a 500 MB now makes sense.
Knowing how often the Linux kernel gets updated, it’d be a good idea to have a gui tool that’ll give the user a list of kernels that are more than one updates old, with an option to delete them. Or is there such a gui tool already? I know that the systems informs the user at the cli, but a newbie-friendly gui tool would make it a lot easier.