This tutorial shows how to dual-boot Linux Mint 17.2 and either Windows 10 or Windows 8.1 on a single hard disk drive and on a computer with UEFI firmware.
Two test computers were used: One is an OEM laptop upgraded from Windows 8.1 to Windows 10. The other is a self-built desktop with a fresh installation of Windows 8 Pro upgraded to Windows 8.1.
Whichever version of Windows you use, the steps will be the same. If you’re new to Linux, it’s recommended that you read A beginner’s guide to disks and disk partitions in Linux.
To complete this tutorial, you’ll, of course, need a computer (desktop or laptop) with an existing installation of Windows 10 (or Windows 8). You may choose to install your version of Windows anew.
You’ll also need an installation image of Linux Mint 17.2, which is available for download from here. NOTE: This tutorial is for the Ubuntu-based version of Linux Mint, and not the Debian-based version, also known as LMDE. After downloading the installation image for your platform, transfer it to a USB stick or blank DVD.
If you have an existing installation of Windows 10, it’s best to shrink the C drive to free up enough space for Linux Mint. And if you’re installing a fresh copy of Windows, you can specify how much of the disk space you want the Windows installer to use. The unallocated space will be used for Linux Mint.
Only three partitions will created for Linux Mint 17.2. They will be mounted at / (root). /home, and Swap. If you don’t have enough disk space, you can skip the /home partition and just create two partitions. Your home folder will be created under the partition mounted at / (root).
Figure 1 shows the partitions on a self-installed computer as seen from the Windows 8 computer. This was from a test installation when the C drive was reduced after installation. Notice the recovery partition at the beginning of the drive.
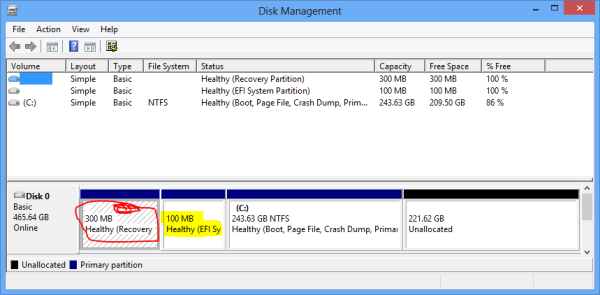
Figure 1: Disk partitions on a Windows 8 computer after shrinking the hard drive.
This image was taken from another test installation on the same computer as above, but when the drive was manually partitioned during the Windows 8 installation. Notice that in addition to the recovery partition at the beginning of the drive, the installer also created another one after the C drive.
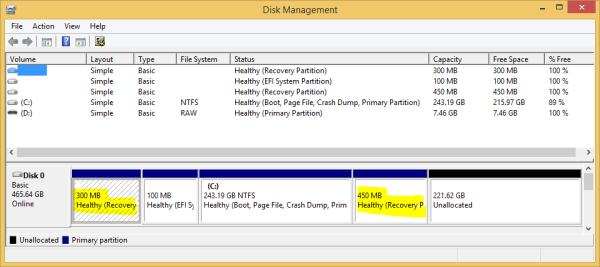
Figure 2: Disk partitions on a Windows 8.1 computer.
In Figure 3, taken from an OEM Windows 10 computer. There are many more partitions. But like in Figure 1, the C drive was reduced to create the free space needed to install Linux Mint 17.2.
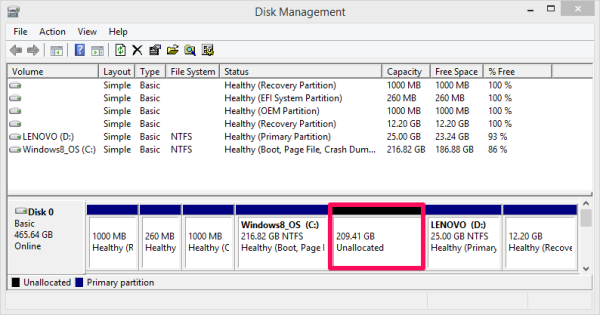
Figure 3: Disk partitions on an OEM Lenovo Windows 8 laptop upgraded to Windows 10.
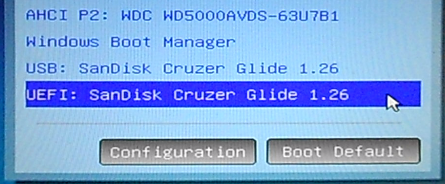
So if you have everything in place, (re)boot the computer with the installation media in the optical drive or USB port. And to be sure that you’ll be booting from the UEFI-aware version of the installer, access the boot menu as the system boots and select the UEFI entry similar to the UEFI: SanDisk Cruzer Glide 1.26 entry shown in Figure 4.

Figure 4: Entries on a computer’s boot menu.
The computer should boot into the Live desktop. While there, double-click on the icon of the installer on the desktop. Then click through the first few steps until you get to the one shown in Figure 5. The Linux Mint installer will always say that This computer currently has no detected operating systems. What would you like to do? But you know that’s not true, because Windows 10 in installed on the same hard drive.
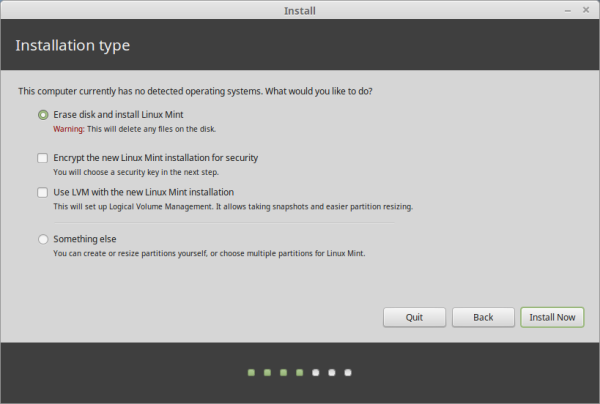
Figure 5: Install methods of Linux Mint 17.2 installer on a Windows 8/10 computers.
To get around that, click on the Something else option, then on the Continue button to access the installer’s manual disk partitioning tool.

Figure 6: Selecting the manual partitioning method on the installer of Linux Mint 17.2.
If your system is self-installed, Figure 7 shows the partitions on the target hard drive as they would appear on the manual disk partitioning tool. That “free space” will be used to create partitions for Linux Mint 17.2. If this is your setup, select the free space by clicking on it, then click on the + button to start creating partitions.
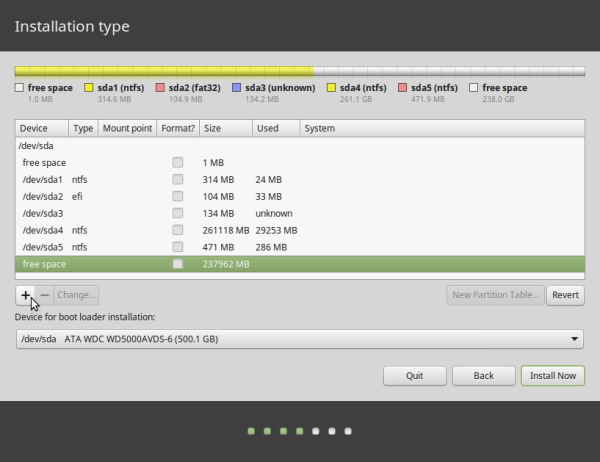
Figure 7: Existing Windows 8/10 partitions as seen from the manual partitioning tool of Linux Mint 17.2 installer. This was taken from a self-installed computer.
If using an OEM computer, Figure 8 shows how the partitions would be displayed on the installer’s manual disk partitioning tool. And as on Figure 7, the “free space”, freed up from the C drive, will be used to create partitions for Linux Mint 17.2. If this is your setup, select the free space by clicking on it, then click on the + button to start creating partitions.
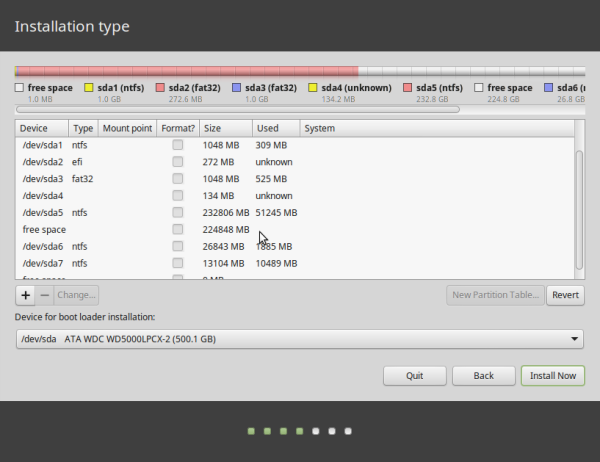
Figure 8: Existing Windows 8/10 partitions as seen from the manual partitioning tool of Linux Mint 17.2 installer. This was taken from an OEM computer.
This is the installer’s disk editor’s window. All you’ll have to specify here, is the size of the partition, the file system to use, and the mount point. For all the partitions except the one that will be used for Swap, stick with the default file system, which is Ext4 journaling file system.
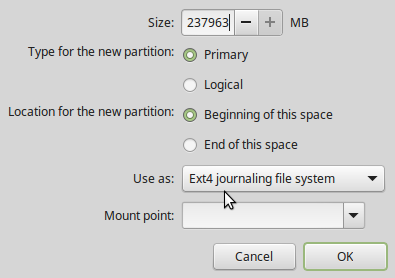
Figure 9: Partition editor of Linux Mint 17.2.
The first partition we’ll be creating will be for root. The recommended disk space for installing Linux Mint 17.2 is about 9.5 GB, so be sure to allocate at least that amount. If you’re installing a system that you’ll be using for some time, the more disk space allocated to root, the better. In this example, 50 GB (50,000 MB) was allocated to it. After specifying the size, select the mount point as shown in Figure 10, then click OK.

Figure 10: Creating root partition on Linux Mint 17.2.
If you have enough disk space to create a separate partition for /home, allocate most of the available disk space to it, and select /home as the mount point. OK.
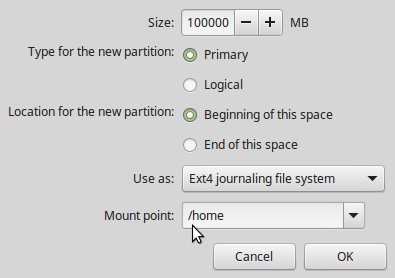
Figure 11: Creating home partition on Linux Mint 17.2.
The last partition will be for Swap. On a 64-bit system, 4 GB should do, if you have disk space to spare. Be sure to select swap area from the “use as” menu, then click OK.
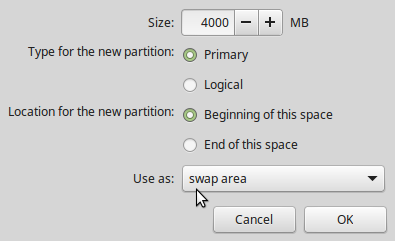
Figure 12: Creating Swap partition on Linux Mint 17.2.
With all the partitions created, they should all be listed as shown in Figure 13.
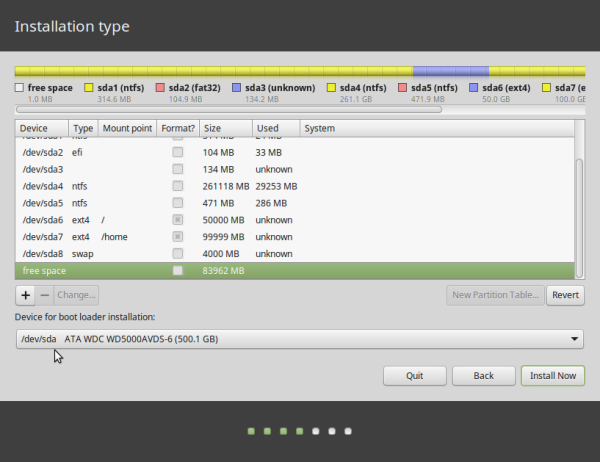
Figure 13: Newly created Linux Mint 17.2 and Windows partitions on a self-installed computer.
This is how they will be listed on an OEM computer.
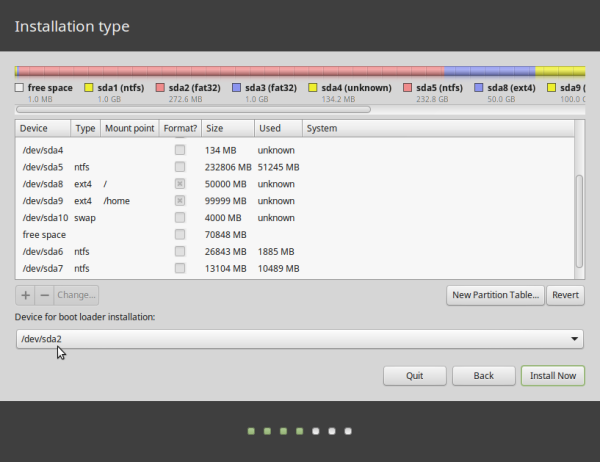
Figure 14: Newly created Linux Mint 17.2 and Windows partitions on an OEM computer.
Whether on a self-installed or OEM computer, the last task to accomplish before clicking Install Now, is to select the Device for boot loader installation. That device is your Boot EFI Partition. In most cases, it’s /dev/sda2. If in doubt, look for the partition of Type efi. That’s the Boot EFI Partition
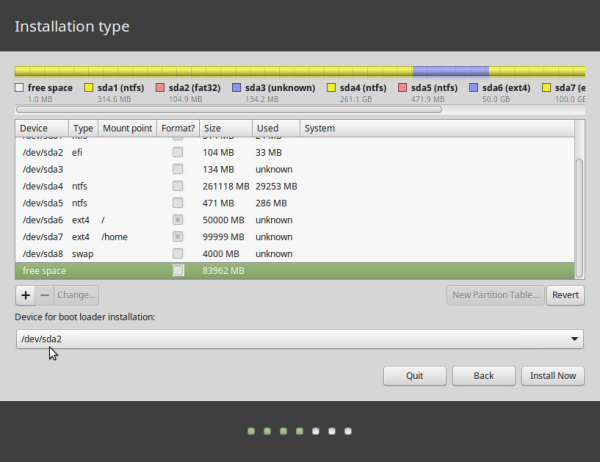
Figure 15: Selecting the EFI boot partition as the device for boot loader installation on Linux Mint 17.2.
After installation and reboot, the computer should boot into Linux Mint 17.2. And you should be able to boot into Windows by selecting the entry for its boot manager on the GRUB menu.


I everybody. I am facong a problem that I think no one has mentioned. The point is that I installed linux Mint following the instructions, but my computer in not booting into Windows, I mean, I only boots Linux Mint. The Windows drive and the information is still ther, but I can’t manage to boot make the dual boot. Any ideas? Oh!!! I have Windows 10 and my laptop is a Dell Inspiron.
As the system boots, do you see the GRUB menu before it boots into Mint?
Also the problem that my Sony VAIO laptop keeps booting back into Windows 10. The Linux Mint install itself went ok and followed all your nice clear instructions. I used the VAIO assist menu to boot from the USB, but no UEFI option on the list though. Also no Linux boot option in the BIOS.
Did you disable Secure Boot?
Same exact issue here, even with “Secure Boot” disabled!
Mine too is SONY VAIO with Pre-installed OEM Windows 8 (64-bit), upgraded to Windows 10.
I installed Linux Mint 17.3 Cinnamon 64-bit (UEFI mood) successfully but GRUB2 menu doesn’t show up and the machine boots into Windows 10 as if I did nothing!
Hi,
This tutorial is great, I’m just running into a problem choosing a device for boot loader installation. There aren’t any partitions of type efi to choose from.
Any help would be appreciated.
Thanks
If the computer came with Windows 10 or 8, it should have a Boot EFI partition.
Did you install the Windows side ourself, or did you buy the computer with Windows pre-installed?
If you boot into Windows, do you see an EFI System Partition from the Windows partition manager?
I have the same problem installing (This computer currently has no detected operating systems. What would you like to do?) but no EFI partitions. Will this guide work for me also?
Do you have Secure Boot enabled? f yes, then disable it, and make sure that you boot from the UEFI version of the Mint installer.
Thank you very much for sharing this, much appreciated!
Hi! I just had to install an adblocker to view this article because whatever junk you’re shoving onto the page kept freezing Chrome.
Thanks for bringing that to my attention, but imagine if everybody installed an adblocker…
I visited the page on Firefox and Chrome on Linux, but they did not freeze. You using Windows?
Chrome 46, OS X 10.11.1. I appreciate that ad blockers damage your income, it’s not something I normally do, but the whole Chrome tab was locking up.
Doesn’t seem to be happening now. Perhaps it was a specific advert that was causing the problem.
You should mention disabling secure boot.
That’s why some of the readers laptops can’t boot.
My laptop is the latest Lenovo Thinkpad Yoga 12. I went through the process described here and the installation of Linux Mint 17.2 alongside Windows 10 went smoothly – so I thought. But alas, the machine would not boot into the Grub menu. I have tried all the tricks in the book, but Linux Grub does not even show up in the boot options that come up when you press F12. It would only boot into Windows 10. Anyone who has successfully installed Linux Mint 17.2 alongside Windows 10 in Lenovo Thinkpad Yoga 12 should please let me know. By the way, I had successfully installed Linux 17.1 in the older edition of this same laptop, branded Lenovo Thinkpad Yoga 13.3 – which is in fact physically and in specifications exactly the same as the now Thinkpad Yoga 12.
If you look in the BIOS/UEFI Setup Tool, do you see an entry for a Linux Mint boot manager in the list of boot options?
No. Nothing like it. I suspect Lenovo connived with MS to ensure the machine does not “see” any Linux installation.
Actually, I believe Lenovo is one of those companies working AGAINST Linux. I have used several laptops and found consistently that Lenovo models pose the greatest challenge to Linux installations. I think the company is gagged to silence by some pact with Microsoft to make it virtually impossible. Can you imagine that the BIOS of the Thinkpad Yoga 12 actually has a “Microsoft validation” test of any OS on the machine?
Hi… I Was Able To Install Linux Mint 17.2 Alongside Windows 10 On My 64 Bit Lenovo Laptop As Per Your Tutorial… I Freed 50 GB Of Space For Installing Linux Mint And Split It 15 GB, 30 GB And 5 GB For Root, Home & Swap Respectively… Everything Runs Perfectly Fine, Except, When I Open The WINDOWS Disk Management Tool, The 50 GB I Freed Is Still Listed As Unallocated Free Space Even Though I’ve Installed Linux Mint In It… Should I Be Concerned ??? Does Windows Not Recognize Linux Partitions As Linux Recognizes Windows Partitions ??? Or Is It Just Some Bug Specific To My System ???
You have nothing to worry about. Windows does not recognize Linux file systems, so it just sees the partition as one big unused, unallocated partition.
I have a laptop that can only have 4 primary partitions. Right now I have three plus a block of unallocated space that I will use for Linux. I read that it is possible to dual-boot Linux using logical partitions. So, using your instructions as guidelines, could I instead make root, home, and swap logical partitions? Would this work in bypassing my 4 partitions only restraint? Would this cause a problem of sorts during the installation? Or does using logical partitions require different or more instructions then you have provided in this tutorial? In which case I will continue my research elsewhere. Sorry for the question bombardment:(
Thank you!
You didn’t state what version of Windows you have installed on the PC and what Linux distribution you wish to install.
If the system can have only 4 primary partitions, then it’s either an old PC or a new, UEFI firmware-using PC using with Legacy BIOS set as default. Which is it?
Which even one it is, you can install and run any Linux distribution from logical partitions. So yes, you can set the free space as an extended partition, then create any number of logical partitions from it.
Note that this tutorial is not for that particular situation. If Mint is the distribution you wish to install, see How to dual-boot Linux Mint 13 Cinnamon/MATE and Windows 7 for an example of how to go about it
Hi, I tried everything as per this but after reboot system is directly opening windows 10. no boot loader option to choose linux.
If you access the computer’s boot menu, do you see an entry for Linux Mint? One of the F-keys should bring up the boot menu.
Hello. My installation ran into an error with boot load. I did use efi partition to load but it failed with the fatal error message. What might have gone wrong?
The message says,
“Unable to install GRUB in /dev/sda2
Executing ‘grub-install /dev/sda2’ failed.
This is a fatal error.”
Did the installer freeze at that point, and did the computer become unresponsive?
What type of PC did you try to install it on?
Hello. My laptop is Lenovo Thinkpad Yoga S1. Yes, the installer freeze at that point and told me that they are sending the bug report. My computer did not become unresponsive. I tried it about five times, secure boot off and everything, made sure I booted my usb in UEFI mode, tried to use other sda# to install load before clicking install. I also have ran linux mint 17.1 on a separate old external hard drive (clean installed) I had connected through usb on my laptop and it works fine..
The only thing I am uncertain is your Figure 4. I do not have options to choose for my usb boot. I only have one slot for my USB but when I go boot into it and check my /sys/firmware directory, I do see UEFI folder, and so I think I did boot into UEFI.
Thank you very much for your help #finid!
I had several instances where the installer froze at that same point. I finally found that the system’s resources (RAM and CPU) were being exhausted at that point of the installation process. See Solution to freezing Ubiquity while attempting to dual-boot Ubuntu with Windows 10.
That was on Ubuntu, but maybe the same is happening with your Mint install.
Thank you for your help. But dropping cache does not seem to solve it. 🙁 I tried reaching downloading iso files from three different mirrors, re- created live USB and all…but no success. So frustrated…what can I do?
Many thanks for a useful guide. In my case I had to make a bootable USB with GPT/efi. Then every thing went smoothly !
Thank you VERY much for this.
You’re welcome
Hey! After struggling a bit with this, I found this post and it completely solved my life! Thanks very much for it :D. It appears I was misselecting the partition where to install the boot loader (which according to this tutorial has to be the efi one, and it worked perfectly). And also thanks for being really up-to-date, making tutorials for such a recently released OS as W10.
Thanks!
You’re very welcome.
And don’t forget to like us on Facebook and/or subscribe via RSS or email.