Editor: For a more recent version of this article, using the latest edition of Kali Linux and Windows 10, see Dual-boot Kali Linux Rolling 2016.2, Windows 10 on a PC with UEFI firmware.
The last dual-boot tutorial on Kali Linux I wrote was back in March 2013 (see Dual-boot Windows 7 and Kali Linux), and that was on a computer with Legacy BIOS. That means it’s not a very useful guide if you wish to dual-boot a recent edition of Kali Linux and Windows 7 or Windows 8 on a computer with UEFI firmware.
So, following an exchange with a recent visitor to this site, I decided to make an attempt to dual-boot the latest edition of Kali Linux and Windows 7 on a computer with UEFI firmware. And since Windows 7 and Windows 8 share the same installer, it can also be used as a guide if Windows 8 is your choice of a Microsoft operating system.
The first attempt failed, but I quickly figured out why. So for the benefit of those who might want to do the same, this tutorial provides a step-by-step guide on how to get it done. If you are new to Linux and have never installed any distribution or attempted to dual-boot a Windows operating system and a Linux distribution, this guide gives you all you need to dual-boot Windows 7 or Windows 8 and the latest edition of Kali Linux on a computer with UEFI firmware. It will, however, help if you read A beginner’s guide to disks and disk partitions in Linux before attempting it.
By the time you’re through with this guide, you should have a computer with Kali Linux installed alongside Windows 7 or Windows 8 on the same hard drive, so that when you attempt to reboot into Kali Linux, the GRUB menu should look like the one shown in Figure 1.
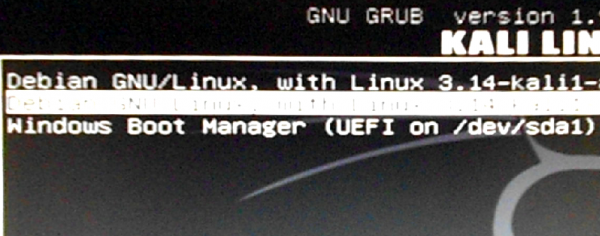
Figure 1: GRUB menu of Kali Linux 1.0.9 showing entries for Kali Linux and Windows 7.
For that to happen, you’ll first have to download the latest edition of Kali Linux from https://www.kali.org/downloads/. The edition used for this tutorial is Kali Linux 1.0.9a, which has support for UEFI booting. After downloading it, transfer it to a USB stick (recommended) or a blank DVD. See this forum post for how to transfer it to a USB stick in Linux.
You’ll also, of course, need a computer with Windows 7 or Windows 8 installed. The computer could be an OEM unit (store bought) or custom-built. Then you’ll have to shrink the C drive to create enough disk space that Kali Linux will be installed on. For this tutorial, I used a custom-built unit and installed Windows 7 on it. The hard drive is a 500 GB piece, so I recovered about 200 GB from it to use for Kali Linux. Figure 2 shows the partitions on the system as seen from the Windows 7 partition manager.
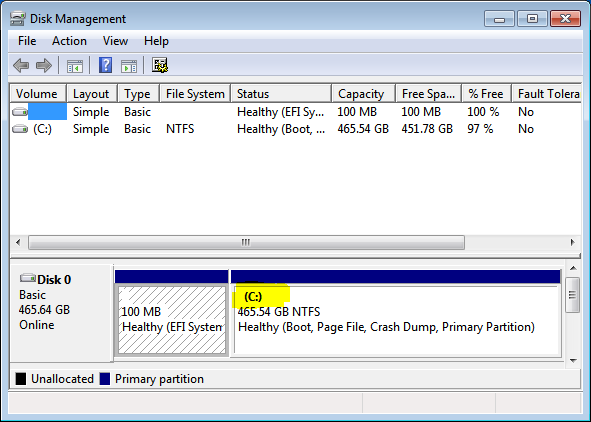
Figure 2: Windows 7 partitions as seen from the Windows partition manager. The C drive is highlighted.
And this is what it looks like after shrinking the C drive. See this forum post for help on how to shrink a Windows 7 or Windows 8 C drive. That Unallocated space will be used for Kali Linux. Note that on a store-bought computer, there’ll likely be more partitions than shown here. But that does not have an impact here because the only partitions that come into play are the C drive and the EFI System Partition. In Figure 3, that partition is the 100 MB partition.
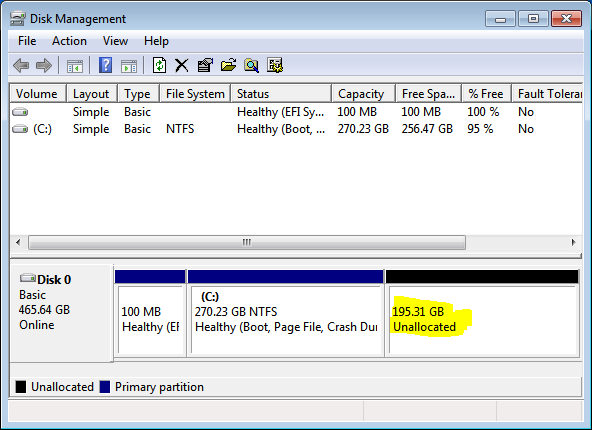
Figure 3: Windows 7 partition manager showing the free recovered from the C drive.
Once you have all you need in place, insert the installation media (USB stick or DVD) into the appropriate place and reboot the computer. It should boot into the installation media if it was configured to boot from it. Otherwise, access the computers boot menu and select the entry that points to the UEFI-aware version of the installer. Figure 4 shows the entries on the boot menu of the computer used for this tutorial. The PNY entries are for the UEFI- and non-UEFI versions of the installer.
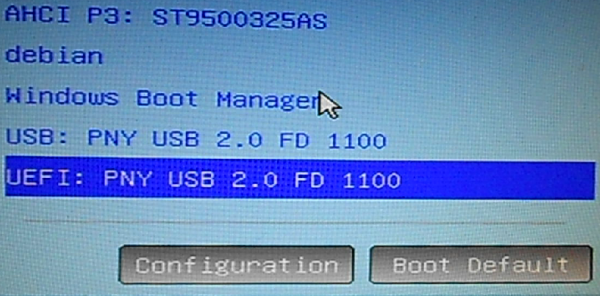
Figure 4: Entries on the boot menu of the test computer used for this tutorial.
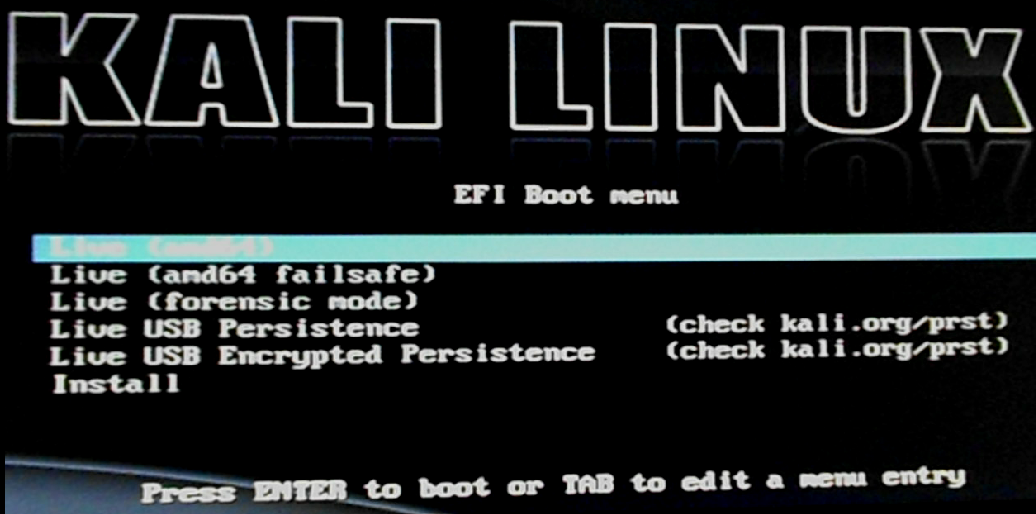
After selecting the UEFI-aware version of the installer, you should be presented with the Kali Linux installer’s menu. Pressing ENTER should cause it to boot into the Live desktop. From there, launch the installer by accessing it from Applications > System Tools > Install Kali Linux.
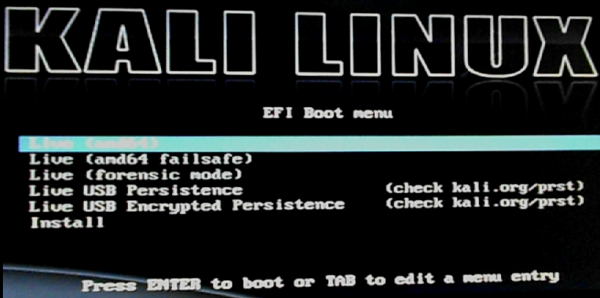
Figure 5: Entries in the Kali Linux 1.0.9a install menu.
After the installer starts, click through the first few steps until you get to the step shown in Figure 6. All the entries sown here are the partition methods. The installation will fail if you select any automatic partitioning method, so select Manual and click Continue.
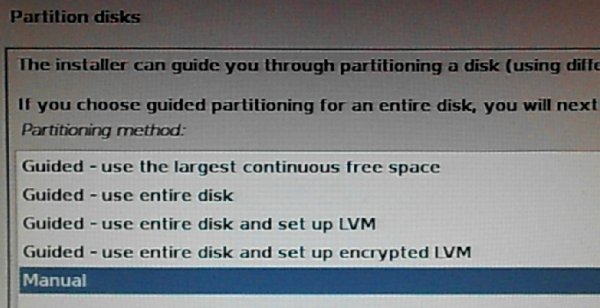
Figure 6: Partition methods of the Kali Linux installer.
You should now see a window with the disks connected to the system listed, along with their partitions. In Figure 7, the first three partitions are the Windows 7 partitions. Partition #1 is the EFI system partition, while partition #3 is the C drive. Below that is the Unallocated space that was recovered from the C drive. I’ll address the EFI system partition later, but for now, let’s install Kali Linux on that free space. To do that, double click on it.
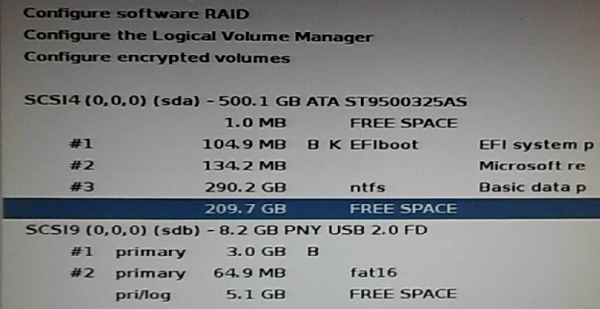
Figure 7: Kali Linux install showing free space derived from the C drive.
You should be presented with the entries shown in Figure 8. Select Automatically partition the free space, then click Continue. Or just double click it.
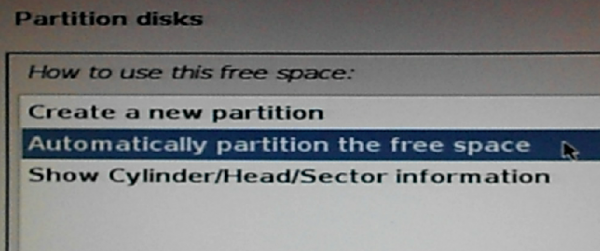
Figure 8: Kali Linux free space partition methods.
The next step lets you decide how many partitions the installer should create. The first option will cause the installer to create just two partitions – the root partition and another partition for Swap space. That’s recommended for new users, but if you want your home directory on a separate partition, select the next option. Whichever option you select, click Continue afterwards.
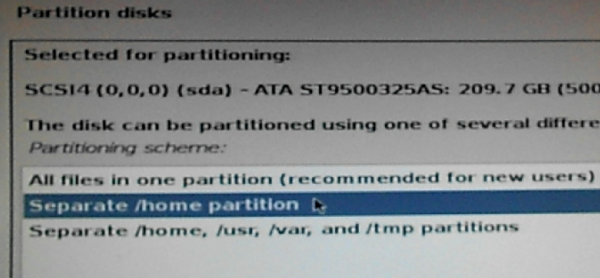
Figure 9: Kali Linux option to create a partition for /home.
Figure 10 shows the result of the last operation. Partitions #4, #5 and #6 are the newly created partitions. The partition number might not match with yours, but that’s not important. What’s now important is that you have to make a slight change to partition #1, the EFI system partition. To do that, double-click it.
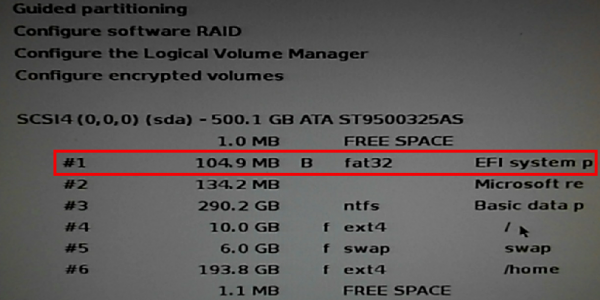
Figure 10: Kali Linux system boot EFI partition
You need to change its Use as entry to something else, so double-click the Use as line and select EFI boot partition from the list of options you’re presented with.
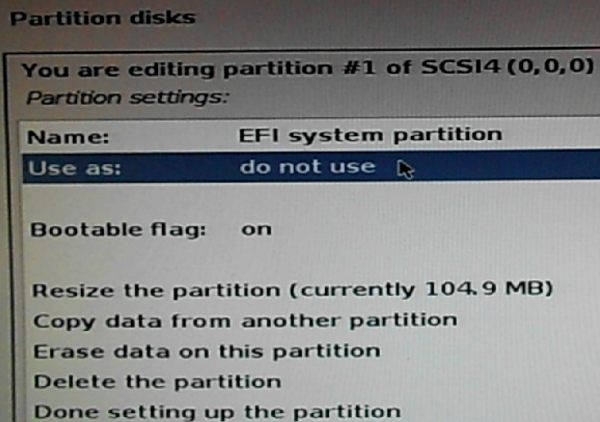
Figure 11: The EFI partition is unset in Kali Linux Debian Installer.
If completed correctly, you should have a Use as line that looks exactly like the one shown in Figure 12. Click Done setting up the partition, then Continue.
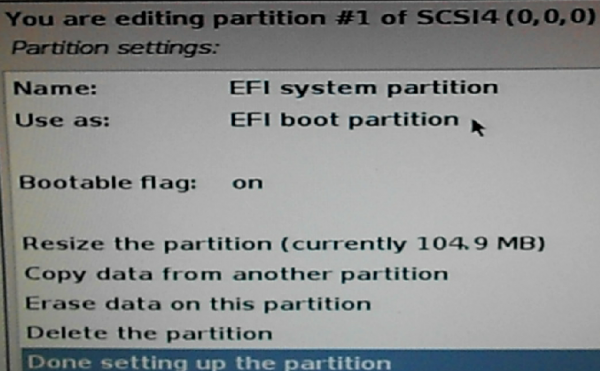
Figure 12: The EFI partition must be set for installation to succeed.
If you neglected to complete the task in the previous step, the installation of GRUB will fail and the installer will show you the message just like the one in Figure 13.
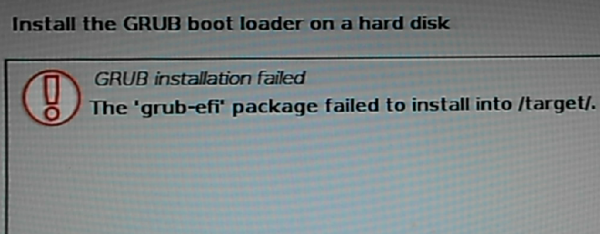
Figure 13: The result of a failed GRUB installation attempt of Kali Linux.
This is the installer letting you know what its about to do. Select Yes, then click Continue.
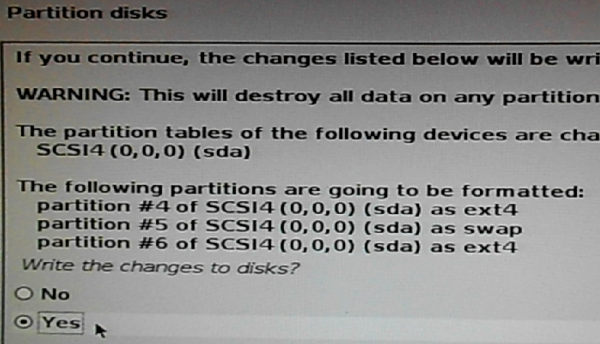
Figure 14: Partitions to be created and formatted by the Kali Linux installer.
If installation completes successfully, you should get a message just like the oen shown in Figure 15. You may reboot the computer at this point.
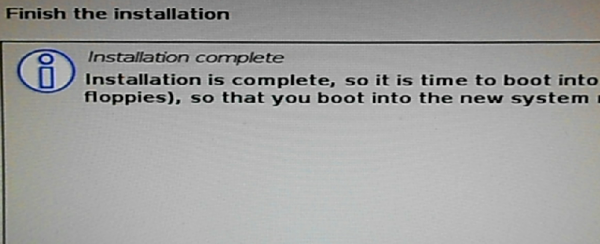
Figure 15: The result of a successful installation of Kali Linux 1.0.9.
And be sure to remove the installation media else the computer will boot into the installer again.
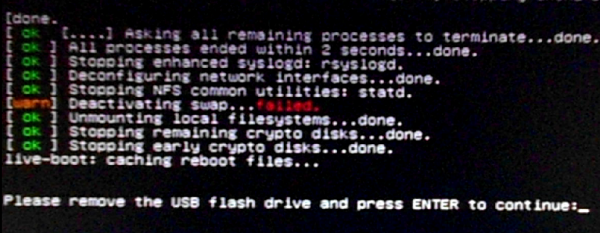
Figure 16: Rebooting the Live system after a successful installation of Kali Linux 1.0.9.
If you access the computer’s boot menu (via the F11 or F12 key) before it boots into the default OS, you should see entries for Windows Boot Manager (boots into Windows 7 or Windows 8) debian (boots into Kali Linux).
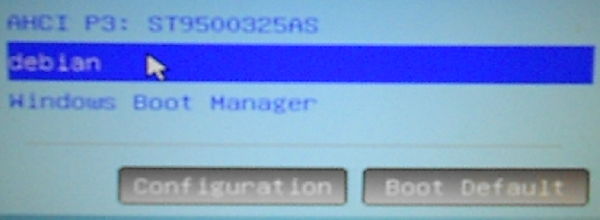
Figure 17: Entries in the computer’s boot menu after installing Kali Linux on the same drive as Windows 7.
If you attempt to boot into Kali Linux, you’ll see the GRUB menu. However, it will not have an entry for Windows as it should.

Figure 18: GRUB menu after installing Kali Linux alongside Windows 7 on the same hard drive.
You can fix that by booting into Kali, launch a terminal and type the following command: update-grub. The output of that command should be just like that in this code block:
Generating grub.cfg ...
Found background image: /usr/share/images/desktop-base/desktop-grub.png
Found linux image: /boot/vmlinuz-3.14-kali1-amd64
Found initrd image: /boot/initrd.img-3.14-kali1-amd64
  No volume groups found
Found Windows Boot Manager on /dev/sda1@/EFI/Microsoft/Boot/bootmgfw.efi
done
Finally, when you log into Windows, you may launch the partition manager to see how the number of partitions has changed.
Figure 19 shows the Windows 7 and Kali Linux partitions as seen from the Windows partition manager of the test system. In this screenshot, D is the root partition, E is the home partition of Kali Linux. In between is the Swap partition. If at any time you wish to “uninstall” Kali Linux, just log into Windows and delete its partitions from the Windows partition manager.
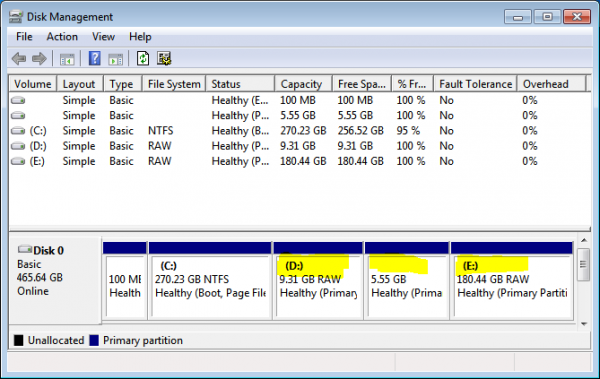
Figure 19: Windows 7 and Kali Linux partitions as seem from the Windows partition manager.


The efi system partition does not provide the option to change it from do not use to efi boot partition. Any solutions?
my primary partition is formatted with the ntfs file system I can’t use it as efl booting system..what do I do then
Your C drive, which I assume is what you’re calling “primary partition,” is not for booting. That what your system partition is for. List the partitions you have on your system.
Someone else hit on this earlier. So I have a Lenovo Y700 that is driving me nuts. I had Windows 10 on a 128GB SSD and a 1TB Sata Drive. I changed only the 1TB drive to use about 500GB for NTFS. The remainder I left as free space. Ubuntu 16.10 allows me to create a EFI partition which I did and I created swap and root and it was good to go. Grub was installed and I can either use Grub to select my OS or use F12 to flip between the two in UEFI mode. My question is with Kali, can’t I simply install it and use my EFI partition on the 1TB drive “/dev/sdb” in this specific case “/dev/sdb3” being it is already there. This way I can leave the EFI for windows untouched. I hate to remove Windows off the box as there actually a handful of reverse malware tools that I use on that side that just will not cut it in a VM. Just looking for feedback.
Theoretically, you can actually do that with the Kali installer. Just specify what the target EFI System Partition is and it should install GRUB there.
With Ubuntu, though, are you even sure that it installed GRUB in the EFI System Partition of sdb? From experience, it likely installed it in the EFI System Partition of sda. Check and verify.
i want to insatall kali linux along side window 7 pro on my lenovo thinkpad L420 the thing is my first window intallation didnt create the EFI partition if i install kali will it work????
If Windows did not create an EFI partition, then the computer is likely not using UEFI. Check the BIOS/UEFI utility to verify what firmware you’re using – UEFI or Legacy BIOS
I have installed kali linux on my Dell inspiron 5558.It installed succesfully but grub bootloader does not load during boot.
I have tried boot menu(F12) but it only shows windows boot manager no kali linux
In that case, it did not install successfully.
During installation, did you verify that the installer knows about the EFI Boot Partition?
i have installed kalilinux the latest version in dual boot ,with windows when i lig and set the pass worf a black screen block and stay looooong time … how to acces directly to the desktop after log in
Hello,
I have 2 drives on my laptop. C: and D:
Can I install Kali on D: instead of C:?
2 drives or 2 partitions?
In either case, the answer is, yes, you can.
Just be sure that D does not contain data that you’ll like to keep.
Hi….boss iam installed Khali_Linux in VmWare..iam using windows 8…..#Problem is khali was not showing the Network Connectios,or any wifi searchs..Plese help me……(‘.’)
open your terminal and type the following to solve your wifi and bluetooth problems:
rfkill unblock all
I\’m having acer laptop.. Wen I try to dual boot kali Linux with windows 7.., It\’s taking full 500gb space… Help me plz…
You need to first shrink the C drive to recover enough space that will be used to install Kali. First check to make sure that you have free space on the C drive, then shrink it using the Windows 7 partition manager.
I followed all the instructions and didnt get any errors but when i boot there is only the windows boot loader not the debian, what did i miss? thanks
Do you have Secure Boot enabled. If yes, disable it.
By the way, what version of Kali did you use, Kali 2?
Hi Yes i have secure boot disabled and kali-linux-2.0-amd64
If you have those taken care of, can you see an entry for Kali in the computer’s boot menu? What about in the BIOS/UEFI utility?
hey i have linux mint 17.2 on my laptop and i also want kali 2.0 on it so can i make kali on dual boot with my linux mint 17.2 or du i have to just use just one of them help me and i dont want kali on virtual machine becose its kid of crappy
Yes, you can dual-boot Mint and Kali on the same physical HDD, and it does not matter which one you install first, though it’s better to install Kali last.
Does Kali 2.0 support EFI or do I have to use 1.0.9
The release notes says it does, so I’ll have to say, yes, it does.
Over this weekend I’ll try and dual-boot it with Windows 10 and see how well the support is.
How did it go, was it successful. I’m about to do same on my PC.
It went well, actually. You may read it How to dual-boot Windows 10, Kali Linux 2 on a PC with UEFI firmware.
You might want to consider disabling Secure Boot before attempting it.
If you want to install #KaliLinux in #VMwareWorkstation, you can watch this video!
https://youtu.be/BeZNpHVdHwE
tnx so easy to install
check this its solved my problem 100%
http://m.mybestforu.info/en/app/windows-or-kali-linux-not-show–dualboot/5471928/36/